I have a sickness of the mind, and it is that I kind of get a kick out of tech week. The idea of 12-hour rehearsals gets me sort of jazzed. The head-down, one-foot-in-front-of-the-othergrind of tech week is very fulfilling to me. It’s a week to throw the entirety of my energy squarely at two targets: put on a good show and don’t die. It’s like a week of wilderness survival but for a theatre kid. It’s exhilarating and when it’s done you get to show off all your cool scars (some figurative, most literal).
I’m a dweeb about tech week preparation, it’s true. If tech week is wilderness survival, I am your overenthusiastic survival guide. I will get through it and I will get you through it, too. Just heed my advice.
Practicing outside of rehearsal is necessary in order to do your best work in a musical. Many actors take recordings during music rehearsals so that they can practice on their own later. This is great, but as a busy person, and I often find that I don’t have time to review those recordings I made with such conscientious aims. Those recordings end up going un-reviewed, and so they mostly just clog up space on my phone.
What I have discovered as a busy person who is often on-the-go is that my commute is a great time to review. To use this time, however, I need a rehearsal track that I can use hands-free while driving. If I were to sit at home and practice, I could just search through the recording manually to find the parts I need– but I obviously can’t do that and drive at the same time.
Enter my preferred new method! It takes some time, but it’s worth it, and I learn my parts well. I also end up with a resource that is easy to share with my whole cast!
Here is how I make my own practice tracks in Audacity:
Step 1: Record your music rehearsal
Step 2: Import the recording to Audacity
Step 3: Cut out everything but the voice parts
Step 4: Export to your phone
Step 5: And practice
Step 1: Record your music rehearsal
You can either use a built-in audio recording function on your phone (iOS comes with the “Voice Memos” app), or download something special. I use the app “Voice Record Pro.”
Be sure to place your phone somewhere neutral, where it won’t pick up a lot of background noise– for instance, you don’t want it in your lap if it’s going to catch a lot of sound from you picking up and putting down your music or turning pages. I usually just put it on the floor under my chair, away from my feet so I won’t step on it.
Record the entire rehearsal. Feel free to pause the recording during any breaks, but just don’t forget to restart it when you start singing again!
Step 2: Import the recording to Audacity
You can use a different program if you’d like, but Audacity is my preferred. It’s free and quite easy to use. For this step, I send the recording from my phone to my laptop (usually I AirDrop it, but you could also use any number of cloud or messaging routes), but you could also edit the audio right on your phone if you wanted. Voice Record Pro has the ability to do this, I just find it easiest to do the editing on a computer where I have finer control.
Step 3: Cut out everything but the voice parts
Comb through your recording in your audio editor. You want to delete any idle chatter and silent “dead space” to create a recording that is concise and straight to the point. Think of it like making a “highlight reel” of the rehearsal, keeping only the important parts. I like to keep some of the music director’s instructions so that the audio makes sense in context: Ie, I’ll keep things like “Look at page 53… at measure 37, altos sing…”
You can also edit out repetitions. If the music director plays the alto part 3 times to teach it, maybe only keep one. You can always simply replay that section of the audio if you need to review. I even cut out extraneous words for brevity. If the director says “Okay, um, next the altos come in here, uh, and they sing…”, I will cut it down to “Next the altos come in, they sing…”
You can be as granular or basic about this as you want. The point is to take the long rehearsal and cut it down so that it is short and easy to review and understand. I have edited 3-hour rehearsals down to only 15 minutes before.
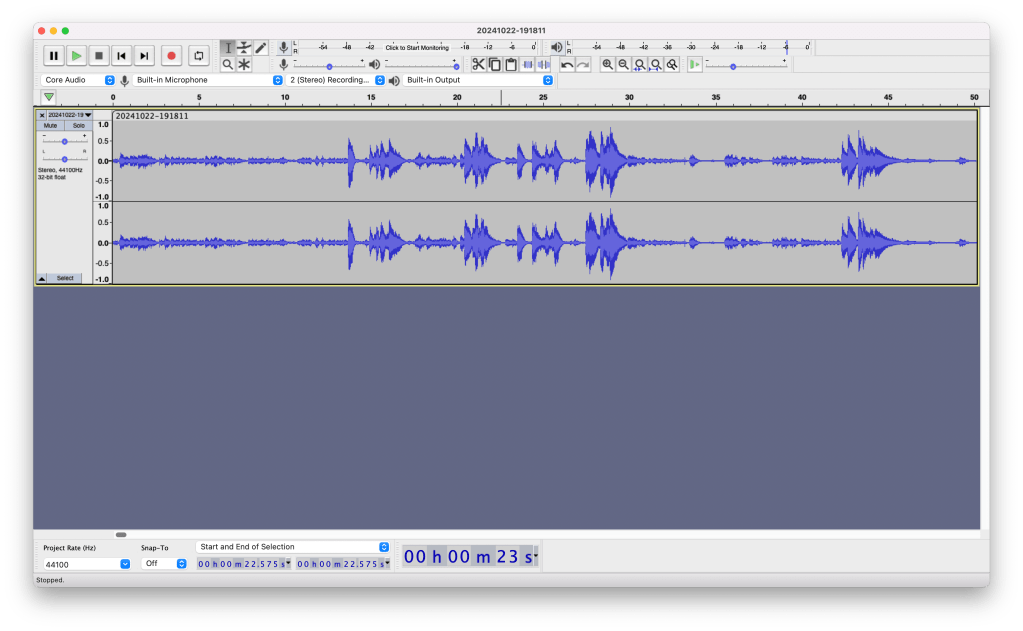
Audacity makes this very easy to do. After importing your audio, you’ll see something like this:
Be sure to “zoom in” so that you’re able to review the audio quite closely: the numbers across the top of the working area are seconds. I am sometimes trimming out individual seconds of audio (or less) while working on these recordings.
The areas where people are singing is usually easy to spot, as those are the places where you see the tall “spikes.” Areas of relative silence are also easy to see, as they’ll look like flat lines. Regular speech will fall somewhere in between these.
Listen to the recording and pause occasionally to cut out unnecessary parts. If you zoom in and watch closely, you’ll be able to “see” the words being said in Audacity. You can select where a word starts and ends by simply clicking and dragging, and delete that section by pressing the “delete” key.
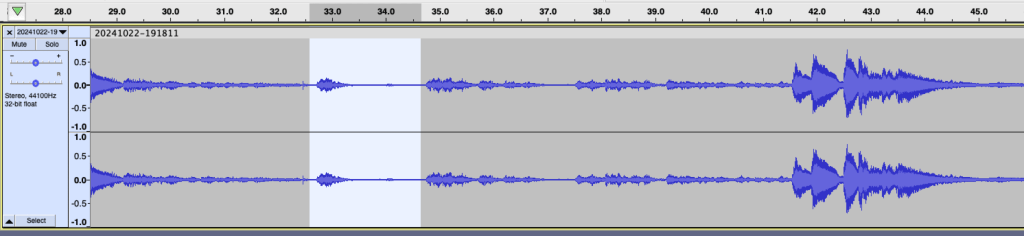
In this picture, I’ve selected the music director saying “um” followed by a second of silence to cut it out of the recording. I played the recording and was able to easily “see” the um in the track, as well as the silence that followed– trimming it makes the recording just a little cleaner and more concise.
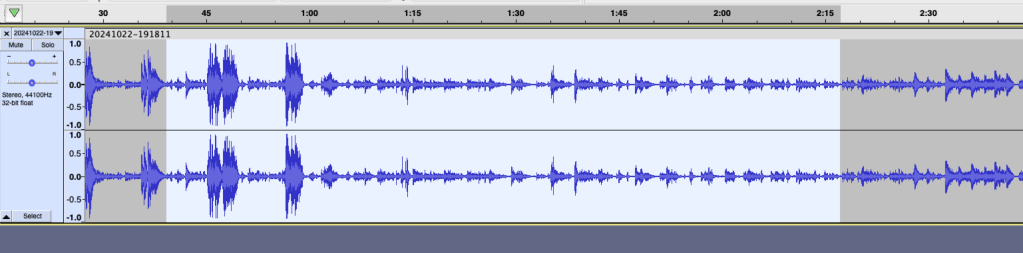
It’s not all that granular, though– here’s almost a minute and a half that I’m cutting. You can see there’s a bit of us singing at the beginning (just a repetition of something we’d done before) followed by a lot of talking. No need to keep that! Select it all and delete.
The downside here is that you pretty much have to listen to the whole recording while you’re editing it. It’s time consuming. The upside of that is that it helps you learn, though!
Ultimately, this is your recording to do with as you see fit. You can choose whether you want to keep all the voice parts, or only your own. You can decide how much chatter you want or how much repetition you want. I like to trim my recordings to be as neat as possible while keeping all the voice parts, so I can share the recording with the whole cast– I started doing this as a stage manager making rehearsal resources for my actors! I also like to keep at least one run of the entire song in the file.
I like doing this because you can hear how things sound with your cast. Unlike with canned practice tracks, you don’t have to worry about the recording not making sense to you based on what you experienced in rehearsal– it’s literally your rehearsal! You can also hear how your music director wants things done, and can get an ear for how your own soloists are choosing to time their choices.
There are certainly easier ways to record a music rehearsal, but I think my way has a lot of benefits!
Step 4: Export to your phone
Once your recording is freshly trimmed, give it a final “proof listen” and then export the file. You can save this as an .mp4 file for audio listening, or turn it into a .mov file so it can be uploaded to a cast page, such as a Facebook group. The idea, anyway, is to have the file somewhere you can use it easily.
Step 5: And practice
Your practice track is done! You should now have a track with which you can simply press play and review your music completely hands-free. This is perfect for reviewing in the car on the way to rehearsal– or work, school, or anywhere else you have to go. You can also, of course, sit down with your music and play this track while you practice at home.
Here’s an example of a practice track I made for our cast during a production of Legally Blonde.(Featuring a meme I made from a rehearsal pic… lol.)
(Featured image by Pittsburgh Performance Photography. The Curious Incident of the Dog in the Night-Time, directed by Jessica Zack, 2024. Lighting design by Craig Soich.)
A few months back, I was asked to build a prop dog for my friend’s production. This prop can be a bit of a challenge– as I was searching forums and Facebook groups for inspiration, I found a number of people looking for advice on how to approach it– so I thought others might find an explanation of my process useful.
(A photo of the finished prop, in the performance space.)
I had not read the play prior to being asked to construct this prop. The director gave me creative freedom to approach it as I saw fit. I started by looking for some inspiration photos online. One of our friends informed us that the original source material, the novel, says that the dog is a poodle– I wasn’t very keen on trying to create poodle fur (or spend the money to purchase it), so I decided to go another direction. I thought a border collie color scheme, with distinct black-and-white patches, might be striking and more easily readable on stage. This ended up being a convenient choice, as it made purchasing fur from Joann Fabrics much cheaper in the long run (more on that in a bit).
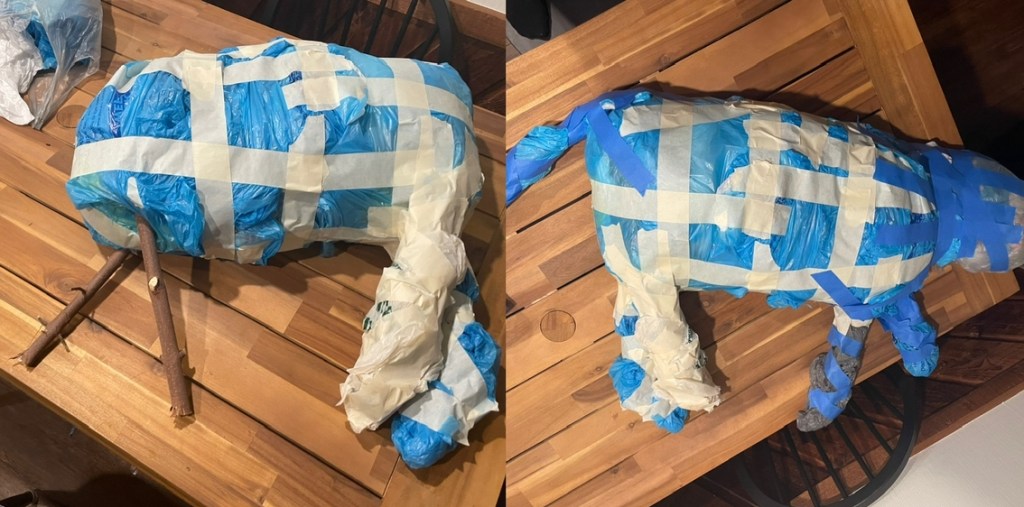
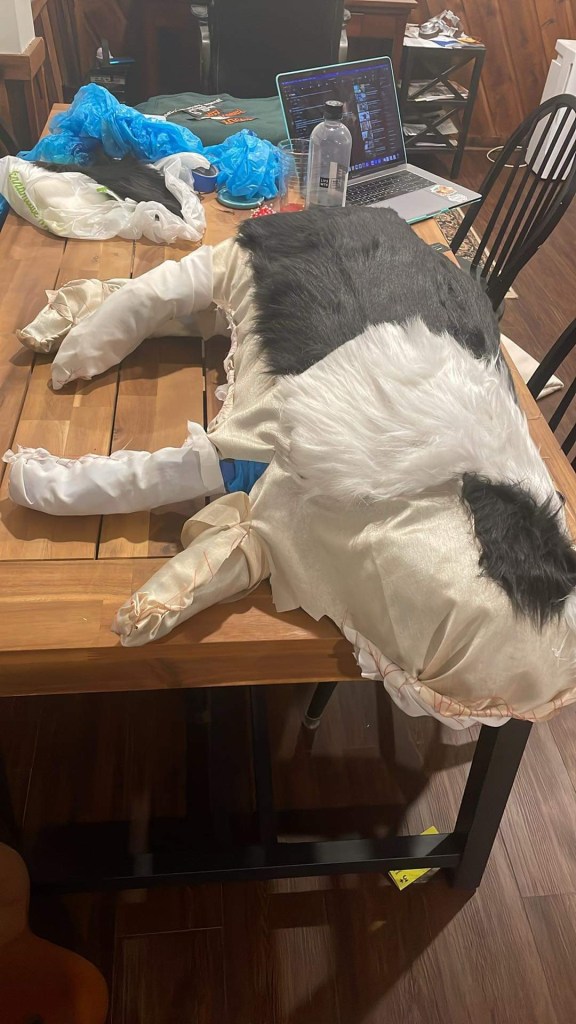
As is my favorite way to start constructing many props, I began with trash! The “core” structure of the dog was several bunches of plastic grocery bags filled with other grocery plastic bags. I arranged these into a roughly dog-shaped form, and then taped them together with masking tape, and then painter’s tape when my tape roll ran out. On a whim, I threw bits of tree branches from my yard into the legs to serve as some more solid supports– In hindsight, I’m not sure this really served any good purpose, but it seemed like a good idea at the time and certainly didn’t hurt anything. I just stabbed four sticks into the underside of the bag-dog, wrapped additional bags around them, and taped everything together.
(Bag-dog in all its glory.)
The result was a dog form that was extremely lightweight, but also held its shape surprisingly well for nothing but plastic bags, tape, and a couple sticks. There was no exact science to taping it together, I just threw tape anywhere where it seems like it would help unify the bags. It’s helpful to stuff a ton of bags into one bag, do the same for another, and then sort of mash the open ends of these together to “marry” them into one, and tape them together this way– I think this helped create a more solid structure.
It is worth noting that the plastic bags, cheap and plentiful as they were for crafting, did make it so that the dog made a distinctive crinkling sound when moved. So, if this is a problem for you, you may want to find another material, or maybe experiment with using additional tape to help deaden the sound/eliminate extra movement that would create the sound.
After this, traced the shape of the dog form on some old fabric, cut out the shape twice, and hand-sewed these together to make a fabric pocket to cover the plastic bags. I have really never sewn anything before, but this was meant to be an unseen interior piece anyway, so I didn’t stress about it and considered this good, low-stakes practice.
(I did eventually also cover the legs and tail with fabric, too– I guess I didn’t take a photo at that stage!)
Once the entire form was covered in fabric, I used that fabric as a surface to sew fur onto. For a brief time, I wondered if I could just sew the fur directly to the bags, but I don’t think that would’ve worked.
I purchased my fur in 9in x 12in sheets from Joann Fabrics. The POP! Brand fabric sheets were cost-effective compared to regular fake fur, and conveniently available in black and white. At time of purchase, these were only $4 each. I ended up buying 7 black sheets (which was the store’s full inventory of them, so I’m glad it was enough!) and 4 white sheets, and I had an extra white sheet left over when I was done. I ended up spending $35 on fur, whereas actual faux fur fabric would’ve run $30-50 per yard, AND I would’ve needed two different colors.
I used black and white thread to sew down the black and white fur pieces, respectively. In hindsight, it probably would’ve made some more sense to sew the inner fabric “pocket” together over the dog form after sewing on the fur? But I wasn’t confident in my ability to do that correctly, it seemed a bit more complicated. I had some trouble sewing at the angle I needed to because of the paper bags inside the form, though. In the end, I also added some hot glue under each of the fur panels just in case. This helped them feel a lot more solid. (I really don’t know how to sew, it was very humbling!)
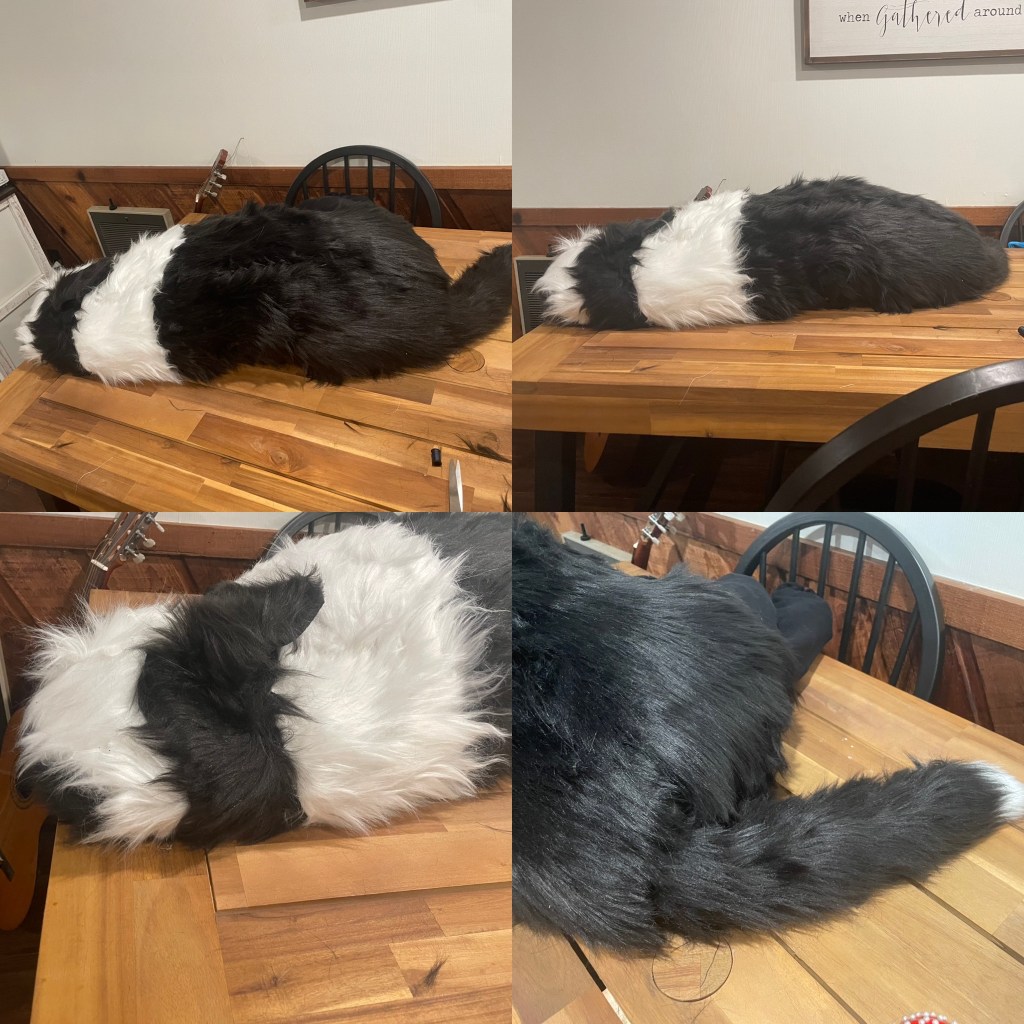
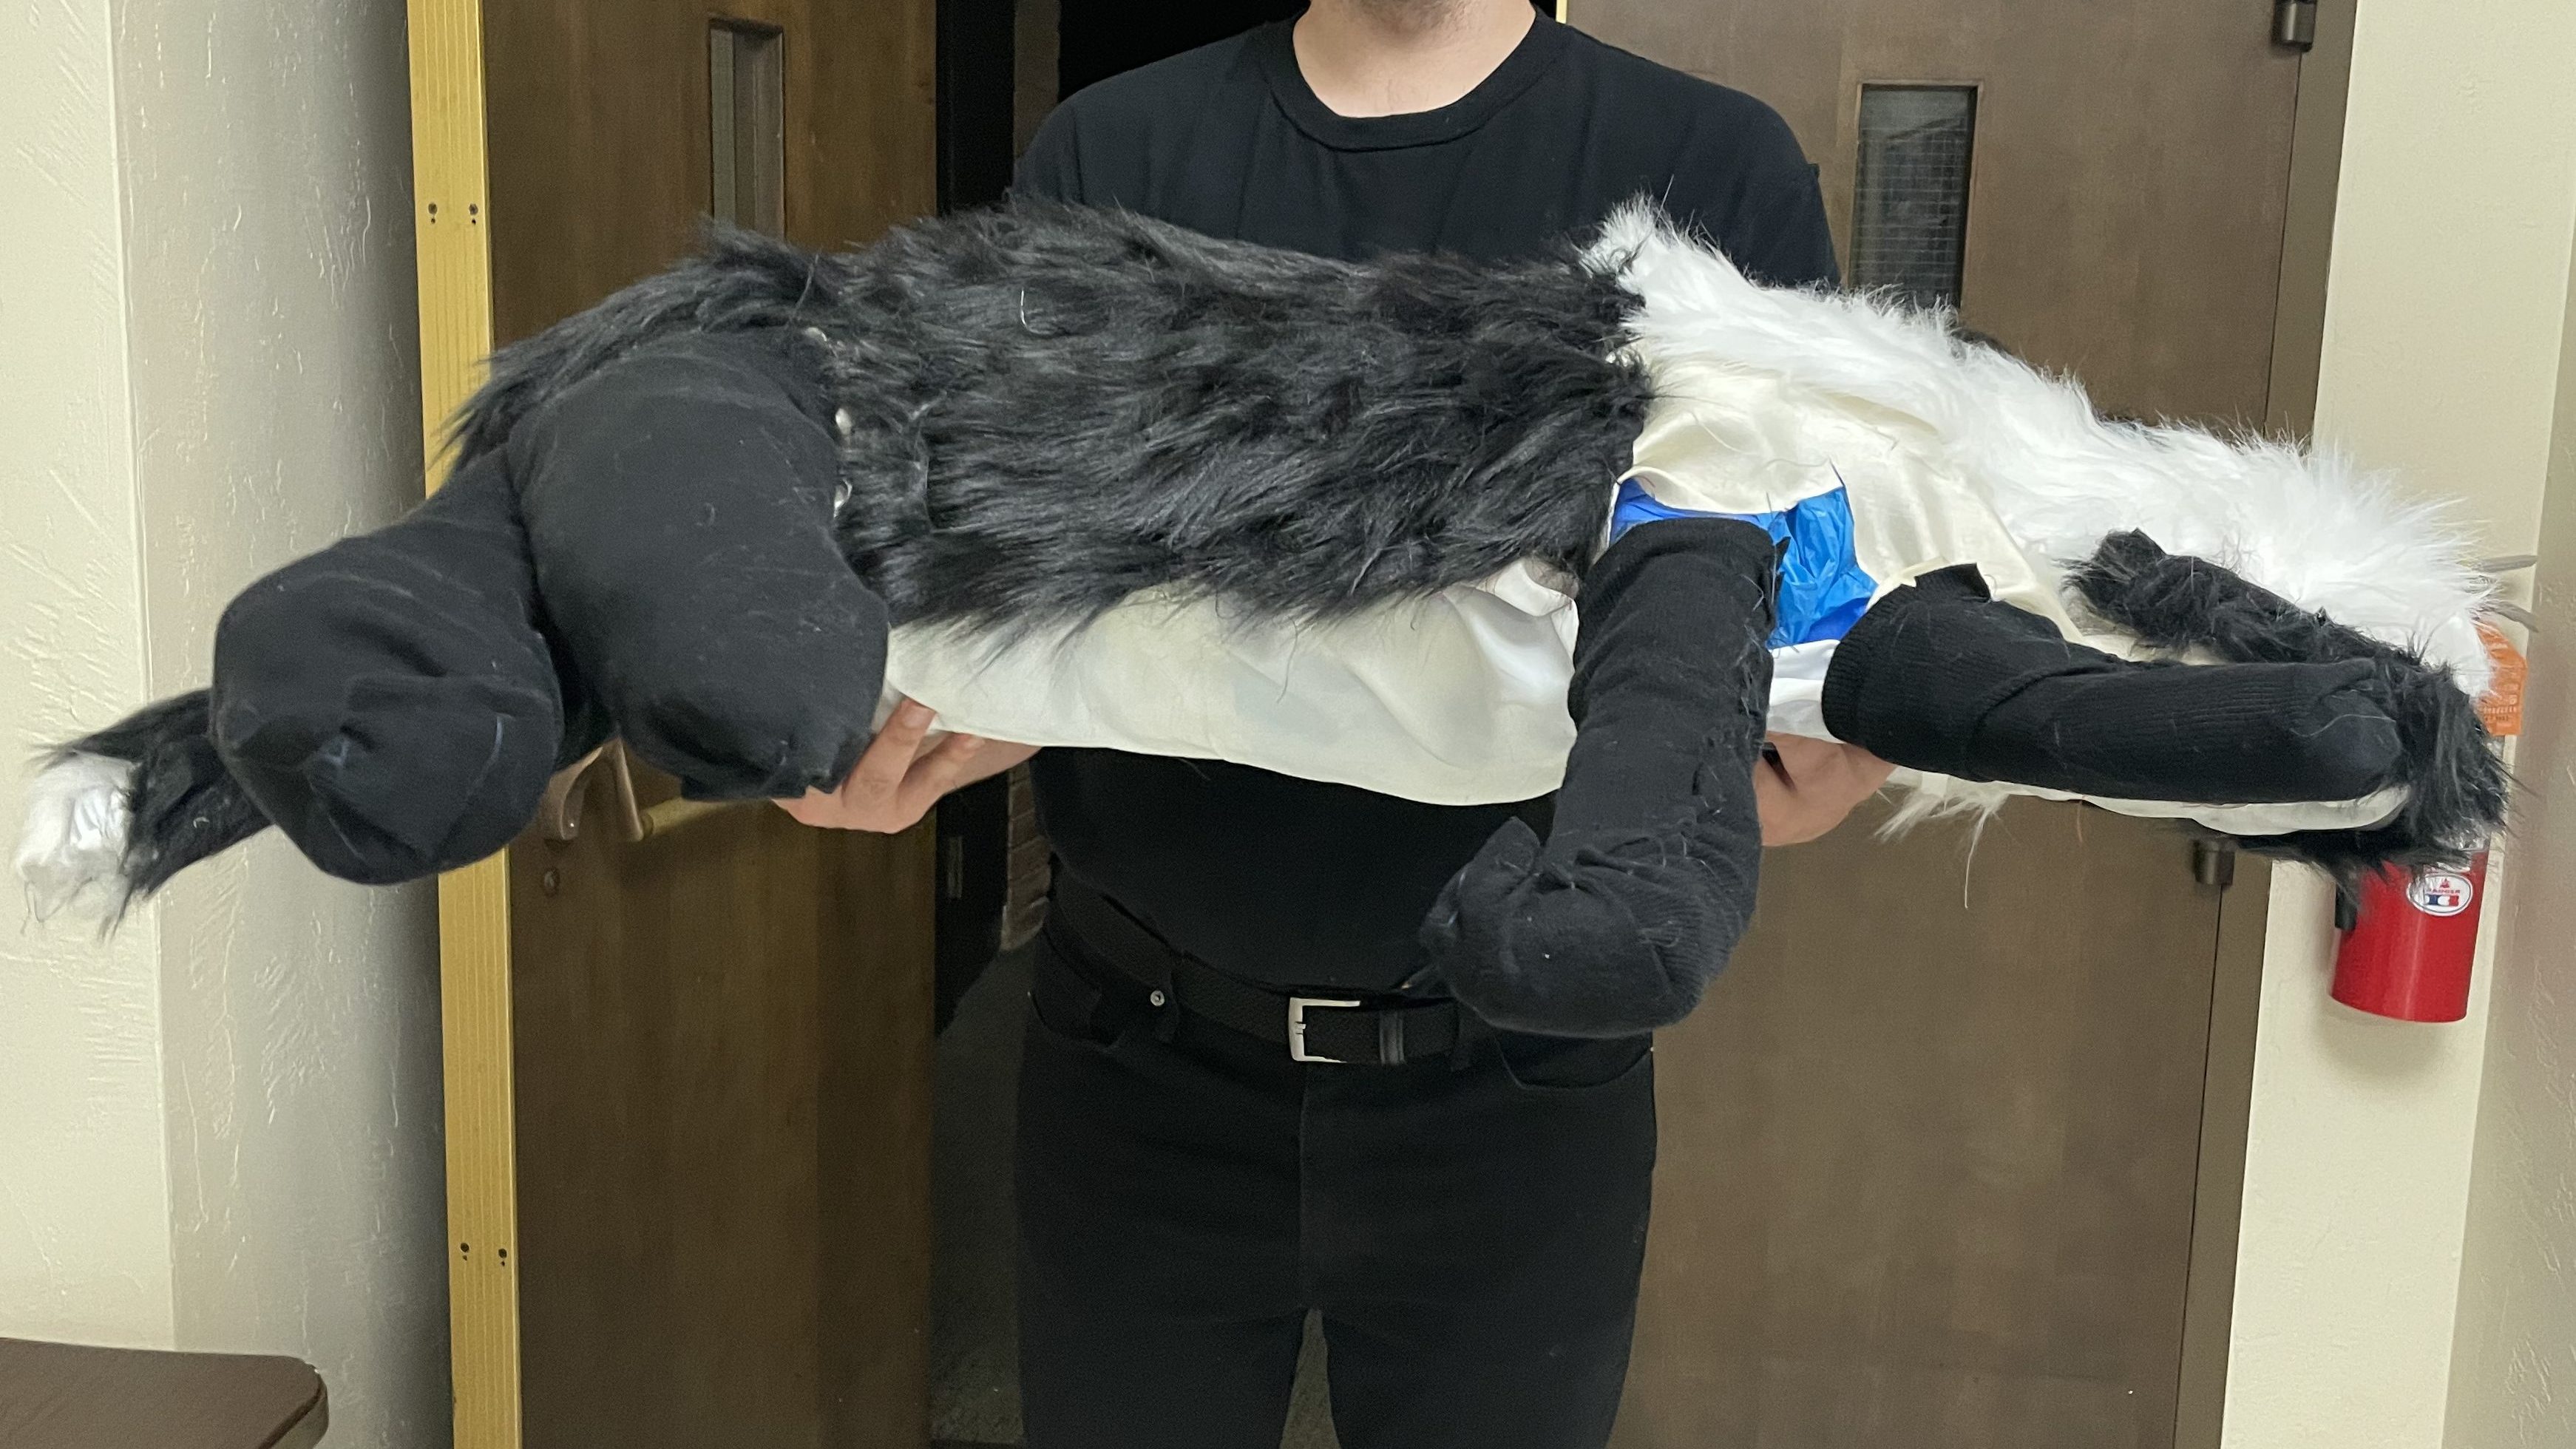
I cut the fur panels into the appropriate shapes, paying attention to the direction the fur on the pants was pointing, so that the fur looked continuous. I applied the patches carefully to the face to help sell the illusion that it was a dog– the shapes here ended up needing a bit more precision than I had expected.
(A photo during the fur process– I was getting pretty nervous around this point. The EPITOME of “trust the process.”)
I ended up running out of black fur, but I had enough to cover the side of the dog that would be visible– I decided I wanted the dog’s back to be to the audience, since that seemed easier to sell an illusion of. Trying to make very realistic looking legs and paws seemed more challenging. I still included the legs just in case someone was sitting at an angle where they would be visible– to camouflage the fact that I ran out of black fur, I just sewed some scrap black fabric over the spots I would have covered in fur. In the end, this saved me money on fur, anyway, and the difference from the audience was really not visible at all.
Shoutout to my mother, who noted upon seeing my work-in-progress that the dog really needed an ear– I added a flap of black fur to the head, sewed down the part where it attached to the head, and put a single stitch at the other end, taking care to position it so there was a small kink in the center. It really looked like a dog’s ear! I was pleased, and I think it made a big difference to the final product.
(The finished dog prop.)
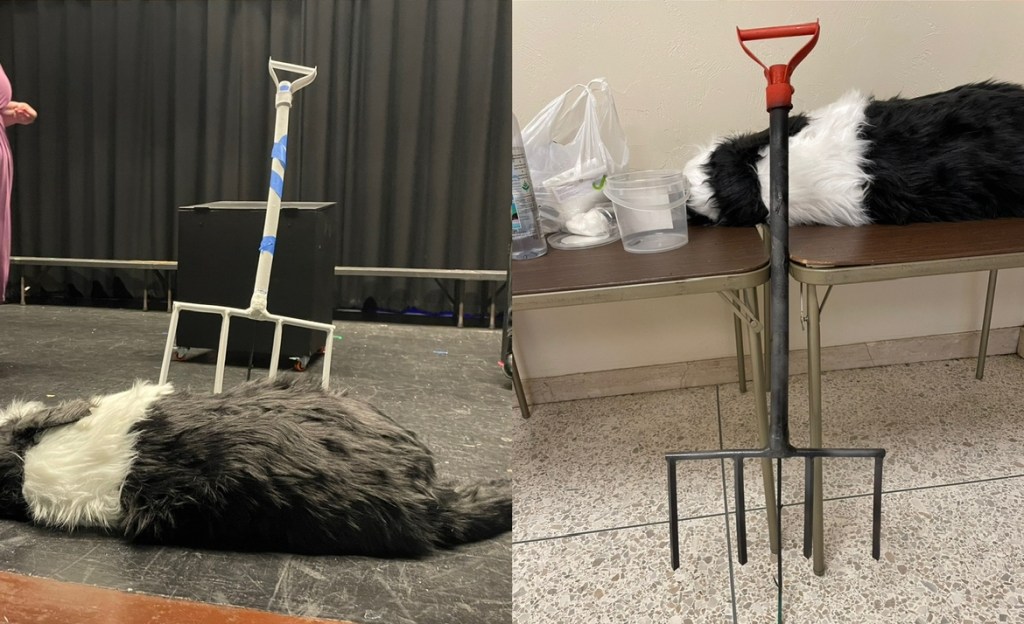
Once the dog was done, I had to set my attention to the second part of this prop– the cause of its death. Wellington the dog is stabbed with a garden fork, and that garden fork is meant to be sticking out of its body when the lights first come up.
I debated just buying an actual tool or borrowing one from a friend, but I feared this might be a safety hazard on account of the pointy ends, plus I wasn’t sure how much work it would require to make such a heavy object stand upright. And, frankly, I didn’t want to spend the money.
I did have some EVA foam materials lying around from a previous crafting project… that I ended up deciding not to use EVA foam for. So, I decided to try a second thing for the very first time with this project and build the garden fork out of EVA foam.
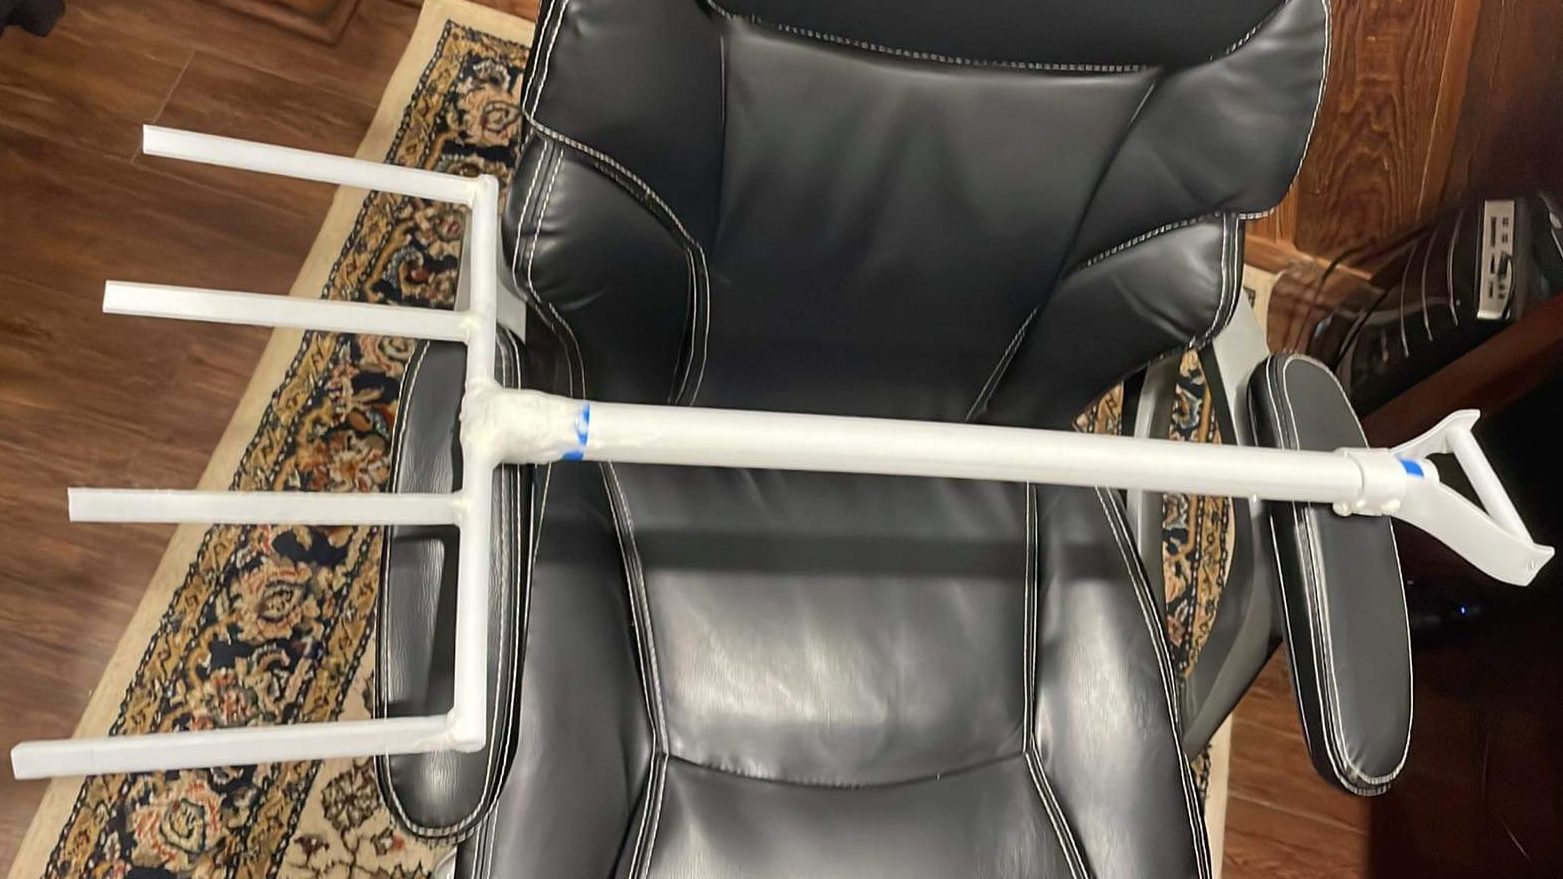
This process was rather quick and haphazard– I spent a bit longer than anticipated on the dog itself, so I finished up the garden fork in the hours before leaving for the theater to drop the prop off! I used some triangle-shaped EVA foam dowels attached to a square-shaped dowel to make the fork end of the tool. (I can’t find the exact dowels I purchased, but they were similar to these.) I cut the dowels to length and applied a bit of white glue to fit the pieces together. Once this was sufficiently dry, I covered the joints with foam clay. I applied the clay all around the joint, then dabbed my fingers in a tiny bit of water to shape it. Some of this shaping was on a very small scale, so I used the rounded head of a straight pin to get into areas I was struggling to reach. This ended up being a surprisingly useful sculpting tool!
I used a larger foam dowel for the shaft of the fork. I attached this piece to the “fork” part in the same way that I attached the fork tines. I used some flat cuttings of an EVA foam sheet for some detailing, and for the handle on the very top. Anywhere where I had an awkward edge I wanted to smooth over, I applied more foam clay.
(I’m not saying it was stellar work, but it definitely did the job I needed it to do!)
To get the fork to stick out of the dog, I used tape to attach a thin, straight stick to the back. Literally, just a stick from my yard! I had been looking for something more like a garden spike, but I didn’t have any of these on hand and figured a stick was just fine.
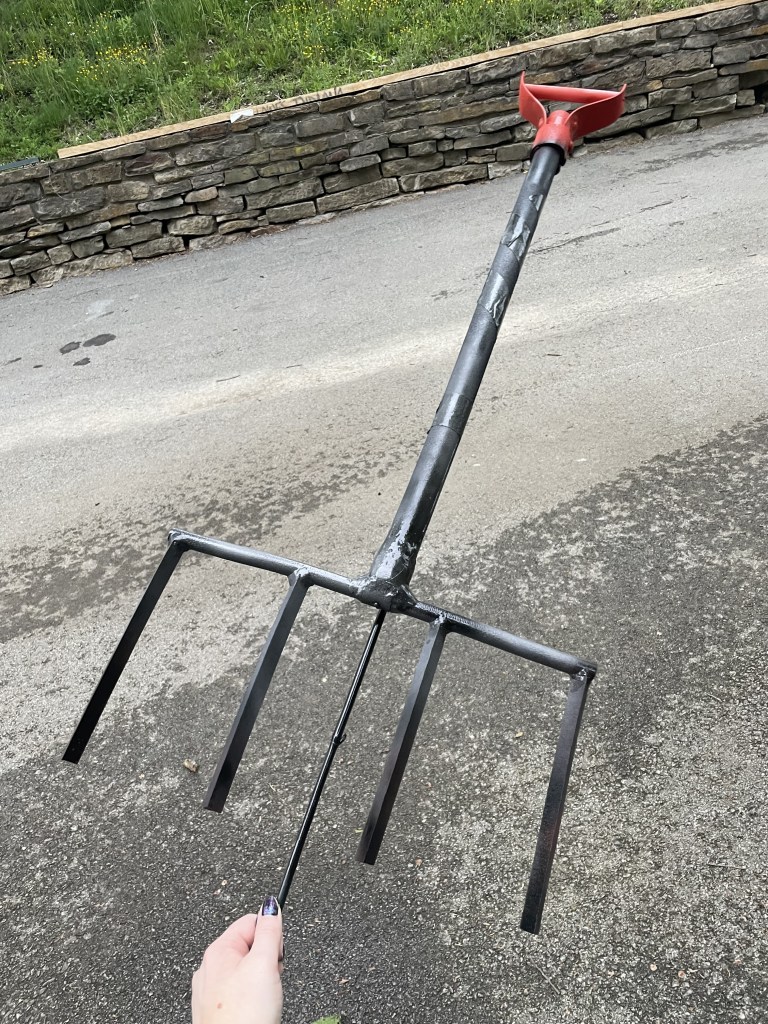
After waiting a bit for the foam clay to dry, (and admittedly, I should’ve waited longer– more like 24 hours instead of 2!) I spray painted the entire thing with a mix of black, silvery gray, and some red for the handle. The spray paint really brought the whole thing together. I spray painted the stick that would hold the fork upright black, so that it really wouldn’t be visible with the black set behind the prop.
(The fork after painting. I loved how the sort of uneven job with the foam clay made the joints look like they were welded together. I was afraid it would just look sloppy!)
(A good before-and-after comparison. It went from a little silly looking to actually looking pretty lethal, in my opinion!)
I had left a gap on the dog’s stomach when I sewed the fur, so I just stuck the stick down into this gap. I still struggled to get the fork to stand upright, it kept flopping over a bit, so I went with the extremely elegant solution of just pumping a ton of hot glue into the gap in the fur until I could get it to stand upright. If it works, it works, I guess.
(A photo from the angle the audience WOULDN’T see– theatre is all about angles and illusions, after all!)
Not counting supplies I already had (scrap fabric; sewing thread, pins, and needles; lots of EVA foam materials, trash bags and sticks, spray paint, hot glue), I spent $35 total to make this prop. If you were to buy everything, this would probably cost a lot more, but many of these supplies are materials the average crafty person would have on hand, anyway. The EVA foam would arguably be the priciest part of this project– if you were buying all of that, I’d estimate adding another $40. You could probably avoid that cost if you used some other materials, I just used what I had on hand.
That covers my process! I hope this might be useful knowledge to some other crafters. If I can do it, you certainly can– I figured out how to work with most of these materials on the fly. Happy crafting!
Post-production set strikes are easiest when many people lend their hands to the cause. Unfortunately, many actors dread strike. The reality is that many actors simply don’t know how to help. While technical skills are of benefit to every performer, and I heartily recommend every actor get the gist of as many backstage skills as possible, many times the root of the anxiety is simply “what can I even do besides stand around the whole time?”
Here is a set of suggestions for everyone, no matter their strength or skills, regarding making themselves useful at strike. The list starts with the least technically-inclined options, with the “hardest” options at the end.
Don’t be afraid to ask where you can help. The director, stage manager, and technical director should all be able to help you find something to do, and many of your cast and crew will also happily accept help if you offer it. Of course, use your best judgement—asking for direction repeatedly while others are busy with their own work gets annoying and makes it seem like you lack initiative.
See if any painting needs done. Some pieces may need primed and repainted if such is practice in the theater. This is almost always one of the last steps of strike, but it’s one anyone can do!
Get on cleaning duty. Strike requires much more than tearing down sets and lights. The lobby, house, bathrooms, greenroom, and dressing rooms may all be part of strike. Find out what needs cleaned— anyone can take care of organizing, vacuuming, or wiping down surfaces. However, remember that strike is messy business! Don’t bother cleaning anything that is likely to be trashed again by the end of the process until all of the work is done.
Take out the trash. As the set gets ripped apart, a surplus trash will quickly accumulate. Gathering this and throwing it away keeps the space clear for other, more important work. Remember, though, that because something has been used doesn’t necessary mean it is garbage. Again, use your best judgement— Large sheets of plywood or bits of lumber at a reasonable length can be reused, as can most hardware like screws, casters, or handles. Anything broken, badly damaged, or under a reasonably useful size should be trashed, while re-usable materials can be cleared away and re-organized. If you’re unclear on what is trash and what is useful, check in with someone first.
Assist with costumes, props, or furniture. Returning these pieces to their homes in theater storage is often relatively light work. On the other hand, if you have the muscle, lifting furniture into trucks or up and down stairs can be very helpful at this step— the “heavy” muscle is often assisting with the technical work at this time.
Remove hardware from set pieces and lumber. Before any lumber or stock structures get taken to storage, any extruding nails or staples should be removed. If they can’t be removed, you can sometimes use a hammer to pound them flat. The goal is to be certain that no one will be impaled the next time they lift that object. Using pliers or a hammer to remove these pointy bits of hardware is a very helpful activity that can be quite time consuming (in other words, if you have no idea what to do all day, this is a GREAT job to sign yourself up for).
Return reusable lumber and hardware to storage. Make sure you are clear on what should be trashed and what should be kept. If there are no organizational rules about where these things should go, strike may be a good time to do some organizing! Sorting like objects into their own bins or shelves is incredibly useful for future productions.
Be ready to help lift, lower, and store structures. There’s generally a wealth of group lifting to be done. “Stock” structures like legs and flats can be taken to storage. Often, large structures like platforms need to be lowered onto one side or moved in order to be taken apart. Even if you lack muscle, lifting as a group effort is easiest, and more hands are always beneficial. If you see people struggling to lift something, don’t take the time to worry about if you’re strong enough to help— just jump in!
Don’t be afraid of the power tools. Even if you’ve never used certain tools before, there will likely be someone willing to show you what to do with them.
Now that you have some suggestions for how to make yourself useful, here are some friendly reminders of what isn’t useful:
Don’t get in harm’s way. If you feel unsafe with something, leave it to those better equipped to handle it. Everyone would rather you pass off the job to someone else than be injured. Further, if you’re waiting for a job or for instruction, make sure you’re not, say, in the path of a light rail coming in, or underfoot when people are lifting heavy objects. Stay aware of your surroundings.
Don’t play supervisor. Regardless of how poorly you feel others may be doing their jobs, nothing is worse than watching someone simply stand back and tell others what to do. If you feel you must give direction to someone, do it, and then return to your own work. However, make sure you ask yourself, Am I a reliable authority on this issue? If the answer is no, keep your advice to yourself.
Don’t hide. This is a popular pastime for those who don’t know what to do with themselves at strike. Yes, we have noticed you’ve been mysteriously missing for the last three hours. No, it’s not a good look.
Don’t leave. Even if you have to leave early for any reason, try to be helpful in some way before you go. It’s better for everyone (yourself included) if you do a little rather than nothing.
Ultimately, what is important is that you find something to do. Almost anything you can find to do is helpful, so pitch in wherever you can. If you really can’t find some way to help, just ask!
Directors, if you’re looking for tips to make your set strikes more organized, check out my post here!
The Theatre 101 Series is a set of introductory articles meant to explain theatrical concepts and situations to young actors as well as adult theatrical newcomers. View the whole series here.
Many new actors find memorization the most daunting part of the rehearsal process. Lines, choreography, blocking, lyrics, and set and costume changes must be memorized, which proves challenging even for veteran actors. How do veteran actors conquer memorization to be prepared come showtime?
The Theatre 101 Series is a set of introductory articles meant to explain theatrical concepts and situations to young actors as well as adult theatrical newcomers. View the whole series here.
Once auditions are over, the rest of the production process can begin. Woohoo!
Normally one of the first documents a cast receives is the production schedule, which contains all of the information on what is to come. In this article, I’ll quickly explain some unfamiliar terms you may come across.
The Theatre 101 Series is a set of introductory articles meant to explain theatrical concepts and situations to young actors as well as adult theatrical newcomers. View the whole series here.
When you are new to theatre, preparing for an audition feels like walking blindly into the unknown. While understanding what to expect in your first audition may help, learning how to prepare properly for an audition can require a lot of audition experience. To help newcomers break into auditioning and put their best foot forward, here is a beginner-friendly guide to preparing for auditions!
About a year ago I listened to to an episode of the Kwik Brain podcast all about hacking your brain in order to learn lines more efficiently. I’d recommend anyone looking for some new strategies check out the episode and the second part, too. However, of all of the concepts presented in the two episodes, only one strategy has really stuck with me and become a crucial part of my preparation for a show. I’ve now used this strategy to learn several roles, and am always eager to share with others, because it has been a game changer.
If you’ve ever performed in school theatre, you know what a horrible, exciting event the posting of the cast list can be. When the roles are assigned for the annual fall play or musical, tensions tend to run high, and students sometimes turn their backs on teachers. Feelings can be hurt, and the casting process can often seem like a personal rejection. Finding ways to keep this process productive and educational for everybody can make your program stronger and help increase retainment between shows!
Truly, every student can learn from every experience they have in the theater. This can be a hard lesson for young people to grasp. Directors can help by making small adjustments to their auditions and communication with students.
About a year ago I was assigned a project for class that involved learning about anything and tracking your learning in a multimedia format. Since I was at the time involved in three different productions occurring simultaneously, I decided to make a blog about my efforts in learning to be a director. Though this project itself was very low-stress and even enjoyable, I got a perfect score and a glowing review from my professor, as well as a brilliant learning experience I didn’t expect.
Apparently required journaling of rehearsals is pretty common in school theatre programs nowadays– I never had to do this, and so I was able to approach the task with a fresh mind. Even if an assignment like this has previously tainted your experience with journaling rehearsals, consider revisiting it– it can be very beneficial for your learning, both in regard to that show and to your overall development as an actor and artist.