I have worked with fabulous directors who create wonderful environments and experiences, and awful directors who foster really unpleasant ones. Sometimes the same director has provided both extremes in different instances.
What makes the difference?
Obviously, this is an abstract and subjective question. The difference between a good director and a bad director (and those terms are hardly absolute, anyway) could be tracked to many unique variables.
If you ask me, though, one of the most critical and most underrated traits that make or break a director is their mindset regarding their actors. I think many directors who would be excellent get this mindset completely backwards– and this is a fatal mistake.
Last year, I took my first workshop with Theatrical Intimacy Education. It blew my mind and set me on a long-term journey to begin building a theater practice that is safer, easier, and all-around less uncomfortable.
I don’t have a statistic to back up this claim, but I feel confident that the vast majority of actors have experienced some kind of awkward stage intimacy encounter in their theatrical career. We think of it as a sort of rite of passage. And indeed, we can’t eliminate awkwardness in the theatrical process altogether– it just wouldn’t be possible. To some extent, that awkward stage kiss or uncomfortable in-character romance we all dread just can’t be avoided.
But go with me for a second: What if we could make it less uncomfortable? What if we could make it a little more fun and a little less scary?
Theatrical intimacy training aims to bridge that gap on both the professional and hobbyist levels, for shows with intimacy as complex as simulated penetration and as simple as a handhold.
Why do I need these?
Theatrical intimacy training is valuable for everyone who participates in theatre: directors, stage managers, actors, and technicians, not just those seeking to become an intimacy coordinator or director. Intimacy training imparts helpful tools and tricks that all participants in the process can use at their own pace. It also imparts a philosophy of consent that can be really revolutionary in a space as collaborative and vulnerable as theater.
This emphasis on consent centers personal boundaries in our performance spaces. In the #MeToo era, the value of this kind of training really can’t be overstated. Through a broader lens, though, learning and practicing these principles can benefit actors of all types. Disabled actors, global majority and BIPOC actors, and actors of diverse marginalized groups benefit when we evaluate and reassess our existing practices and look for ways to make them more inclusive.
The bottom line is that this training helps make theatre spaces healthier and more welcoming for everyone!
Here are just five recommendations to get you started in your exploration:
My first workshop with TIE changed my entire outlook on theatre.
TIE offers a number of different workshops that cover theatrical intimacy from a number of angles. In addition to exploring the staging of intimacy, they also provide workshops on consent, racial equity, and gender in the context of theatre.
One unique offering is their diploma system. While the organization disagrees with the requirement of formal certification, the TIE diploma is a way of recognizing the hours of training accrued by participants. There are multiple diploma levels, each requiring a number of different courses. These make a great addition to a resume!
TIE posts their workshops in seasonal “drops” every few months. You can see their current offerings here. They offer a tiered pay scale for their workshops in the name of greater financial accessibility– pay what you can to access their valuable training!
Special mention: TIE (along with California State University Fullerton’s Pollak Library) also publishes the Journal of Consent-Based Performance, which is another excellent resource. You can find the journal, as well as a digital archive of all its issues, here.
2. Staging Sex: Best Practices, Tools, and Techniques for Theatrical Intimacy by Chelsea Pace with contributions by Laura Rikard
Staging Sex is a bit of an addendum to the previous point: the book is written by the co-founders of TIE, and covers much of the same content that is included in TIE’s “Best Practices” workshop.
If you’ve taken this workshop, the book is a wonderful review of the material. I also found it helpful as a different way to absorb the info I picked up in the workshop– getting to read and reflect at my own pace was valuable.
This book can also be enjoyed independent of any workshops, of course. If you want to get your feet wet with intimacy concepts on your own timetable, I highly recommend this book!
If you’d like to support the blog, you can get the book on Bookshop using my affiliate link!
Previously Intimacy Directors International, IDC is the largest organization training intimacy professionals for both stage and screen. Their website boasts a wealth of resources both free and paid.
IDC certifies intimacy directors and choreographers. Certification is not the path for everyone, and isn’t a requirement to working successfully as an intimacy professional, but if you have the resources, the training can certainly be invaluable. This kind of program offers a more structured approach than the more piecemeal approach provided by TIE– there are certainly pros and cons to both approaches.
I have never personally worked with IDC, but they are a reputable organization whose alums have gone on to highly successful professional careers. They’re worth checking out!
Open provides ongoing professional education and networking opportunities for intimacy professionals. Founded by Chelsea Pace, the organization offers a variety of ways to interact with and learn from other artists. Their workshops are both live and recorded, and past recorded workshops are available on their site for on-demand learning. Open also offers a unique training program called a Cohort, granting participants hands-on, practical training.
Open is designed for intimacy professionals, so it is not meant to be a beginner’s resource. Once you’ve gotten your feet wet through other means, this is a great resource that emphasizes professional networking opportunities. Check them out and make some new connections!
5. The Intimacy Choreographers, Coordinators, and Educators Resource Group on Facebook
Okay, obviously a Facebook group isn’t a replacement for actual training. Nevertheless, this is a great place to ask questions and look for information. I’m sure there are many Facebook groups similar to this one– this is just one that I know and am a part of!
Talking about and immersing yourself in conversation about a subject is an important part of learning. It can be intimidating, though, and if you don’t have the connections, finding the people to discuss with can be a challenge. Facebook groups provide an excellent avenue for discourse that can be explored no matter who or where you are.
If you have any additional resources that you feel should be on this list, please add them in the comments below!
With my warmest applause for @joolieannie, whose viral TikTok video has earned her the money she needs for her transition!
1. You stay quiet while other actors are rehearsing
Being respectful of others while they are working is very cutesy, very demure. Making a bunch of noise at rehearsal is disrespectful of others’ time and energy, and plain old distracting. Treat others like you want to be treated!
2. You learn your lines by (or even before) the off-book date
When you’re the only one who isn’t prepared, it’s embarrassing for you, and it’s frustrating for everyone else. Not knowing your lines is a disaster waiting to happen! It also wastes time in rehearsal. Practicing your lines thoroughly ahead of time so you’re completely ready for the off-book date is very considerate.
3. You communicate with your production staff
If problems arise, you should immediately talk to your production staff so they can handle it. Being a clear communicator is very approachable. It helps you avoid bigger problems in the future.
4. You take good care of your props, and don’t touch other people’s props
Be careful with your props, as well as your costumes, and be especially careful with those that others need to use. There are few things worse than having something you need for a scene messed with by someone who had no business touching it in the first place– except maybe the bad feeling that comes from being the person who messed with the prop. Respecting other’s tracks in the show is very mindful.
5. You pay close attention to the rehearsal schedule to avoid unexpected conflicts
Calling out of rehearsal at the last minute creates a lot of problems for a lot of people. Keep your rehearsal schedule somewhere you have easy access to it, so you can reference it as needed to make sure you don’t accidentally overbook yourself. Being prepared for rehearsals is very cutesy.
6. You come to rehearsals on time, and let the staff know if you’ll be late
Being on time is a must. Inevitably, though, things will occasionally come up– we can’t always plan our way out of freak traffic blocks or unexpected car problems. If you are going to be late, it’s very considerate, very demure to tell the production staff ASAP. Make sure you have contact information for the appropriate people, so you can give them a heads up if something like this happens.
7. You don’t eat in costume
You shouldn’t eat in costume because of the potential for stains or crumbs to ruin the look your production’s costumer likely worked hard and spent money on. Respecting your costumer is very demure.
8. You treat the production techs like human beings
The stage carpenters, lighting designers, and audio technicians who make sure your production can happen are just as important as you are, mx. actor! Be very respectful, very demure in your communications with them. Don’t forget to treat them with kindness– and say thank you!
9. You stay home if you’re sick
Please, don’t come to rehearsal if you’re sick. Call on your understudies if you need them! Coming sick puts everyone’s health at risk. Putting others in harm’s way is not very cutesy.
10. You stay professional with your fellow actors
This means you treat each other well. But not too well. Stay away from that showmance until the production is over, girlies– it can cause real problems for the entire production. Let’s be mindful of everyone else’s boundaries and not get entangled with something that might make others uncomfortable.
A couple years back, I played Miss Honey in a community theatre production of Matilda. I had an absolute blast, and I have super fond memories of that show.
That process did, however, supply me with one of my very favorite theatre horror stories, and I love to share it.
Towards the end of act one, Miss Honey sings the song “This Little Girl.” I was blocked to stand downstage right, right next to the proscenium, at the very front of the stage. It’s a big emotional beat in the story– Miss Honey approaches the Wormwood family to ask about getting Matilda into special classes at school, because Matilda is the most brilliant child she’s ever met. The family is not supportive: Mrs. Wormwood sings a whole song to make fun of Miss Honey and then unceremoniously throws her out of the house. Standing outside, Miss Honey debates going back inside to give Mrs. Wormwood “a piece of [her] mind,” but she is overcome with self-doubt and decides to leave instead, defeated. Just as she starts to walk away, though, she remembers that Matilda is a miracle, and deserves all the support she can get… and it seems like Miss Honey is going to be completely alone in figuring out how to support her. She is emboldened, but afraid; it’s a complex and very human moment in a high-energy, larger-than-life show.
My blocking was very simple. At one point, I would turn to walk away, but remember what a miracle Matilda is and slowly turn back to face front. The rest of the song would be delivered straight out to the audience– I found myself staring straight into a spotlight for this part. After the song, I was to leave down a small staircase at the front of the stage and exit through the aisle of the theatre. Blackout, end of scene.
This had been rehearsed without a hitch, but on open night, something was different.
When I arrived at the theater that day, I had noticed some of the kids in the cast painting the two staircases that lead into either aisle of the house. That was good, they’d really needed painted, they were so scuffed!
The issue is that those children very helpfully painted over the glow-in-the-dark tape that illuminated the edges of these black staircases.
No one noticed this until I did, at the end of my song. I sang “This Little Girl” looking into the spotlight, as I had been doing. I finished the song to excited opening-night applause, and the lights went to blackout. I stepped forward, as I had every night of tech week, and looked down to find the first step of the staircase.
I absolutely could not see it.
I blinked a few times. My vision was a little funny from looking into the spotlight earlier, and now I had been plunged into darkness. I couldn’t make out the glow tape at all, it was as if the stairs weren’t even there!
Well… I’d walked down them every night of tech week. Maybe muscle memory would be good enough. I took a step.
And… yeah. I fell off the stage.
I only fell about two feet. I wasn’t actually hurt, though my ego was magnificently bruised; I’d caught the very edge of the top step and tumbled down the rest. I heard the audience gasp, but I popped right back up and scampered up the aisle like I was supposed to, thoroughly embarrassed. The director was beside herself at the back of the house, I whispered a hurried “I’M FINE I’M FINE I’M FINE” as I passed and went to assess the damage before my next scene.
I scraped my shin on the way down, but this was the extent of my injuries. I’d ripped a hole in my tights, though, so I took that pair off, put a band-aid or two over my scrape, and threw on a new pair of tights before the next scene. The rest of the show went off without a hitch, and they made extra sure there was glow tape on the steps for the rest of the run. I’ve been a stickler about glow tape ever since.
Pro tip: Don’t step off the edge of the stage if you can’t see where you’re trying to step… it won’t go well, but at least you’ll have a good story to share.
(Featured image by Pittsburgh Performance Photography. The Curious Incident of the Dog in the Night-Time, directed by Jessica Zack, 2024. Lighting design by Craig Soich.)
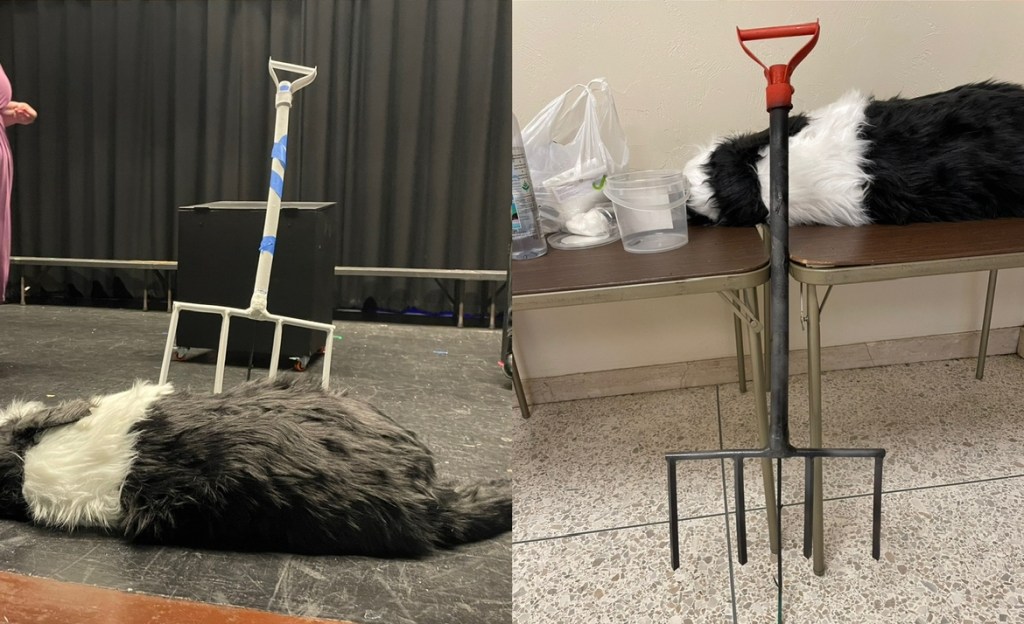
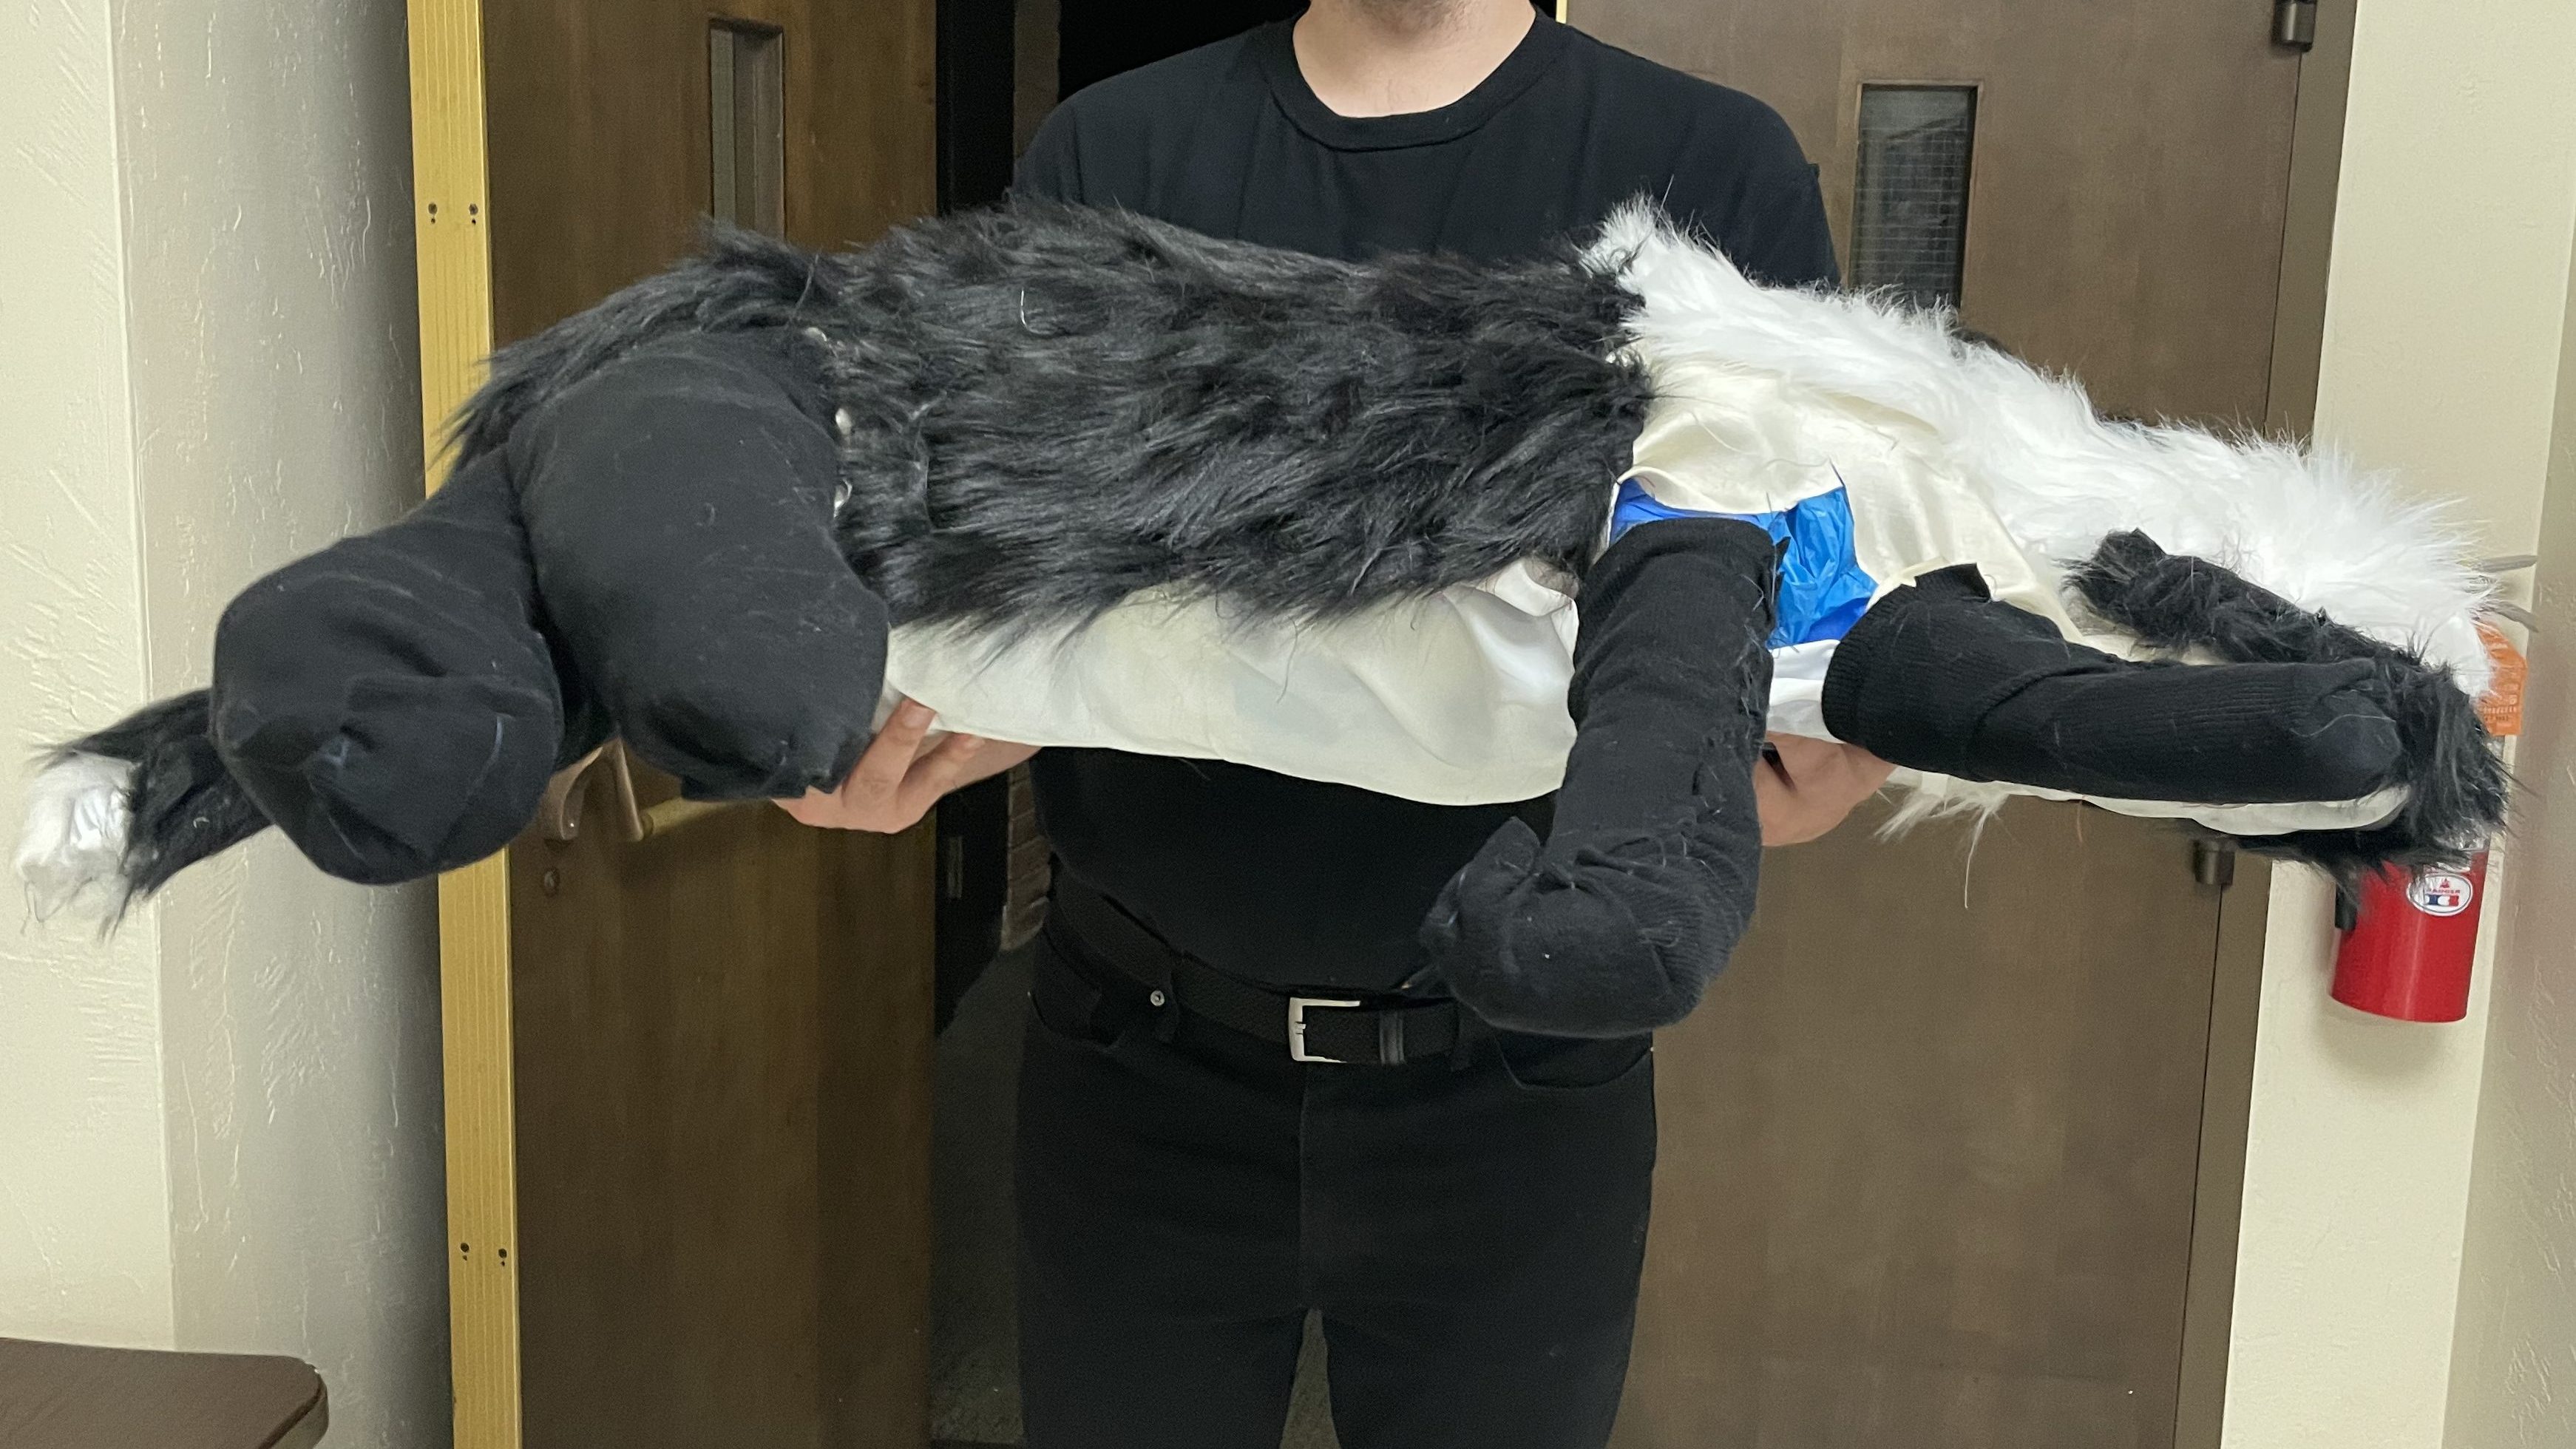
A few months back, I was asked to build a prop dog for my friend’s production. This prop can be a bit of a challenge– as I was searching forums and Facebook groups for inspiration, I found a number of people looking for advice on how to approach it– so I thought others might find an explanation of my process useful.
(A photo of the finished prop, in the performance space.)
I had not read the play prior to being asked to construct this prop. The director gave me creative freedom to approach it as I saw fit. I started by looking for some inspiration photos online. One of our friends informed us that the original source material, the novel, says that the dog is a poodle– I wasn’t very keen on trying to create poodle fur (or spend the money to purchase it), so I decided to go another direction. I thought a border collie color scheme, with distinct black-and-white patches, might be striking and more easily readable on stage. This ended up being a convenient choice, as it made purchasing fur from Joann Fabrics much cheaper in the long run (more on that in a bit).
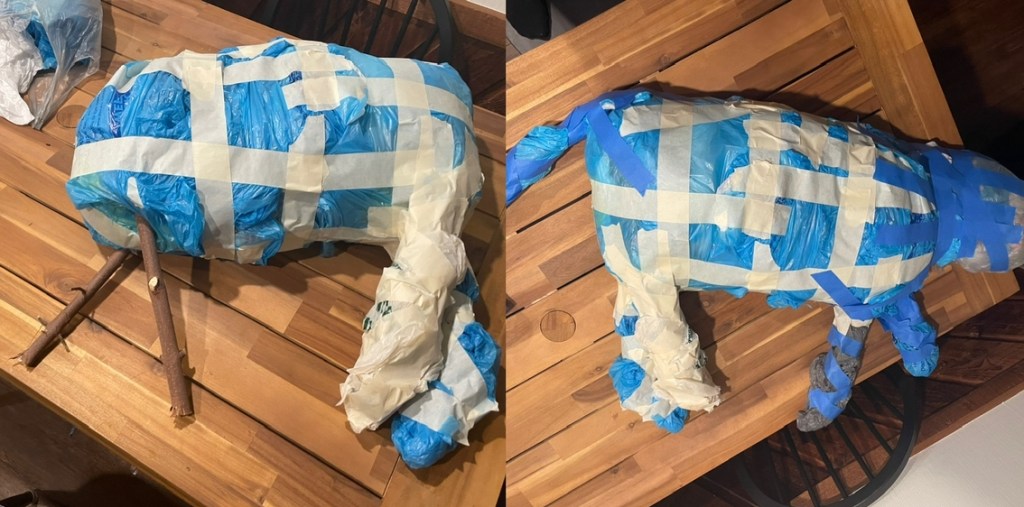
As is my favorite way to start constructing many props, I began with trash! The “core” structure of the dog was several bunches of plastic grocery bags filled with other grocery plastic bags. I arranged these into a roughly dog-shaped form, and then taped them together with masking tape, and then painter’s tape when my tape roll ran out. On a whim, I threw bits of tree branches from my yard into the legs to serve as some more solid supports– In hindsight, I’m not sure this really served any good purpose, but it seemed like a good idea at the time and certainly didn’t hurt anything. I just stabbed four sticks into the underside of the bag-dog, wrapped additional bags around them, and taped everything together.
(Bag-dog in all its glory.)
The result was a dog form that was extremely lightweight, but also held its shape surprisingly well for nothing but plastic bags, tape, and a couple sticks. There was no exact science to taping it together, I just threw tape anywhere where it seems like it would help unify the bags. It’s helpful to stuff a ton of bags into one bag, do the same for another, and then sort of mash the open ends of these together to “marry” them into one, and tape them together this way– I think this helped create a more solid structure.
It is worth noting that the plastic bags, cheap and plentiful as they were for crafting, did make it so that the dog made a distinctive crinkling sound when moved. So, if this is a problem for you, you may want to find another material, or maybe experiment with using additional tape to help deaden the sound/eliminate extra movement that would create the sound.
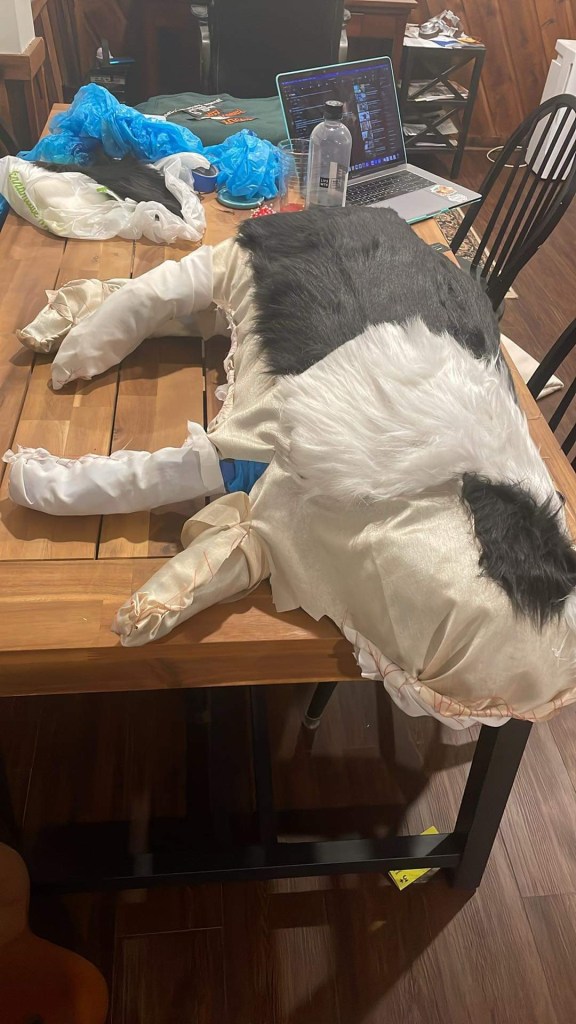
After this, traced the shape of the dog form on some old fabric, cut out the shape twice, and hand-sewed these together to make a fabric pocket to cover the plastic bags. I have really never sewn anything before, but this was meant to be an unseen interior piece anyway, so I didn’t stress about it and considered this good, low-stakes practice.
(I did eventually also cover the legs and tail with fabric, too– I guess I didn’t take a photo at that stage!)
Once the entire form was covered in fabric, I used that fabric as a surface to sew fur onto. For a brief time, I wondered if I could just sew the fur directly to the bags, but I don’t think that would’ve worked.
I purchased my fur in 9in x 12in sheets from Joann Fabrics. The POP! Brand fabric sheets were cost-effective compared to regular fake fur, and conveniently available in black and white. At time of purchase, these were only $4 each. I ended up buying 7 black sheets (which was the store’s full inventory of them, so I’m glad it was enough!) and 4 white sheets, and I had an extra white sheet left over when I was done. I ended up spending $35 on fur, whereas actual faux fur fabric would’ve run $30-50 per yard, AND I would’ve needed two different colors.
I used black and white thread to sew down the black and white fur pieces, respectively. In hindsight, it probably would’ve made some more sense to sew the inner fabric “pocket” together over the dog form after sewing on the fur? But I wasn’t confident in my ability to do that correctly, it seemed a bit more complicated. I had some trouble sewing at the angle I needed to because of the paper bags inside the form, though. In the end, I also added some hot glue under each of the fur panels just in case. This helped them feel a lot more solid. (I really don’t know how to sew, it was very humbling!)
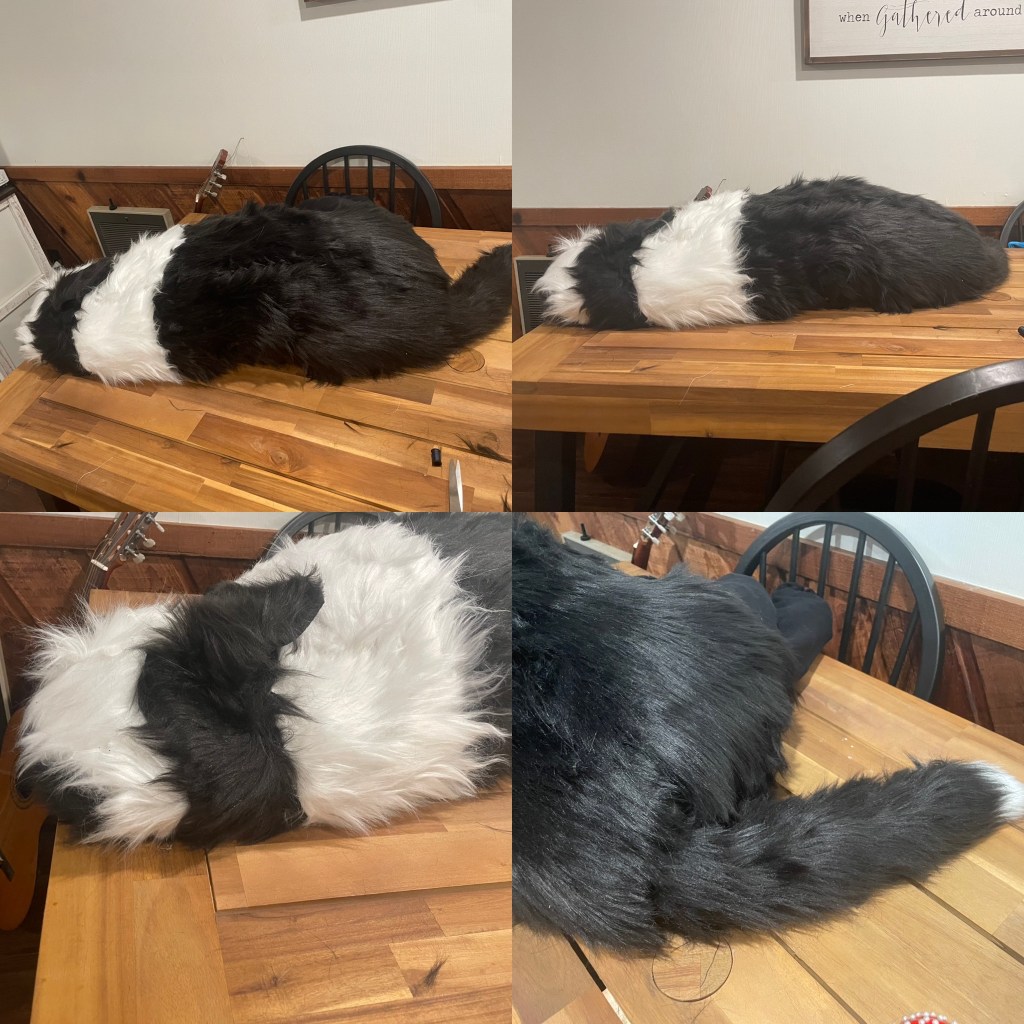
I cut the fur panels into the appropriate shapes, paying attention to the direction the fur on the pants was pointing, so that the fur looked continuous. I applied the patches carefully to the face to help sell the illusion that it was a dog– the shapes here ended up needing a bit more precision than I had expected.
(A photo during the fur process– I was getting pretty nervous around this point. The EPITOME of “trust the process.”)
I ended up running out of black fur, but I had enough to cover the side of the dog that would be visible– I decided I wanted the dog’s back to be to the audience, since that seemed easier to sell an illusion of. Trying to make very realistic looking legs and paws seemed more challenging. I still included the legs just in case someone was sitting at an angle where they would be visible– to camouflage the fact that I ran out of black fur, I just sewed some scrap black fabric over the spots I would have covered in fur. In the end, this saved me money on fur, anyway, and the difference from the audience was really not visible at all.
Shoutout to my mother, who noted upon seeing my work-in-progress that the dog really needed an ear– I added a flap of black fur to the head, sewed down the part where it attached to the head, and put a single stitch at the other end, taking care to position it so there was a small kink in the center. It really looked like a dog’s ear! I was pleased, and I think it made a big difference to the final product.
(The finished dog prop.)
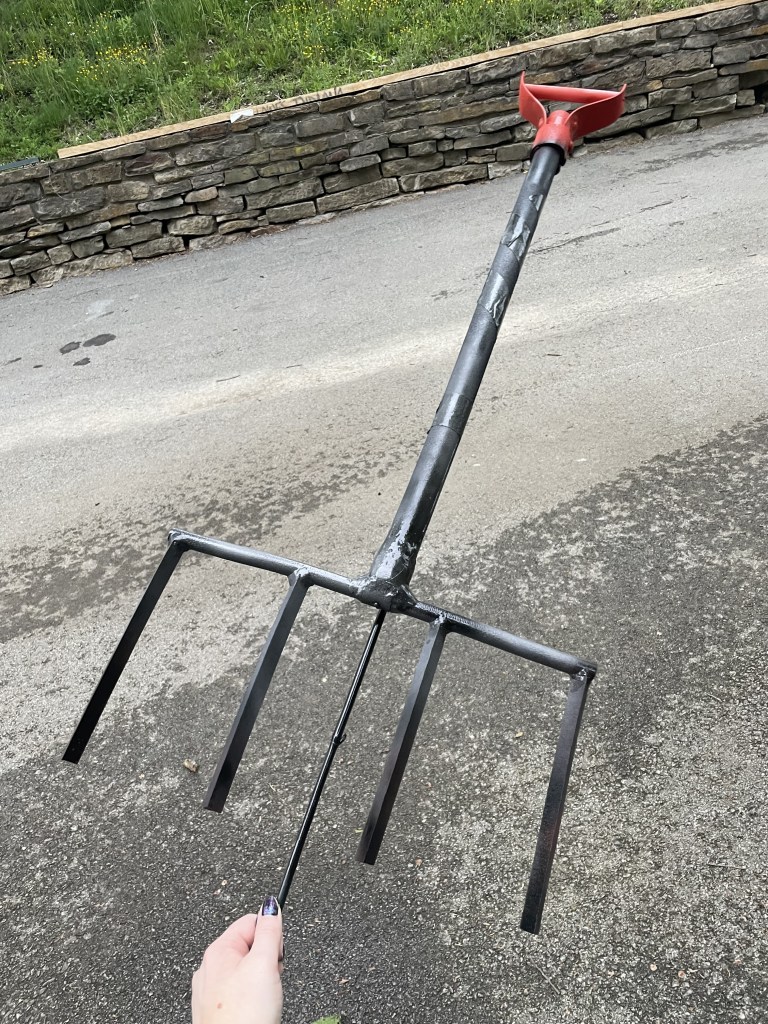
Once the dog was done, I had to set my attention to the second part of this prop– the cause of its death. Wellington the dog is stabbed with a garden fork, and that garden fork is meant to be sticking out of its body when the lights first come up.
I debated just buying an actual tool or borrowing one from a friend, but I feared this might be a safety hazard on account of the pointy ends, plus I wasn’t sure how much work it would require to make such a heavy object stand upright. And, frankly, I didn’t want to spend the money.
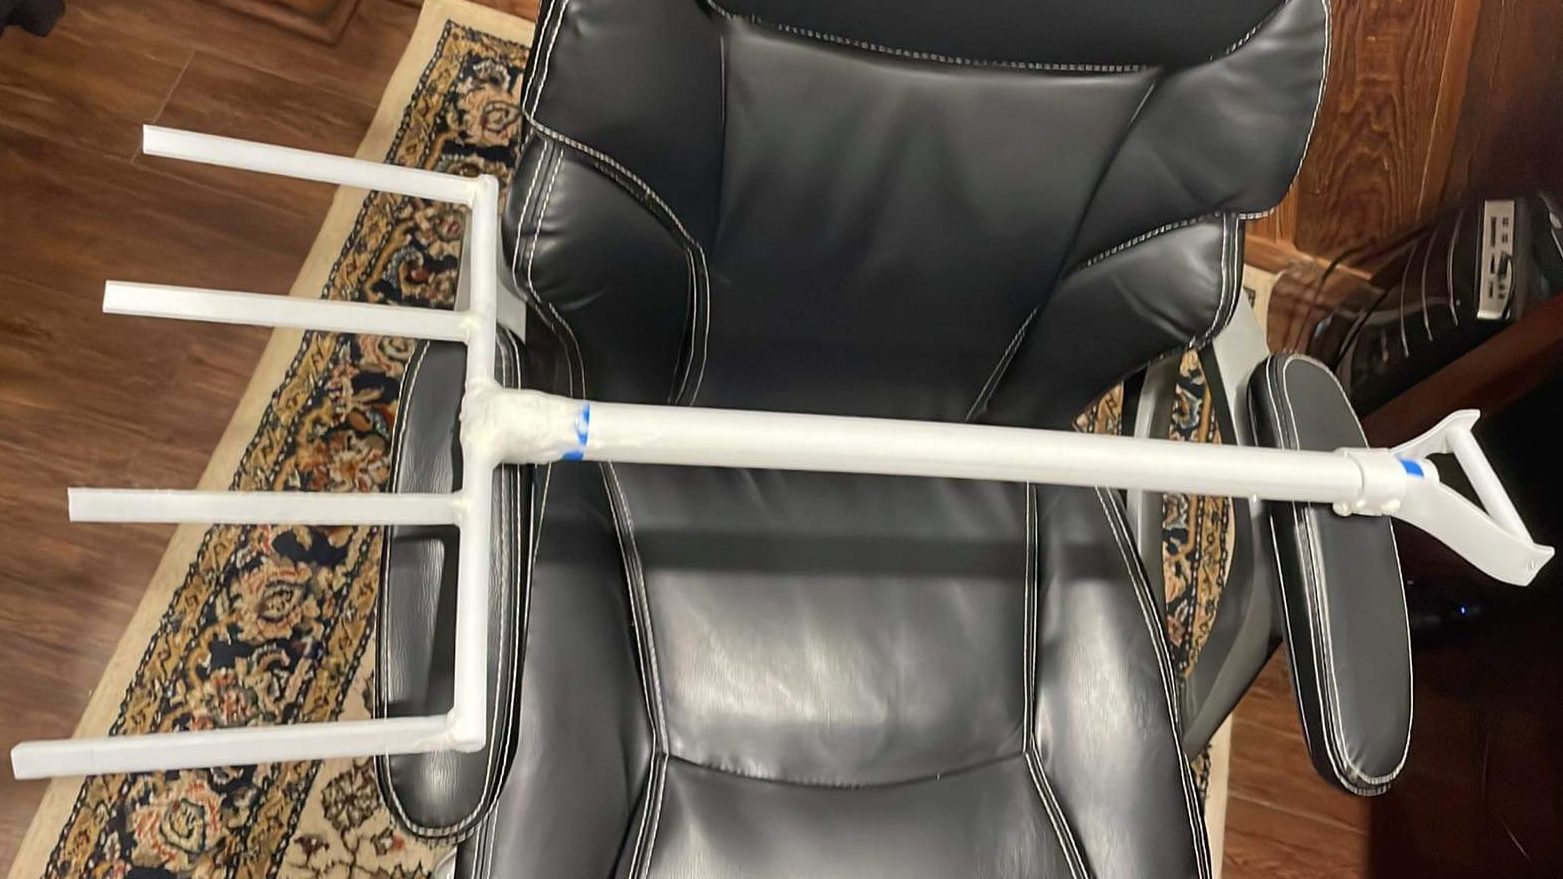
I did have some EVA foam materials lying around from a previous crafting project… that I ended up deciding not to use EVA foam for. So, I decided to try a second thing for the very first time with this project and build the garden fork out of EVA foam.
This process was rather quick and haphazard– I spent a bit longer than anticipated on the dog itself, so I finished up the garden fork in the hours before leaving for the theater to drop the prop off! I used some triangle-shaped EVA foam dowels attached to a square-shaped dowel to make the fork end of the tool. (I can’t find the exact dowels I purchased, but they were similar to these.) I cut the dowels to length and applied a bit of white glue to fit the pieces together. Once this was sufficiently dry, I covered the joints with foam clay. I applied the clay all around the joint, then dabbed my fingers in a tiny bit of water to shape it. Some of this shaping was on a very small scale, so I used the rounded head of a straight pin to get into areas I was struggling to reach. This ended up being a surprisingly useful sculpting tool!
I used a larger foam dowel for the shaft of the fork. I attached this piece to the “fork” part in the same way that I attached the fork tines. I used some flat cuttings of an EVA foam sheet for some detailing, and for the handle on the very top. Anywhere where I had an awkward edge I wanted to smooth over, I applied more foam clay.
(I’m not saying it was stellar work, but it definitely did the job I needed it to do!)
To get the fork to stick out of the dog, I used tape to attach a thin, straight stick to the back. Literally, just a stick from my yard! I had been looking for something more like a garden spike, but I didn’t have any of these on hand and figured a stick was just fine.
After waiting a bit for the foam clay to dry, (and admittedly, I should’ve waited longer– more like 24 hours instead of 2!) I spray painted the entire thing with a mix of black, silvery gray, and some red for the handle. The spray paint really brought the whole thing together. I spray painted the stick that would hold the fork upright black, so that it really wouldn’t be visible with the black set behind the prop.
(The fork after painting. I loved how the sort of uneven job with the foam clay made the joints look like they were welded together. I was afraid it would just look sloppy!)
(A good before-and-after comparison. It went from a little silly looking to actually looking pretty lethal, in my opinion!)
I had left a gap on the dog’s stomach when I sewed the fur, so I just stuck the stick down into this gap. I still struggled to get the fork to stand upright, it kept flopping over a bit, so I went with the extremely elegant solution of just pumping a ton of hot glue into the gap in the fur until I could get it to stand upright. If it works, it works, I guess.
(A photo from the angle the audience WOULDN’T see– theatre is all about angles and illusions, after all!)
Not counting supplies I already had (scrap fabric; sewing thread, pins, and needles; lots of EVA foam materials, trash bags and sticks, spray paint, hot glue), I spent $35 total to make this prop. If you were to buy everything, this would probably cost a lot more, but many of these supplies are materials the average crafty person would have on hand, anyway. The EVA foam would arguably be the priciest part of this project– if you were buying all of that, I’d estimate adding another $40. You could probably avoid that cost if you used some other materials, I just used what I had on hand.
That covers my process! I hope this might be useful knowledge to some other crafters. If I can do it, you certainly can– I figured out how to work with most of these materials on the fly. Happy crafting!
I pride myself on being a multi-talented actor. I have had the good fortune to experience theatre in a number of on-stage, off-stage, and backstage positions, and I have really treasured these opportunities! In fact, I value them so much, that I think every actor should try them out for themselves.
Here are 40 miscellaneous reasons you should:
You learn practical life skills. Almost every skill you’ll pick up in theatre tech– whether it’s a hard skill like design, construction, and electrics, or a soft skill like teamwork, critical thinking, and problem solving– can be used in other domains.
You get to experiment with tools you’ve never used before. Learning to use new power tools and other technology can be both fun and extremely useful even outside the theatre. I learned how to weld because I decided to try a position as a work-study tech in college!
You make new connections. You’ll likely work with different people than you do as an actor, and that networking can translate to new opportunities.
You become more marketable as an actor. Tech skills are a nice addition to a resume. If you do community theatre, this skill is extra useful, since much of the tech crew will be volunteers anyway.
You develop your problem-solving skills.
You develop your mathematical and technological skills. Essentially every role you’ll take on in theatre tech will involve some measure of either math or technology, or both. This can be a valuable way to practice these skills.
You discover new ways to participate in and enjoy theatre. I’ve known many actors who have tried tech theatre and discovered they actually enjoy it much more than acting!
You deepen your understanding of theatre as a whole. Understanding “how the sausage gets made” so to speak can help you better understand the art of theatre. You’ll be surprised at how this can shape your understanding of performance.
You can find new hobbies. Theatre tech integrates a number of different trades and skills. You may find that painting sets or making props becomes a source of creative inspiration for you!
You can pick up skills that can be useful for a professional career. As I said before, both the hard and soft skills of theatre tech can be practical in many other domains– including professional ones! For a time, I seriously considered looking into taking formal welding lessons to shore up the welding skills I learned doing theatre tech in order to get a new vocation. You never know how useful the skills you learn may be: you might even be able to build a life out of them.
Or pick up a new professional career itself! Theatre tech is a career, and one that can be highly satisfying. If you experiment and find the work exciting, you might have a new career aspiration on your hands.
You hone your teamwork skills.
You become more well-rounded.
You stay active. Theatre tech can be a decently physical job, though it also doesn’t always have to be.
You learn useful safety principles. You’ll learn the importance of and how to operate useful safety equipment, and learn important rules for keeping yourself safe while working.
You learn useful design principles. You’ll learn about artistic ideas that can be used in many other domains of design and decor, not just for the stage!
You get to flex different creative muscles. If you’re used to acting, trying set construction, prop design, or scenic painting can be a good way to try something new and develop new artistic skills.
You can become known for some niche skills. I became known as a good “strange props” person in my local theatre communities after I made a prop dog for The Curious Incident of the Dog in the Night-Time. This has made for some cool opportunities! If you have an interest in puppet-making, handcrafting, and mixed-media art, you can find a really sweet way to put those skills to work in tech theatre.
You find joy in supporting others. I’ve found working backstage to be incredibly rewarding– getting to support a performance in a different kind of way can be a lot of fun.
You’ll always find opportunities. Theaters always need volunteers (and/or paid professionals!) to run light or sound boards, work backstage, or build sets! Once you have some of these skills, they can be a great way to get your foot in the door with different groups of people.
You can lend a helping hand, and maybe even save the day. It often happens that productions suddenly discover they need an extra dresser backstage, or their light board operator has suddenly become unavailable. Sometimes, theaters need a volunteer to step up right away. Stepping in and saving the day in situations like this can be super rewarding!
You learn to work under pressure. Theatre techs often work with challenging time constraints put on their work. They need to find solutions for big problems, sometimes while a whole room full of actors are waiting around for you to find a fix. The work isn’t always high-pressure, but working in these conditions when they arise can be a valuable learning experience.
You can discover a new sense of purpose. If you become talented with these skills and develop a good reputation, you can find yourself becoming indispensable within certain theatre communities for your skills. You may find yourself becoming hard to replace!
You can hang out with friends who aren’t actors. If you’ve been trying to get some of your friends to try theatre, but they’re nervous about acting, consider getting them to volunteer for set builds or run crew with you. Or you may already have friends working backstage– join them!
You might be able to find paid opportunities more easily. Finding paid acting work is notorious for how challenging it is. Some shows require more technicians than on-stage talent! Finding paid work as a technician can be easier than doing so as a performer.
You’ll engage different parts of your brain. We often say that some people are “good with their hands,” or “book smart”– these are just ways that certain people have become accustomed to working. Some people develop different areas of the brain more than others as a result of the things they find interesting and fun. Actors who are more accustomed to academic skills may find experimenting with more physical and technical skills to be a fun challenge.
You develop dexterity on both small and large projects. From gluing tiny rhinestones to a prop you’re making to building massive set pieces, theatre tech trains a number of unique muscles both physical and mental.
You refine your eye for detail-oriented work. Being “detail-oriented” is a soft skill many employers praise.
You learn to be more adaptable. You have to be when working backstage! Lots of tech tasks don’t go the way you expect them to at first, and that’s okay. You learn to work around this.
You build communication and collaboration skills. Almost nothing in tech theatre is a solo endeavour– you will always be working with others, asking others for feedback, or working with others’ ideas. These skills are a must!
You’ll discover greater confidence with all things theatre. Once you’ve worked backstage and you understand the theatrical process better, working on stage feels surprisingly different. The greater understanding of the art and craft can do wonders for your sense of confidence, and for banishing the dreaded imposter syndrome.
You test your time management skills. If you’ve been tasked with building a prop, designing a set, or doing some other independent task, you’ll have to plan accordingly to ensure your work can be completed before any deadlines set for you. Learning to manage your time well is a must!
You can make some friends in high places. I have found that taking positions as a stage manager, ASM, or volunteer scenic technician can be valuable for meeting new directors and tech directors. These people can then help get you more opportunities going forward. Who you know is definitely important!
You’ll appear more dependable. Showing up at set builds and working hard is a great way to show a production staff your work ethic. People will notice!
You learn to think in different ways. Working with new people and learning new skills forces your brain to discover new patterns of thinking.
You’ll understand how to interact with techs better. Being a technician and working backstage can be humbling. Many actors can be quite rude to techs! Working as one can teach you a lot about how to treat others, and the impression you make by interacting with techs positively and helpfully can help open doors for you.
You get to participate in theatre with less of a time commitment. Okay, this one is admittedly very situational depending on the tech position. Many theatre tech positions do not spend nearly as much time working on a production as actors do. Instead of attending weeks or months of rehearsal, many techs will only participate in a fraction of the process. If you enjoy theatre but don’t have the time to commit to a whole production, tech may be a great option for you!
You learn to be inventive. I have a friend who calls theatre tech work “making gold out of trash.” You’ll often find yourself working with odd materials, on a low budget, with minimal assistance– the process can be very freeing, and a little crazy in the best way.
You may find the experience useful to include on a professional resume. As I’ve said before, theatre tech is a great opportunity to learn both hard and soft skills. Listing your tech experience on a professional resume can help you resume stand out– unusual skills can provide interesting discussion in an interview! When I told a hiring manager at a retail chain that I had learned how to weld, we had a spirited conversation about it because it turned out she was also a welder… I ended up getting the job.
You’ll have fun! Tech is hard work, but
What reasons have you found to enjoy technical theatre work? I would love to hear about peoples’ experiences in the comments!
What if I told you every high school theatre kid likely has access to an excellent training ground where they can grow their performing abilities, learn important music skills, and get valuable practice with performing, all for free?
School choir is a stellar opportunity for growth that all high school theatre kids should take advantage of! Here are five ways joining school choir will make you a better, more accomplished performer.
1. You learn to read music better
Being able to read music is an extremely valuable skill for musical theatre actors. Reading music helps you learn it faster and understand it better. This means easier music rehearsals and easier audition prep!
Whether you have no experience reading music or are a sight-reading expert, practice will always be necessary to keep your skills sharp, and the more practice the better! You’ll have plenty of friends and a choir director to assist you if you get confused. Since you most likely won’t have to learn any blocking or choreography (unless you’re in a show choir), choir is an opportunity to focus on the music. You’ll be able to digest complicated pieces without having to worry about anything else.
I know a lot of performers who wish they could read music better. It’s a useful skill, and school is the perfect place to learn it!
2. You learn more about your voice… For free
Voice lessons can be expensive and therefore aren’t accessible to everyone. School choirs, on the other hand, are usually free, unless they require concert attire purchases or entrance fees for music and other materials. If there is a price for participating in school choir, the value in return for those dollars is likely pretty high– whereas voice lessons will typically be $20-$30 per lesson minimum, a daily choir class for 180 days of school that requires a one-time concert outfit purchase would probably amount to less than a dollar per session.
Of course, the one-on-one training in voice lessons is indispensable, but working with a good choir director and learning all you can about singing and your voice within that setting is a fantastic alternative. If you have specific questions or want specific help, your choir teacher should be able to help you out.
Choir settings are specifically useful to beginner singers because choir singing can explore a variety of styles and musical concepts while emphasizing principles of vocal technique. Choir is the first place many young performers learn about breath support, posture, and the vocal process, and is therefore a great place to begin training. More advanced choirs and more difficult repertoire can provide advanced singers with adequate challenge to improve as well.
3. You get more practice singing and performing
All practice is good practice! It’s generally true that if you want to become a better singer or performer, then any extra singing or performing you do is probably beneficial in that regard.
Live performance opportunities are extremely worthwhile for performers. The more you perform in front of an audience, the better you learn to deal with stage fright and focus. Practicing singing in a group is also incredibly valuable, as it requires some different skills than singing alone does– group singing is all about listening and balancing with the individual performers around you.
One of the benefits to choir participation I found when I was in school was that each choir rehearsal was essentially a mandatory daily warmup. My voice was in great shape when I was in choir– I never had a real chance to get “rusty!”
4. You train your ear with complicated harmonies
Learning to sing with others is a challenging skill. Learning different voice parts can be really difficult, and some musical theatre composers are notoriously challenging in this regard.
Choir music is written in often intricate patterns of rhythm and harmony. If you can hold your own singing in a choir, you’ll build skills that will allow you to hold your own while performing shows by tricky composers like Sondheim. And again, since choir is about the music first rather than blocking or choreography, you have the opportunity to really focus on building the skills you need to tackle any complex voicing in a musical.
5. You might not get this chance again
There really aren’t that many opportunities to sing in a choir once you get out of school.
Church choirs can be found in almost any town, so this is an accessible option if you attend church. Many cities have various choral societies, but these are often by audition, and your participation isn’t guaranteed. Almost every school has a choir, and school choirs are some of the most accessible choirs you’ll ever come across.
I don’t particularly miss much about high school, but getting to sing with a choir is definitely something I wish I could revisit as an adult.
Take advantage of this opportunity while you have it!
Even adults struggle with the trials of casting. For most people, auditions are a huge source of anxiety, and of course they are: auditions are a bit like a job interview, except you’re expected to sing and dance in front of the hiring manager.
Not getting the part you want can be absolutely crushing. It’s hard not to take rejection in acting personally, because acting is such a personal activity. You stand on stage and do things the way you think you should, in your body, using your voice. You’re out on a limb! But the nature of theatre is that not everyone can get the part they want. After all, there are only so many parts, and casting is often a wildly unpredictable endeavor. Being passed over for a role you worked hard for or really wanted can feel like a deep betrayal.
Understandably, this is hard for young actors to deal with. It’s not uncommon for young kids to be cast in an ensemble role, quit the show, and never perform again as a result. This is a really unhappy outcome.
Even if they don’t get the part they want, they’re still getting a great opportunity.
Even if they’re only in the ensemble, they’re still going to have a good time.
And they have the chance to learn an extremely valuable lesson.
No matter what, auditioning alone is a rewarding process. The thing is, actors can’t savor those rewards if they think every casting process was rigged or unfair.
In fact, learning to take rejection gracefully is one of the more valuable lessons theatre can teach. If your kid is interested in acting, they will have to learn to take rejection… and they’ll also need that skill for when they’re applying to jobs and colleges, beginning to date, and navigating the challenges of adulthood.
Discovering how to take rejection– maybe even what your child interprets as a failure— as a fact of life, and possibly even a learning opportunity, is an important part of becoming a successful adult.
Parental guidance can have a big impact on how productive casting decisions are. You can remind your child that they haven’t failed, and that just auditioning was a brave thing to do. You can remind them that casting is a complicated process, and that sometimes we just can’t control whether or not we get the things we want. We can try our best to improve our skills and be the best people we can be– we can’t change anyone else, though.
If you’re like me, these are lessons you’re still learning in adulthood. It may not feel like it at first, but what a gift to begin to understand these ideas early in life! Navigating them now can reduce a lot of heartache later.
Encouraging your child to stick with the show builds commitment. It will likely teach them that something that seems like a bummer at first can turn out to be a great opportunity– a door closes, a window opens. But it’s not just about accepting the role and muddling through the show. Entering the show with a negative attitude is possibly even worse than quitting. Kids won’t learn that way, and they won’t have fun. Worse, the production staff is likely to see the negativity, which can be more damaging in the long run. This is a good time for children to learn that integrity, mindset, and reputation are important.
And if your child has a genuine interest in performing, then any performing opportunity is a useful one. Child actors tend to balk at being “only ensemble,” but the ensemble is an amazing learning opportunity for young actors. Ensemble actors are often some of the busiest in a production. They typically play multiple roles in a production, meaning actors have to juggle many different scenes, roles, and costume changes. They’ll have to learn a lot of music and choreography. Further, ensemble roles have the benefit of being open for any interpretation. “Townsperson” is not just an inactive person on stage, they are a living, breathing part of the show’s universe– and they have to be acted as such! For creative kids, this is an amazing outlet. Kids can develop entire backstories and personalities for their ensembles roles and act them as appropriate. Not only does this flex creative muscles, it also builds up acting skills, arguably even more so than a “bigger” part. It requires them to think outside the box and portray an entirely new character in entirely their own way.
When your kid is cast in an ensemble role, stress that this is a good opportunity and a very important task. Explain how it can be creative and help your child develop a character all their own. Make sure they know that this is a fantastic opportunity to learn new acting skills!
What if your child auditions and just doesn’t like their part? Maybe they wanted to be Belle, but ended up being Mrs. Potts instead. When this happens, you have to stress the importance of the entire cast. Every character is important, and every character can still be fun. It’s important to note that many kids don’t realize the size of their part when they’re cast. Almost every little girl wants to play Ariel in The Little Mermaid, but Flounder, Sebastian, and the Mersisters get to sing songs that are way more fun than Ariel’s anyway, like “She’s in Love” and “Under the Sea.” Often, a kid just needs time to grow into the role, and will find they enjoy it later.
Many of my adult actor friends say “side characters” are their favorite roles to play– you get your own moments to shine, but it’s also a lot less pressure to perform, and easier to learn. It’s the best of both worlds!
I think it’s important to also note that directors value their entire cast. When even one actor quits, it can really shake up a director’s plans. Getting cast as a role you didn’t want can be hurtful, but quitting as a result hurts everyone else! Many directors are wary to cast actors who are known to quit in these situations, as it can make the actor seem unreliable. Quitting can have negative repercussions for years to come.
The bottom line is that your child will almost undoubtedly end up enjoying the experience of the show. Encourage them to stick with it, and they’ll be glad they did! It is very important you not let your child quit when they don’t like their part! This sends a really strong message about work ethic. You can’t always quit your job or your classes just because you don’t like them. You shouldn’t always quit your hobbies as soon as they become difficult or frustrating. Although there’s a lot of value in letting kids have agency and make choices, parents guiding their children through this decision can be instrumental for helping kids grow. Quitting sends the message that some roles are unimportant and that kids can back out of things they’ve committed to, and it will hurt the rest of the cast. Help them see the value in sticking it out. They’ll thank you eventually!
I wanted to try something a little lighter and sillier for a change– I thought it might be fun to start sharing some stories from past performances. I certainly have a wealth of them.
One of my favorites from high school is from my sophomore year. I was playing a character who wore a big, oversized robe, with long sleeves that dragged almost to the floor. The robe was heavy and made of thick, bulky fabric.
The Thursday before our Friday opening night at our school was always our “preview night,” a a night with limited attendance, reserved for school faculty, production volunteers, and the actors and staff of our district’s middle school drama department. It was always an exciting night– the promise of getting to show off in front of our favorite teachers and next year’s freshmen was especially thrilling to our teenage sensibilities.
And this preview night was going great! I was feeling confident and in my element. The whole cast was having a blast.
In one scene, an actor came on stage holding a hat she had worn in the first scene. (The hat also had some fake hair extensions hidden in it– the character was supposed to “cut her hair” between scenes.) During the course of the scene, I would pass this actor a silver platter, and she would take both the hat and the platter offstage with her. This would leave my hands free to perform my big solo to close the scene.
On this night, I hand the actor the platter. After doing this, I’m blocked to turn to another actor, who was standing on my other side. I do so, and I feel an odd tugging on my sleeve. I pull my arm away, and I notice the actor I’m now talking to has a funny look on her face. But I am an *actor*, and I am in the zone, and I do not break character! My character admonishes both of the others, and they exit.
Then it’s time for my solo. It’s fabulous! The audience is hanging on my every word! The energy is magnificent. They’re laughing at all the right moments, and when I finish the song, I get wild laughter and applause. I turn to walk off the stage, and there is a cluster of faces visible in the wing, staring at me.
Funny.
I get backstage, and before I can ask what’s going on, the actor who had given me the funny look earlier grabbed my sleeve and lifted it up.
Attached to the bottom, swinging from pins covered in fake hair extensions, is the first actor’s hat, complete with locks of fake hair. When I had passed her the silver platter, the hat had become attached to my sleeve. She’d tried to grab it back, but didn’t want to ruin the flow of the scene (we were in high school, after all, and running on a heady combination of adrenaline, stage fright, and sugar), so she left it. The other actor, too, hadn’t known exactly how to approach the elephant in the room, and so they both left… and left me to sing my entire solo, wildly swinging around the hairy hat attached to my costume.
Well, the audience loved it. And the middle school show’s staff told me they used it as a teaching moment to illustrate the importance of staying in character even when you have a prop or costume mishap. Which… yes, I absolutely knew the hat was there the whole time, and uh… it was absolutely intentional on my part that I didn’t remove it, and it’s definitely a testament to my superior focus as an actor. Yes… for sure, go with that!
My senior year of high school, I was cast as the Witch in Into the Woods. School theatre was my entire life, so I was stoked all through the rehearsal process. Inevitably, though, as we got closer and closer to tech week, I found my boundless, passionate energy beginning to flag. I felt run-down, fatigued, and eventually sick. My voice started to get scratchy, and then started failing altogether. After wrapping the show one night, I found I could barely speak.
This situation is obviously not ideal, and for a number of reasons– I was at risk of serious vocal injury and definitely in need of a good rest. Unfortunately, the nature of performing school or community theatre is that you sometimes don’t have that option.
Vocal strain and fatigue should be taken seriously, as should illness. Your vocal folds are delicate muscles, and pushing through injury and sickness can cause more serious and lasting problems. That said, if you don’t have the option of taking a break just yet, there are things you can do to keep yourself in as healthy shape as possible.
I ended up performing all four of my shows as the Witch without any significant issues. Here are some tips.
Please note that I am not a doctor and this is not medical advice. I am not a voice expert. I am merely a performer speaking from my own experiences. The following are my own opinions.
1. Seriously, take a break if you can
Before you read on, I’m going to double down on the riskiness of “just pushing through.” Hear me out: your voice is a part of you, and injury can potentially cause lifelong vocal problems. Unfortunately, a stressful tech week can be the “perfect storm” of conditions that make injury likely. Plain overuse over a single week isn’t necessarily that likely to lead to a lasting vocal disorder, but overuse isn’t the only factor contributing to vocal strain issues. Tech week likely involves long hours of using the voice, possibly coupled with illness or allergies, or poor air quality inside old, dusty theaters; it probably includes eating less-than-healthy meals and drinking caffeinated beverages that might cause acid reflux; it almost certainly presents a number of miscellaneous stressors that can lead to excessive muscular tension and all the associated complications. These many factors combine and create a situation where serious medical issues associated with the voice may develop.
It’s really worth assessing the options you have. Does your production have an understudy you can rely on– even if only for a single show to allow you some time to recover?
If there isn’t an understudy available to cover for you, I would recommend searching for a certified laryngologist in your area and getting your situation assessed. It may be worth specifically searching for one with experience working with singers and performers.
2. Consider seeing a doctor
A specialized throat doctor called a Laryngologist will be able to tell you how serious any vocal problems you may be experiencing actually are, and can provide suggestions for how to best move forward. If you are genuinely concerned about your voice, this is the best way to know your concerns will be adequately addressed.
If the doctor assesses your situation and finds that it’s not safe to continue performing at this time, they will be able to write a note to any teachers/professors/show staff who may want written record of your condition.
If you are feeling sick (don’t we all inevitably get that terrifying cold halfway through tech week?), you may want to see a doctor to treat that sickness, or take OTC medications as directed. Keeping your immune system in good shape is important, as sickness can make any inflammation, pain, or fatigue you’re experiencing feel worse.
3. Use vocal rest periods to reduce fatigue
Think of your vocal capabilities over the course of the day like a glass of water. There is only so much water in the glass: you’ll want to save some for when you really need it.
When your voice is strained, even speaking can be additional stress for overworked muscles. Periods of vocal rest, where you don’t speak at all, can be very helpful for allowing the voice time to recover. Obviously, this can be hard to achieve, especially if you have a job that requires speaking or are a student who has to attend school during the day, but even staying silent for an hour or two at a time is better than nothing. When you’re not vocal resting, be sure to use your voice mindfully and carefully.
I’ve written another article about vocal rest that goes into further detail. You can read it here.
And if you find the idea of being quiet for hours at a time daunting, I have an article with tips for getting through it here!
Vocal phonation occurs when the vocal folds vibrate together, and those vocal folds are covered in mucosal membranes. Keeping those mucous membranes hydrated is key for easy production of sound.
5. Get plenty of rest
Sleep is a critical bodily function! Sleep is especially important for maintaining and recovering good health. If you’re not feeling your best, rest is absolutely crucial.
Sleep can be hard to get during tech week. If you’re feeling sick, don’t feel guilty about calling out of work or school to get some much-needed extra sleep. If your cast usually goes out after shows, consider skipping this and putting yourself right to bed instead.
6. Use pain relievers mindfully
Remember that treating the pain of a sore throat is not the same as curing it. Taking pain medication (or using a more natural method of pain relief, such as hot tea) will temporarily lessen the pain, but it won’t resolve the underlying issue itself… and resolving that underlying issue is key!
At worst, taking pain relievers can be counterproductive for healing. They can make you think you’re feeling better, so you go on stage and belt your face off, only to feel much worse later that night. Absolutely take medications or your preferred natural remedies as needed– but don’t let the temporary relief lull you into a false sense of security!
7. Communicate with show staff
This one is last because it is MOST IMPORTANT!
Communication is always key in an art form as collaborative as theatre. If you are feeling sick or strained, you must mention this to your stage manager and/or director, music director, voice coaches, or any other relevant staff. This is important for multiple reasons.
First, if you’re feeling sick in rehearsal, it’s a good idea to take it easy so you don’t hurt or exhaust yourself. If you do this, you must communicate with staff. Staff will always understand if you say, “hey, I need to dial it back tonight, my throat is killing me.” If you don’t say anything, they might mistake your gentle choices for lack of effort or care.
Second, it’s just never good to surprise your staff. People both on and offstage depend on audible cue lines. Sound balancing will be shaped around your work in rehearsals. Failing to communicate can lead to unnecessary confusion and frustration.
It also lets your staff know how you’re doing. If you’re feeling so sick that you’re worried you might not make it to the end of the weekend’s performances, your staff needs to know that. They may be able to make plans to help support you, or may even have to make plans to replace you in case of emergency.
The bottom line is that communication is a MUST– even when everyone is feeling healthy!
Final Thoughts
There’s no shame in getting sick or feeling strained during a busy production process, but taking care of yourself to prevent further problems is absolutely necessary. You, and your entire production, will be in much worse shape if your situation goes from bad (a sore, fatigued throat) to really bad (being unable to speak or sing at all) to catastrophe (medical emergency or persistent issues stemming from misuse).
If you don’t do anything else on this list, the most important thing is that you communicate. Always keep your production staff un the loop. You’ll feel better if you make feeling better a priority!