technical theatre, Theatre

Costuming a Cadre of Creatures for “She Kills Monsters”

I made my directorial debut for community theatre doing Qui Nguyen’s She Kills Monsters. This is my absolute favorite play, I had long been hoping to put it on one day. When I finally got the opportunity, I was absolutely thrilled– and startled by the sheer amount of work this meant I needed to start on, pronto!

She Kills Monsters is about two sisters getting to know each other (with a twist) through playing Dungeons and Dragons. Like many of Qui Nguyen’s plays, this one is action-packed, full of fighting and off-color humor. The main character, Agnes, and the rest of her party fight against swarms of classic D&D baddies. Creating these monsters can be a real challenge.

Since the show is so popular, I thought others might find it helpful to hear about my process!

First Trial

Initially, I wasn’t sure how exactly I would pull off these monsters… but I’ve always been a crafty person, and I started making plans for my monsters early on (before I even officially knew I’d be directing the show!).

Discovering Wintercroft LLC marked the moment that I knew I could put this show on, even if I didn’t have a dedicated costumer.

Wintercroft designs papercraft templates for masks, jewelry, and home decor. Their masks are really remarkable. The templates are mostly quite easy to assemble (the site provides a difficulty rating and crafting time estimation for each mask– some are harder than others), and very cost effective. The templates generally sell for under $10, and once you own the template, you can print it as many times as desired. The masks themselves are constructed out of thin cardboard (think cereal box material) and glue.

Instead of buying Halloween monster masks at $10-30 bucks a piece (or more), you could hypothetically craft a whole group of monsters for no more than $15 (one template printed multiple times, made with some cereal boxes you scavenged from your pantry, and add the price of some glue sticks).

To test out the process, I decided to use Wintercroft’s Dragon V2 mask as a trial. The process was a lot of fun, and turned out looking pretty good. My mistakes with this first test were using cardstock instead of thin cardboard, and opting for the “untabbed” construction method (explained in the template files), which both created a much floppier final product than I was hoping for.

(My first trial went pretty well, and looked pretty cool, but I had hopes that switching up my method would have even better results.)

So, I went back in for a second test-run, this time using cardboard and trying the “tabbed” construction method.

The basic process, in a nutshell: You print the templates on paper, cut them out, glue them to the cardboard, cut those out, and fold all the pieces on the dotted or dashed lines as appropriate (the templates explain all this, too). Then you use the matching numbers on the edges of the pieces to put the whole thing together, like a puzzle, gluing as you go.

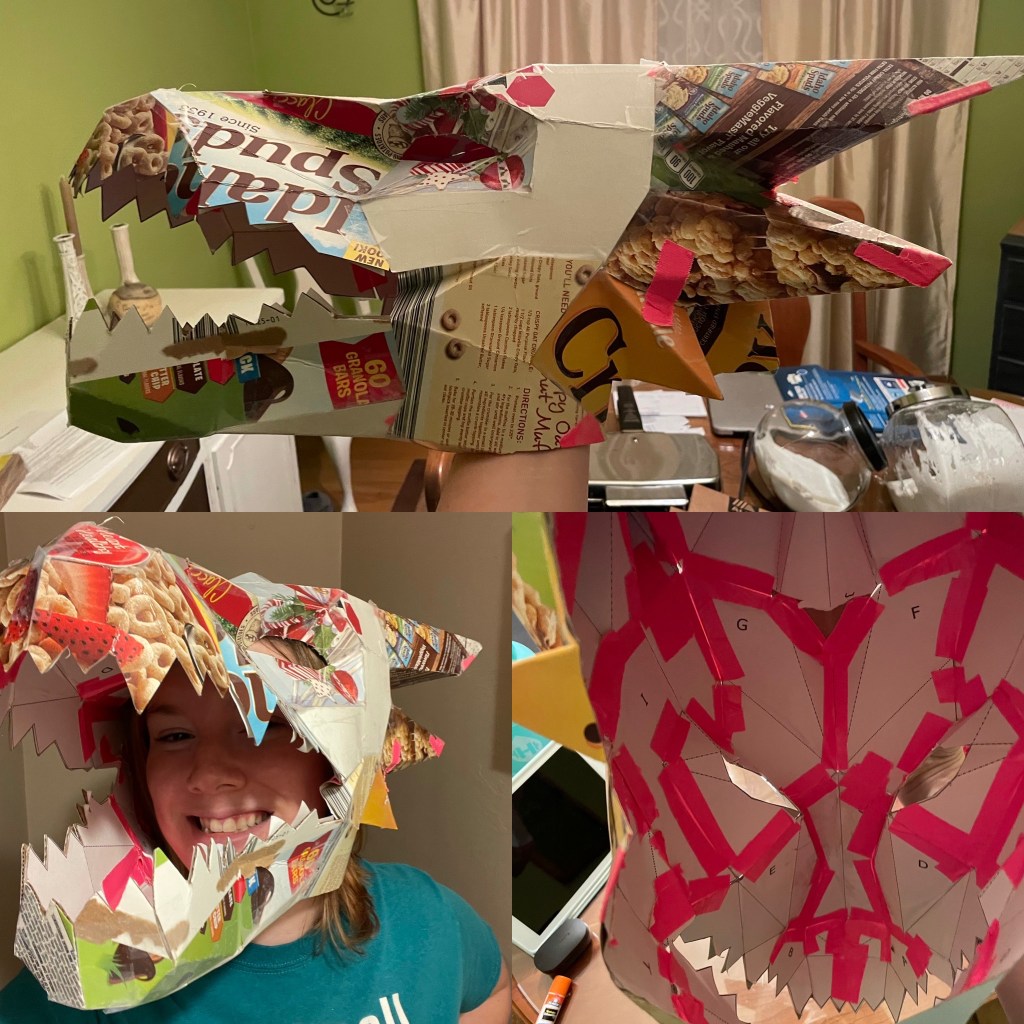
(Some pictures of my second attempt. I used card for this one and had some help from duct tape. Bottom right shows you what the inside of the templates look like– there’s tape over the numbers that show you what piece goes where, but as you can see, the pieces are also lettered.)

This version was a lot sturdier, but I was still a bit unsure of how this would hold up for performance, especially during fight scenes or in the dark backstage. I had horrible visions of someone dropping their mask and stepping on it in a rush.

In searching for solutions, I found this video from Ultimate Paper Mache, explaining the process for super sturdy, quick-drying paper mache using brown paper bags and a specific brand of wood glue. It seemed like exactly what I needed! I’d never done paper mache, but the process seemed really simple (and fun), so I decided to give it a try.

I invested in some wood glue, ripped up some paper bags, and got to work. The process was easy, I just did exactly what the video said– the most time-consuming part was just waiting for the paper mache to dry. I found it seemed the most sturdy after about 24 hours of drying. Materials-wise, I found heavy paper bags (think grocery bags or food delivery bags, like you get from Chipotle or McDonald’s) to be better than paper lunch bags.

One coat of paper mache was pretty solid, but I decided to try doing more to see how sturdy it could get. I did a test with one coat of paper mache on the interior of the mask and two coats on the exterior, and the result was SO sturdy that these masks felt borderline indestructible. For good measure, I sealed everything in with a clear coat of mod podge.

With these tests done, I figured Wintercroft was a really good option for my monster needs. I sent the company an email to ask if it was okay to use their masks in a theatre production, and they gave me the go-ahead! On to phase two…

Plans, Designs, and Further Tests

I started searching for Wintercroft templates that I could use to create the various monsters for the show. Of course, Wintercroft didn’t really have the specific creatures I was looking for, but I was excited about the prospect of using additional cardboard, paper, and mixed media details to really make the templates my own. Using Procreate on my iPad, I started drawing up some plans.

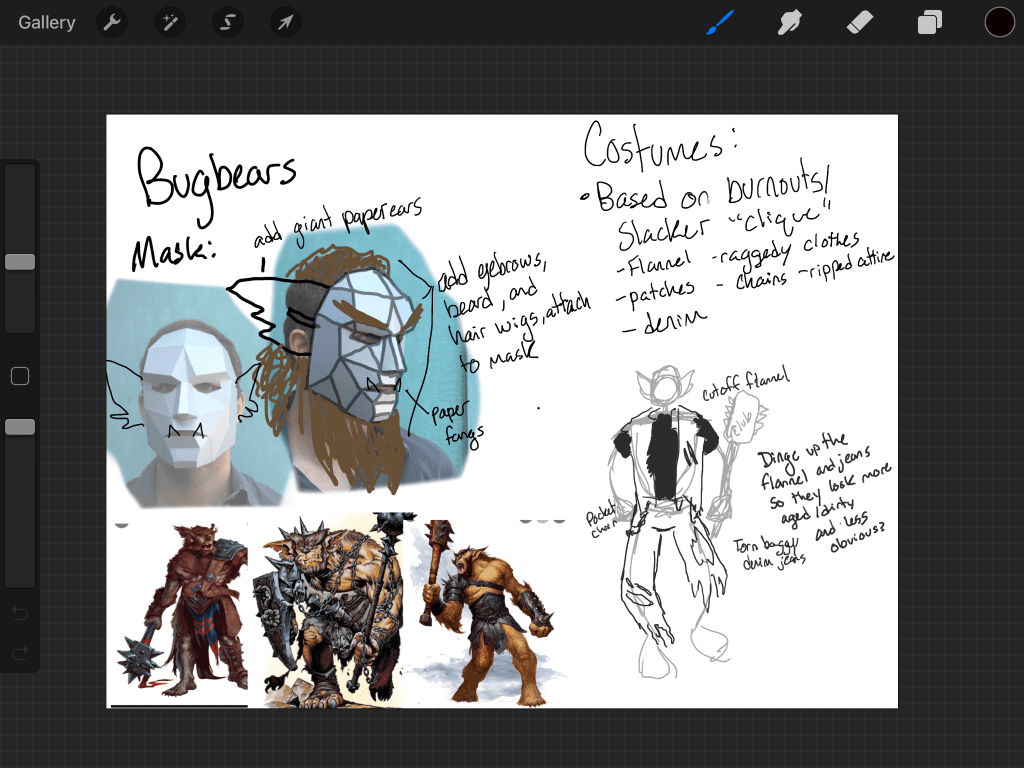
(As a sample, this was the plan for the Bugbears, which ended up being my favorite monsters! I ended up simplifying/changing quite a few elements from this first design, but those mask add-ons are exactly how the final product turned out.)

I decided to try out the process of modifying the masks, so I got started on some Bugbears.

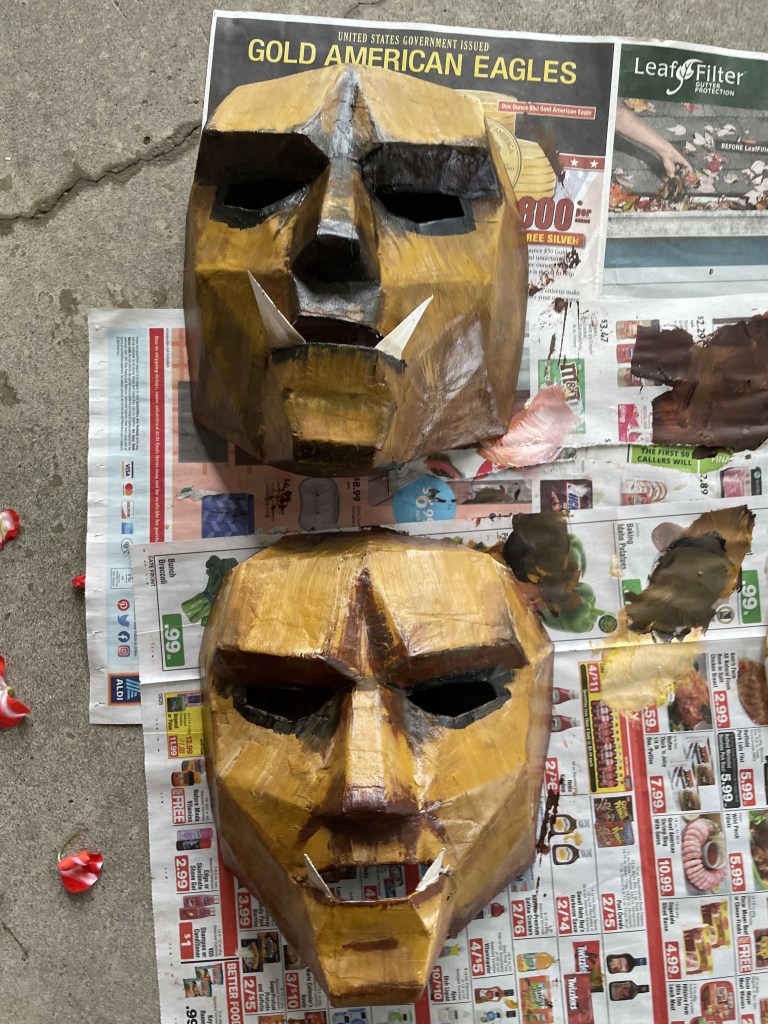
I repeated the same process I did with my test dragon. I made the masks, covered them in paper mache, and sealed everything with mod podge. Then I painted them, sealed the paint with more mod podge, and got started adding some additional details. The teeth were as simple as cutting triangles out of extra cardboard and glueing them into the mouths. I decided to make the ears out of EVA foam (not really sure why when cardboard would’ve worked just as well… but that was also as easy as cutting out shapes and painting them, for the most part).

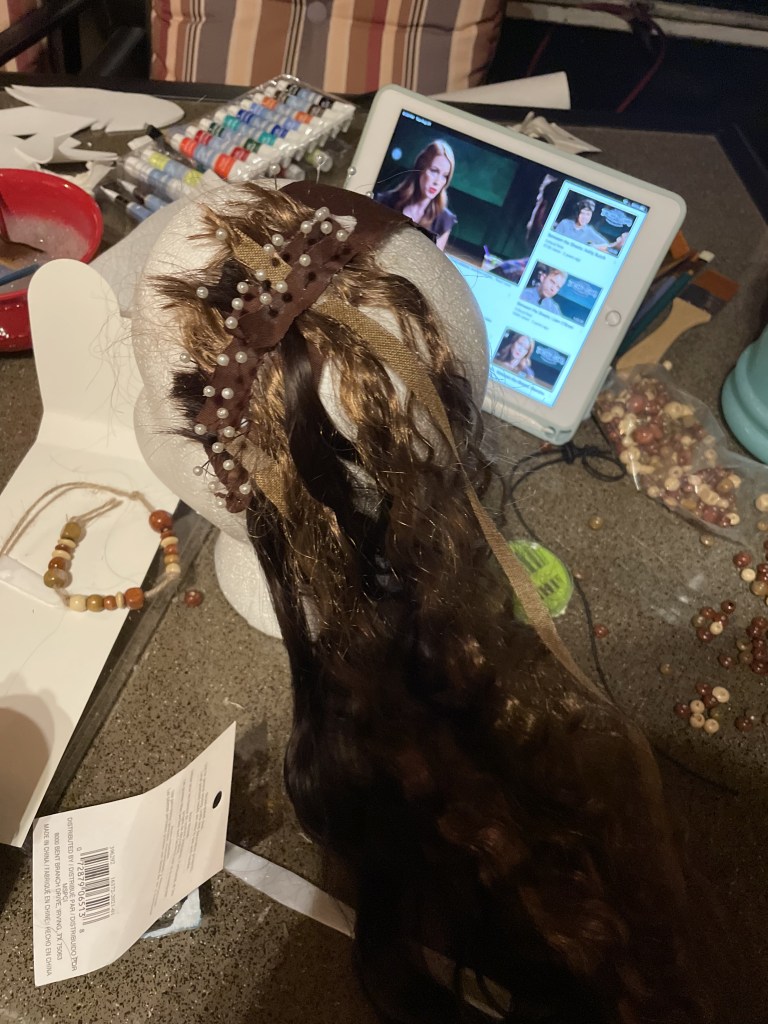
I decided to get a little more ambitious with the hair pieces. I bought a number of crappy “ponytail extensions” on Wish, all slightly different textures and colors. I handmade a wig for the mask by cutting locks of hair off these extension and gluing these individually to a strip of fabric. I alternated different styles and colors of hair to make the wigs more “wild” and unkempt looking. I also added some lengths of twine (and put some beads on some of these, just for fun) and some strips of different fabrics, to help break up the texture. I liberally applied more glue over all of this and put another piece of fabric down over the top, so I had a sort of hair-fabric sandwich– then, once this was dry, I attached it to the top part of the mask using velcro pieces. I wanted the wigs to be removable, just in case. I repeated this process but with shorter pieces to create beards.

(Miscellaneous process photos of my Bugbears. These were SO FUN. The wigs took a stupid long time, but it feel like the final result was so worth it.)

These turned out pretty much exactly how I’d pictured them, so I was confident that my plans were going to work out. Now I just had to make a whole lot more.

Lots and Lots and Lots of Mask-Making

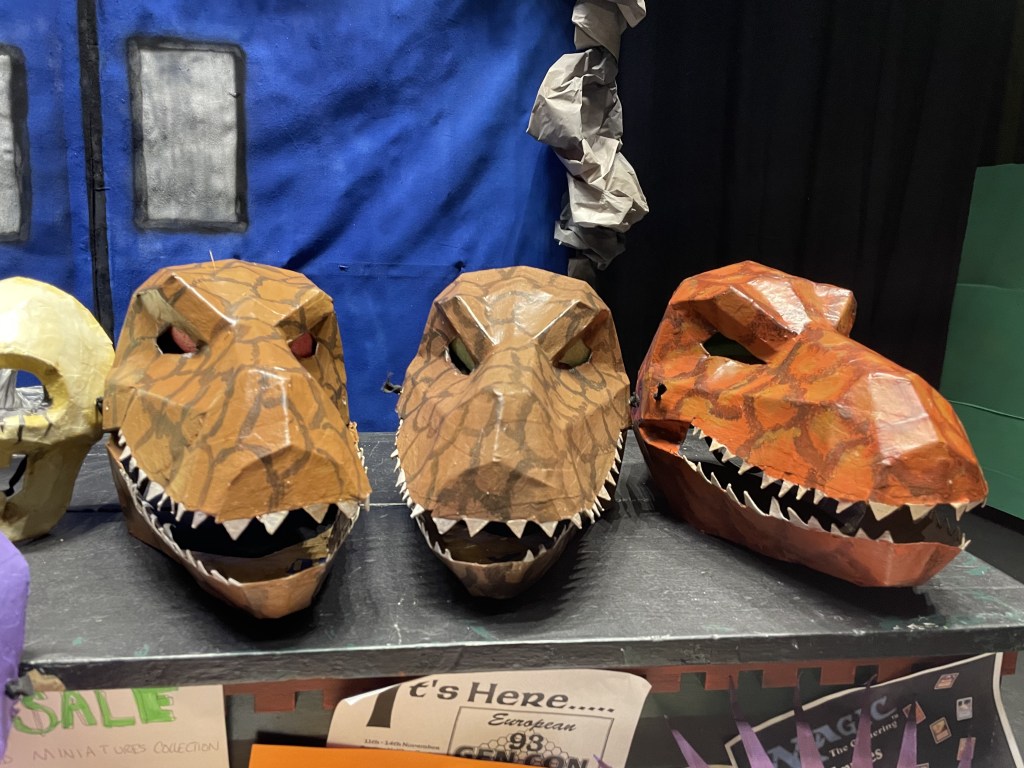
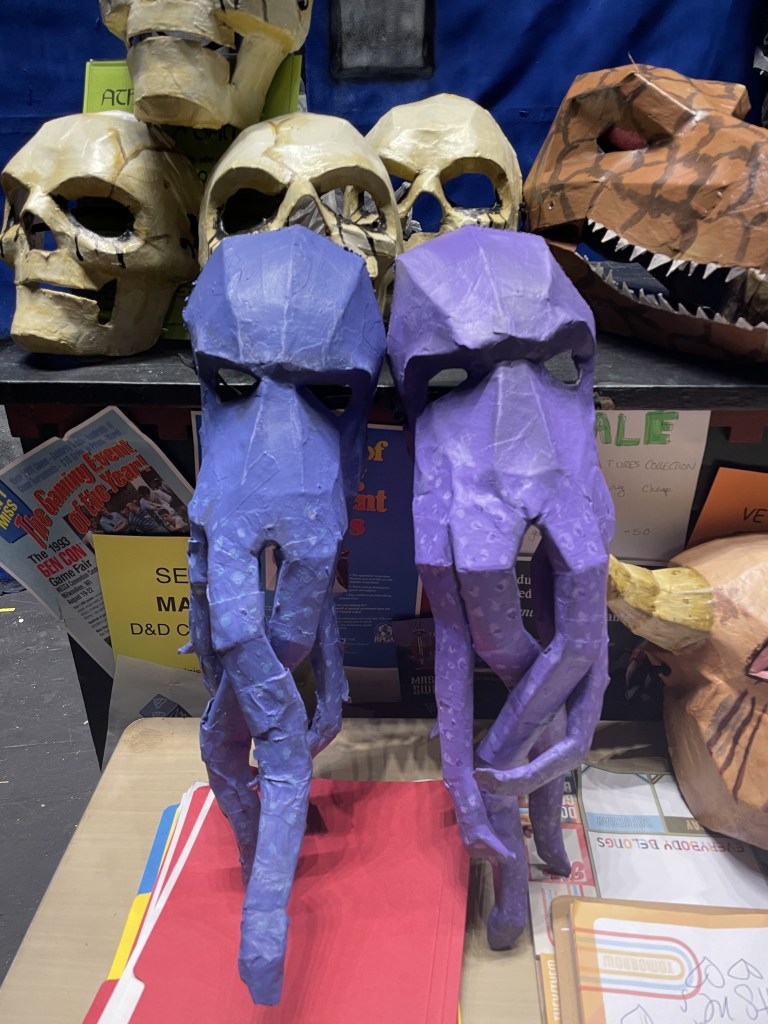
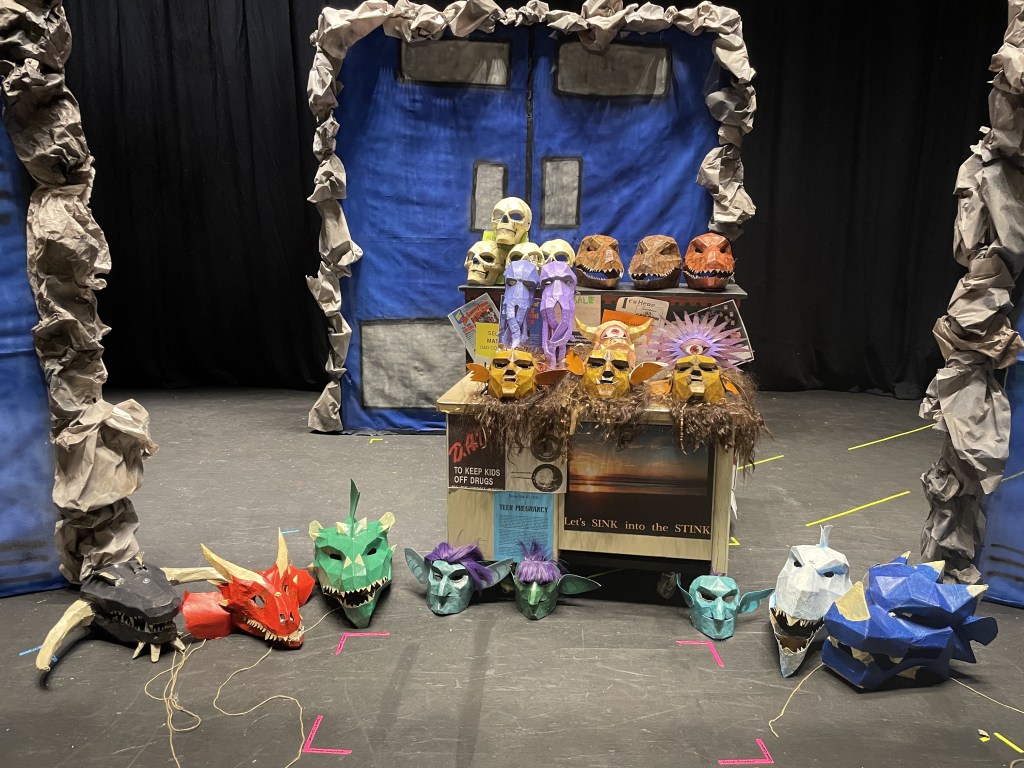
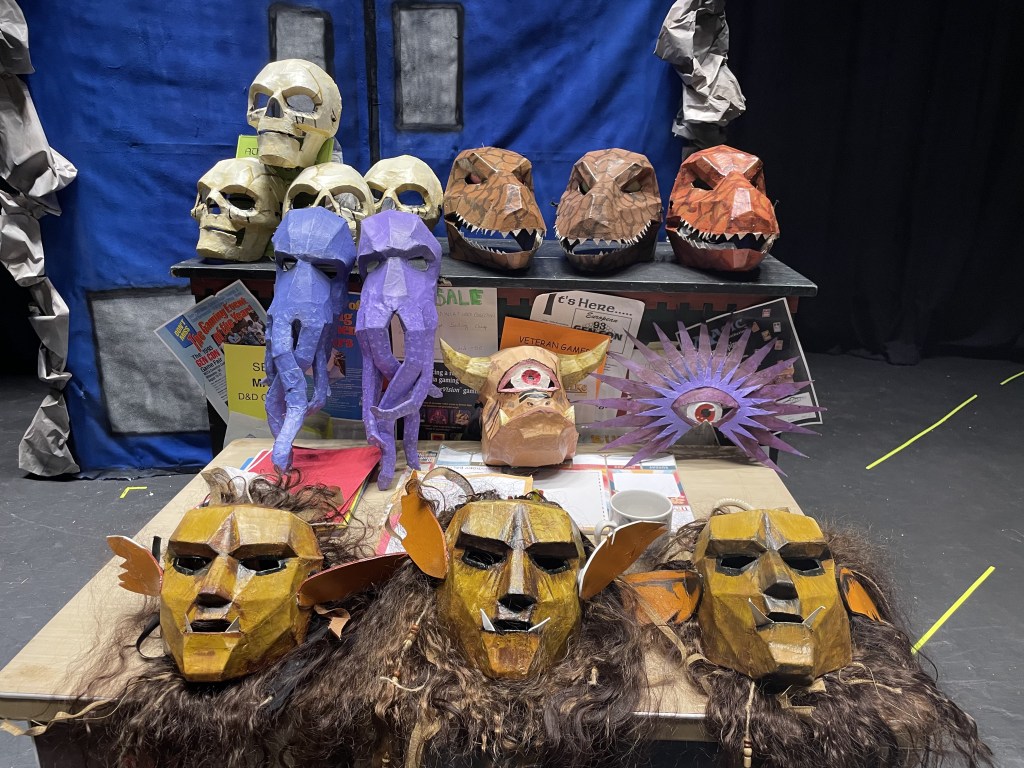
I finished my planning/designing process and tallied up my monster count: 3 goblins, 3 kobolds, 3 bugbears, 4 liches, 2 mindflayers, a cyclops, and a beholder. I also needed 5 dragon heads for Tiamat (which will be its own post in the future). This was a total of 22 Wintercroft masks. Wintercroft’s website suggests that their masks take somewhere between and hour (for easy masks) to 8+ hours (for hard masks) to build… and that was just to build the mask itself, leaving aside time to paper mache, paint, and adapt the masks to suit my needs. AND that also didn’t account for the rest of the monster’s costumes: the mask was only supposed to be one part of the whole outfit!

Mask-making became a pastime not just for me, but for my whole family, and on a few occasions for some of my co-workers, too. The process of cutting the templates out, gluing them to cardboard, and then cutting the cardboard pieces was so simple that anyone could do it. I was lucky to have a number of helping hands for this step.

The actual assembling of the masks was time-consuming and lot more complicated, so I primarily did this myself. (I had some help to finish assembling the last 2 or 3 at a set build during the rehearsal process– big thanks to my volunteers!) This step took me about a year. My bugbear tests were in September 2021, and I continued to work on masks until the month of the show, November 2022. To be fair, a lot of the construction happened after summer 2022 and was crammed into those few final months, so it’s not like I was crafting nonstop for 14 months.

Some tips and tricks for working on Wintercroft templates I picked up during this time:

  • If you’re making a lot of creatures, be prepared to gather a LOT of card. You can scavenge this from a LOT of food and household products. Cereal boxes, frozen pizza boxes, tissue boxes— anything along those lines. You want the boxes to be in good shape (not crumpled up/folded). I explained to my coworkers what kind of cardboard I was looking for and asked them to save theirs for me— I ended up with a ton! 
  • I said above that the “card” the templates call for is NOT the same as cardstock. Cardstock could possibly be used for some small details, though— just not for big, structural shapes. If you’re really struggling to collect enough card, you could possibly experiment with this.
  • I found wood glue to be a really good adhesive when glueing the pieces together. It dries fast and solid. You only need a tiny bit. Use less glue than you think you need, and use your finger to smear it flat on the tabs, so it doesn’t take so long to dry. Glue sticks also work, but maybe not as well.
  • You have to hold the pieces together while they dry. I found paperclips and chip clips really useful for this— you could glue a piece, throw a chip clip or paper clip onto the spot you’re trying to get to stick together, and set that aside for a minute to dry while you worked on a different piece. 
  • I found a combo of glue and tape to be useful— the tape helped to keep the pieces solid while the glue was still drying down. When I started getting really impatient, I tried to use a stapler when sticking pieces together. I feel like glue and tape/staples together work better than just staples or just tape. I wouldn’t use staples on a mask that has to fit close to the face, though, for fear of someone getting scratched or poked!
  • In general though, a lot of the mask-making process is just waiting for glue to dry. Podcasts and 8-hour YouTube videos were my best friends during all-nighter crafting sessions.
  • These templates are very adaptable! You can modify elements of the templates, or Frankenstein some together in some interesting ways. You can also get creative with mixed-media experiments to create some really cool results, like I did with my bugbears. Don’t be afraid to experiment and work with your own ideas. Even a good coat of paint can totally change the vibe of a mask.

Here are some photos of all of my finished Wintercroft monsters:

Here are links to each of the templates used:

This was a boatload of work. I can’t say I regret it– I did have fun assembling all these! If I were to do it all again, I would finish more of the construction in advance (cramming most of the work into the last few months before the show was a bad call, lol) and probably enlist some more help.

Garments and Final Touches

Masks were not the extent of my monster plan. Unfortunately, they were much more time consuming than I was expecting them to be, so I SORT OF ran out of time for the rest of the costumes.

My plans for the rest of the monster costumes weren’t elaborate, anyway. Many of my monsters would need to make some pretty quick changes (I planned my cast so Evil Gabbi and Evil Tina played 5 different creatures each through the course of the show), so I wanted to go pretty basic, anyway. I simplified my original plan so that, generally speaking, each monster costume was a mask plus one or two other garments at most. The “base” for each monster costume was a plain black shirt and black pants so that other elements could be added on top.

Since Tilly draws on her high-school trials and tribulations to create her adventure (the Succubi are her cheerleader nemeses, and her guidance counselor appears as a Beholder), I decided to lean into this and make give each group of monsters a classic teenager archetype. As it happens, I work at an escape room that was getting rid of a locker room themed game, so I scored a number of sports jerseys that they were going to throw out. Pretty much every other garment we used came from either Goodwill or clearance Halloween stores. We got a few finishing touches from Amazon.

The kobolds, pack-hunter lizard folk generally considered to have less-than-average intelligence, were a perfect fit for the “jock” stereotype. I cut apart the football jerseys I got from the escape room so that they resembled basketball jersey-tanks. The kobolds also got sweatbands for their wrists. Since I had the football jerseys, I decided to make my cyclops into a football player– it seemed appropriate, since I planned on making the cyclops the “big boss” of the fight montage at the end of scene 5.

The big, hairy bugbears were grungy burnouts, a la Judd Nelson in The Breakfast Club. They got some flannel shirts from Goodwill. The skull-faced liches made perfect goths– long black cloaks for them. We made the goblins punk-rockers and gave them each a denim vest.

All the garments got some artificial aging with the help of some sandpaper and spray paint.

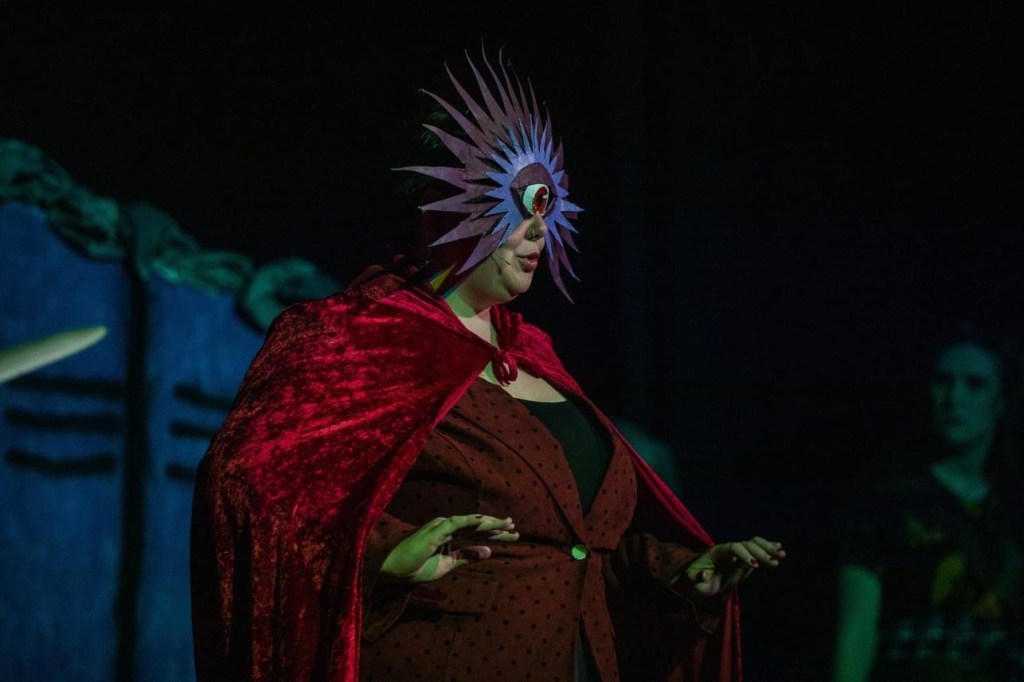
(These are the best two photos I have of my monsters– Vera the Beholder and the cyclops. Photos by KGTunney Photography. I have a few other photos, but they’re just low-quality rehearsal snaps. You can see the football jersey I got from the escape room on the cyclops.)

22 monsters down, I decided I wanted to add one more. This allowed me to add DM Biggs to the fight montage, and I thought it would be more fun if everyone got a turn to fight… so at our final few set build days, we speed-built a silly mimic costume out of a cardboard box. It figures that the monster we spent the least time on was probably the biggest crowd favorite.

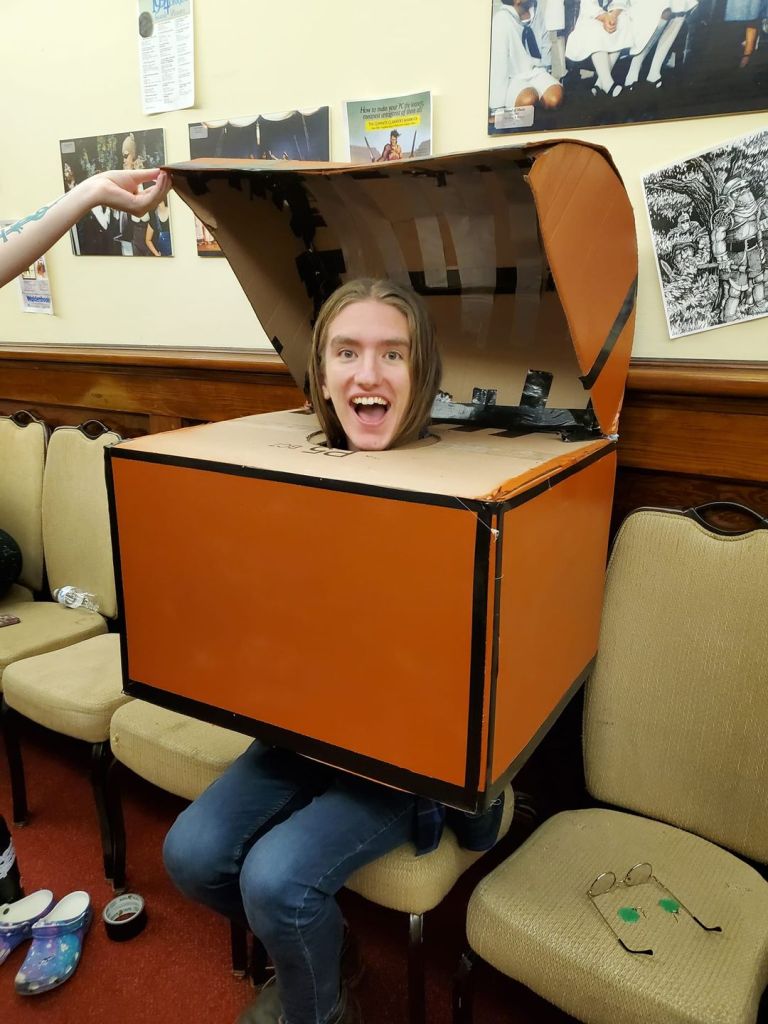
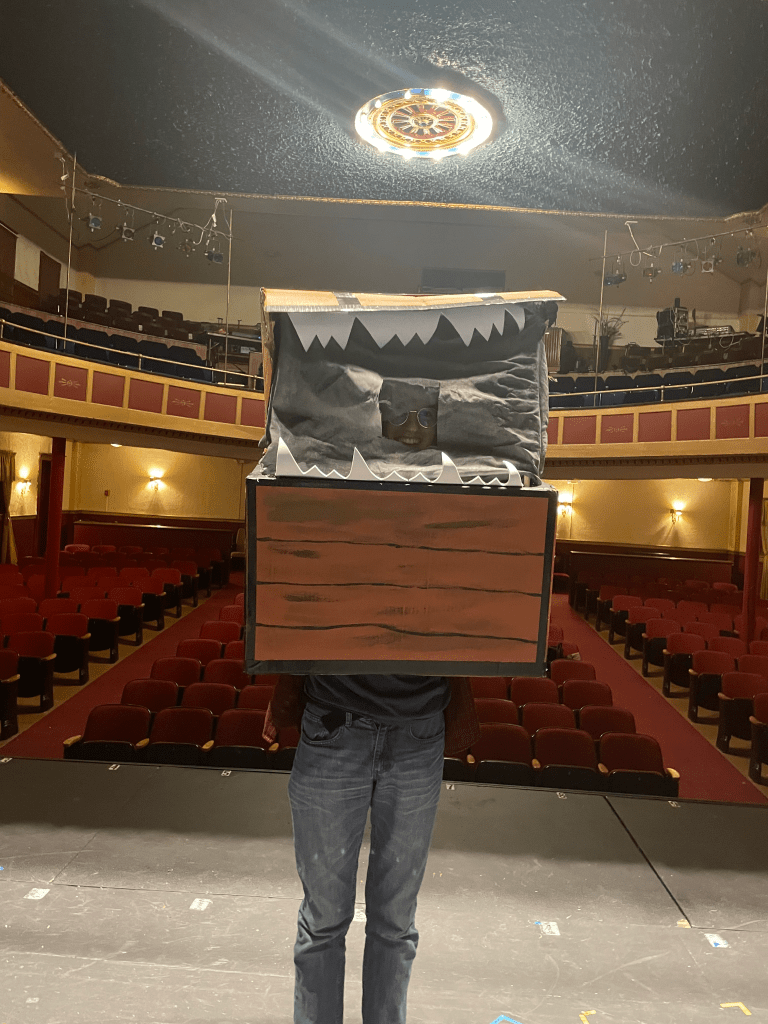
(A work-in-progress pic of the mimic, and a photo of it more or less completed. I had almost nothing to do with the construction of this one besides saying I wanted it and bringing a box. Thanks, volunteers!)

The mimic was such a hit that I do wish I’d been a bit more creative with the rest of the monsters. The masks were really cool, but a lot of work, and a cardboard box with legs delighted the audience just as much if not more!

Final Thoughts

I still can’t bring myself to regret all the time I spent frantically building monsters. It was a lot of fun! If I did it all again, I’d get more creative– and either start a lot earlier, or get a dedicated costumer instead of trying to do it while also directing. (Or start a lot earlier and with a dedicated costumer… both is good!)

If you’re looking for a resource for making cheap and impressive monsters, Wintercroft is such a great resource– I can’t recommend them enough. Besides the theatrical applications, they’re just fun art projects, and they also make great halloween costumes. If you want to use their masks in a production, just email their support to ask for permission, and be sure to give them the credit that is due!

Happy monster-making!– I’d love to see some monsters others have made in the comments.

Actor Life, Guides and Tips, Theatre

The Secret to Success in Performing Arts: Mastering 3 Vital Traits

I’ve been around a lot of performers in a lot of different settings. I’ve directed, I’ve taught, I’ve acted, I’ve watched from both the audience and the stage manager’s booth. Every performer is unique, and everyone has their own strengths and weaknesses. Yet, in all of the actors, dancers, and musicians I’ve worked with, I have found that there are exactly three traits every truly excellent performer has in common.

These traits are instrumental to success in the performing arts. You won’t get very far without them, and having them can put you on top in close auditions.

If you can honestly say you have these three traits, then pat yourself on the back! If you’re not so sure, read over this article closely and do what you can to pick them up immediately.

Continue reading

directing, Theatre

What I Learned as a First-Time Community Theatre Director

Directing for the first time is a learning curve nothing can really quite prepare you for.

In 2022, I got the opportunity to solo direct my first full-length play. My production of Qui Nguyen’s She Kills Monsters ended up being a big success and one of the better selling plays in our community theater’s season! I had a blast, and I also discovered a lot. 

Here is what I learned from my first directing credit!

Read more: What I Learned as a First-Time Community Theatre Director

Staring Early is Key

I began making plans for my production in earnest in 2020. While the world was shut down, I had little else to do, so I spent time workshopping designs and reading and re-reading the script. At this point, I had no idea when I would get to put on the show, but I was adamant that I would get the chance to somehow, somewhere. The play is one of my absolute favorites, and I had dreamed of directing it for a number of years by that point.

The benefit of starting so early was that I had a lot of extra material to bolster my directing proposal packet. When the theater asked for directing candidates for 2022, I was ready! The board was impressed by the work I’d done, which made my pitch all the more appealing. 

Starting early also meant that I had to do less work during the run of the show itself. Which was great, because…

Every tech and design element will take 2 to 3 times longer than you think 

Having a solid base of pre-production work to operate from proved very important. In fact, I should have done more. Without a costumer or a dedicated props person, I ended up spending days during the rehearsal process working on various props and monster costumes. It was creatively fulfilling, but super hard work. I had a specific vision for how I wanted these done, and I had a method that worked for me, so I was determined to finish them myself. It took forever.

Speaking of which…

You absolutely must learn the skill of delegation

This is a skill, because it is absolutely something you have to learn how to do. 

At our first set build, I was an absolute mess, a chicken with my head cut off. I was trying to give directions to everyone, about everything, all at once. I would give someone a job, and by the time I finished explaining instructions to the next person, the previous would be done with their task and coming to me for a new one. I ended up becoming a bottleneck in the whole process— we had so many volunteers, and because I didn’t plan properly for delegation, I couldn’t use them all effectively!

Part of this issue was simply the way this particular theater works, in which the director usually wears a lot of hats and does a lot of things themself. Don’t get me wrong, I’m a control freak, so I kind of love working this way. Designing practically every element of the production was super exciting! But the work also could’ve turned out much better if I had let more skilled people take the reins on certain things. Letting others take the reins requires some more pre-thought and communication (which is also a learnable skill). It’s worth it. 

It’s important to know a little about everything in theatre

I went into this production knowing basically nothing about lights or sound, and boy do I wish I had known more. It was difficult to communicate with my light and sound techs because I didn’t have the vocabulary to express my desires.

Before directing, it is very helpful to volunteer for and learn about as many different tech positions as possible. Many community theaters are always looking for sound and light board operators. Stage managing (or assistant stage managing) is also a valuable experience, as you’ll be at all rehearsals and can observe up close how a director works. It also gives you a good idea of some of the more practical elements of a production that many actors don’t think about— good, hands-on experience with planning, paperwork, and problem-solving.

You can probably get more done in one rehearsal than you think

Maybe this is just a me thing, but I thoroughly under-filled our rehearsals. I just really thought we wouldn’t be able to get as much done as we did. For the first month of rehearsals, we’d inevitably end up finishing everything I wanted to do within the first hour and a half to two hours of rehearsal, and then we’d end up drilling or dipping into stuff we had planned for other rehearsals until the end.

This wasn’t really a bad thing— I actually think scheduling your rehearsals just a little light so your cast has time to mess around, have some fun, and get to know each other can be really good for morale and the group dynamic overall. Not planning rehearsals to be more efficient started to bite us towards the end of the process, though, when everything always gets a little crunchy and nerve-wracking.

Don’t be afraid to plan your rehearsals rather heavy on activities. Just know that the more work you plan, the more rigid you have to be about staying focused.

Attendance and the schedule will probably be a little bit of a mess, no matter what

I was really adamant about planning out the entire rehearsal schedule in advance. I did… and then we had a slew of conflicts come in anyway due to illness, changes to another local production’s rehearsal schedule, childcare surprises, etc.

Turns out, you just can’t really organize a group of peoples’ schedules perfectly. This is why it’s super useful to have a number of “TBD” days in your rehearsal schedule, so you can catch up on things people miss. (I list these as full-cast rehearsals on the schedule and whittle them down to whoever is actually needed. Or, if we’re all caught up, they can be cancelled altogether. I only had a few of these sprinkled throughout the process, but I wish I’d had some more. You can cancel an extra rehearsal, but you can’t ask everyone to clear their schedules at the last minute to add an extra rehearsal.)

If attendance is truly a big issue for your production, you can of course fire actors who are especially unreliable. I never felt like the issue was that serious for our show.

Also, no matter how direct the schedule is, or how clear the daily call is, or how many times you said it at yesterday’s rehearsal, you will have people asking you what you’re doing that day. Always. You’ll have to embrace it. 

Giving direction is one of the hardest parts of directing

It’s not enough to know what you want (although this is a step I think a lot more directors should spend more time on). You also need to know how to steer your actors there.

This is a skill that thousands of pages of directing theory have been written on. There’s actually achieving the performance you’re trying to get from an actor, and there’s also doing it in a way that doesn’t demoralize them. Maybe I’m just too polite, but discovering how not to feel guilty giving actors repeated notes was a harsh learning curve for me. I’m still working on this today.

This is something that only gets better with practice and wisdom. Reading books on directing is super helpful, and working with lots of different directors to examine their manner is awesome. But in the end, learning to do it yourself is just really hard. Try to get experience any way you can. 

You also have to let the actors be

Some of the best and most creative decisions that will be made during the production process will come from the actors themselves. No amount of pre-planning can really prepare you for the individual chemistries and personalities of the actors in the room, so don’t be afraid to let your plans change, and let the actors do the jobs you selected them to do.

You are the director, and you ultimately have creative control. You do have to learn the art of reining in choices you don’t like, and helping actors find choices that adhere more closely to your vision. But it’s also important to learn how to let the actors take charge themselves.

Suddenly, you’ll find you have nothing to do

There is a point at the end of the rehearsal process where, after weeks of absolute panic and endless toil, you will suddenly find your to-do lists empty. Everything will be humming along without you. You will miraculously find yourself empty-handed, wandering around the theatre as your actors prepare to perform independently of you. 

Some directors will work backstage during their shows, or run lights or sound for their productions. As a first-time director, I wanted to be free to just watch my show. It was very odd when things all at once changed from being intensely dependent on me to not dependent at me at all.

At a point, the show is no longer quite yours. It belongs to the actors. You have to pass it over gracefully. 

You can never quite be 100% ready

You’ll always be kicking yourself a bit during the production process, wondering why you didn’t taking the time to learn more about X or Y or Z beforehand. That’s okay. Embrace the information you have now, and welcome the learning process.

And as the production deadline comes rushing at you, you’ll inevitably be wondering how you’re going to get everything done in time. You’re just not ready yet. You could, hypothetically, continue refining and reworking a show forever. But that isn’t how most real-world theaters work, so you’ll have to let it go, whether you feel quite ready for it or not.

Directing for the first time is the hardest thing you’ll ever do, and also one of the coolest

It is a boatload of work. No one else will completely understand how much work it is. You are doomed to be the person who cares the most about the final product, and yet, in a roundabout way, have very little bearing on exactly how that product turns out. You will forever be learning and being horrified by what you didn’t know you didn’t know. You will put literal blood, sweat, and tears into the process.

And when it’s done, you’ll be dreaming about when you can do it again. 

Guides and Tips

How to be Useful at your Required Set Strike when you have no Technical Abilities

Post-production set strikes are easiest when many people lend their hands to the cause. Unfortunately, many actors dread strike. The reality is that many actors simply don’t know how to help. While technical skills are of benefit to every performer, and I heartily recommend every actor get the gist of as many backstage skills as possible, many times the root of the anxiety is simply “what can I even do besides stand around the whole time?”

Here is a set of suggestions for everyone, no matter their strength or skills, regarding making themselves useful at strike. The list starts with the least technically-inclined options, with the “hardest” options at the end.

Read more: How to be Useful at your Required Set Strike when you have no Technical Abilities
  • Don’t be afraid to ask where you can help. The director, stage manager, and technical director should all be able to help you find something to do, and many of your cast and crew will also happily accept help if you offer it. Of course, use your best judgement—asking for direction repeatedly while others are busy with their own work gets annoying and makes it seem like you lack initiative.
  • See if any painting needs done. Some pieces may need primed and repainted if such is practice in the theater. This is almost always one of the last steps of strike, but it’s one anyone can do!
  • Get on cleaning duty. Strike requires much more than tearing down sets and lights. The lobby, house, bathrooms, greenroom, and dressing rooms may all be part of strike. Find out what needs cleaned— anyone can take care of organizing, vacuuming, or wiping down surfaces. However, remember that strike is messy business! Don’t bother cleaning anything that is likely to be trashed again by the end of the process until all of the work is done.
  • Take out the trash. As the set gets ripped apart, a surplus trash will quickly accumulate. Gathering this and throwing it away keeps the space clear for other, more important work. Remember, though, that because something has been used doesn’t necessary mean it is garbage. Again, use your best judgement— Large sheets of plywood or bits of lumber at a reasonable length can be reused, as can most hardware like screws, casters, or handles. Anything broken, badly damaged, or under a reasonably useful size should be trashed, while re-usable materials can be cleared away and re-organized. If you’re unclear on what is trash and what is useful, check in with someone first.
  • Assist with costumes, props, or furniture. Returning these pieces to their homes in theater storage is often relatively light work. On the other hand, if you have the muscle, lifting furniture into trucks or up and down stairs can be very helpful at this step— the “heavy” muscle is often assisting with the technical work at this time.
  • Remove hardware from set pieces and lumber. Before any lumber or stock structures get taken to storage, any extruding nails or staples should be removed. If they can’t be removed, you can sometimes use a hammer to pound them flat. The goal is to be certain that no one will be impaled the next time they lift that object. Using pliers or a hammer to remove these pointy bits of hardware is a very helpful activity that can be quite time consuming (in other words, if you have no idea what to do all day, this is a GREAT job to sign yourself up for).
  • Return reusable lumber and hardware to storage. Make sure you are clear on what should be trashed and what should be kept. If there are no organizational rules about where these things should go, strike may be a good time to do some organizing! Sorting like objects into their own bins or shelves is incredibly useful for future productions.
  • Be ready to help lift, lower, and store structures. There’s generally a wealth of group lifting to be done. “Stock” structures like legs and flats can be taken to storage. Often, large structures like platforms need to be lowered onto one side or moved in order to be taken apart. Even if you lack muscle, lifting as a group effort is easiest, and more hands are always beneficial. If you see people struggling to lift something, don’t take the time to worry about if you’re strong enough to help— just jump in!
  • Don’t be afraid of the power tools. Even if you’ve never used certain tools before, there will likely be someone willing to show you what to do with them.

Now that you have some suggestions for how to make yourself useful, here are some friendly reminders of what isn’t useful:

  • Don’t get in harm’s way. If you feel unsafe with something, leave it to those better equipped to handle it. Everyone would rather you pass off the job to someone else than be injured. Further, if you’re waiting for a job or for instruction, make sure you’re not, say, in the path of a light rail coming in, or underfoot when people are lifting heavy objects. Stay aware of your surroundings.
  • Don’t play supervisor. Regardless of how poorly you feel others may be doing their jobs, nothing is worse than watching someone simply stand back and tell others what to do. If you feel you must give direction to someone, do it, and then return to your own work. However, make sure you ask yourself, Am I a reliable authority on this issue? If the answer is no, keep your advice to yourself.
  • Don’t hide. This is a popular pastime for those who don’t know what to do with themselves at strike. Yes, we have noticed you’ve been mysteriously missing for the last three hours. No, it’s not a good look.
  • Don’t leave. Even if you have to leave early for any reason, try to be helpful in some way before you go. It’s better for everyone (yourself included) if you do a little rather than nothing.

Ultimately, what is important is that you find something to do. Almost anything you can find to do is helpful, so pitch in wherever you can. If you really can’t find some way to help, just ask!

Directors, if you’re looking for tips to make your set strikes more organized, check out my post here!

Teaching Theatre, Theatre

Many Classrooms are Becoming More Student-Centered: Why Does School Theatre Lag Behind?

Most school drama departments are not democracies. Instead, they tend to resemble dictatorships.

This used to be the way every school organization functioned: the students unwaveringly followed the command of the teacher, the all-knowing, all-powerful leader of the classroom. Nowadays, classrooms are moving away from functioning this way, as this is not the practice most modern education theory supports. The role of the teacher becomes less hierarchically superior, with many educators considering themselves “guides” or “facilitators” rather than singular leaders. In their place, students step up to direct their own learning, and learn about leadership and self-actualization by fulfilling a more active role than “the one who receives the knowledge the teacher imparts.” The process is better for educating critical thinkers and problem-solvers. 

School theatre is lagging behind in this endeavor.

Continue reading

technical theatre, Theatre

Tips and Ideas for Organizing a Better Set Strike

If you are not a technically inclined director (or even if you are), figuring out how to organize an efficient post-production strike can be a nightmare. Ideally, strike gets done quickly and with minimal strife. Everyone is so tired by the time strike rolls around that the thought of a long, drawn-out teardown is demoralizing. As always in live theatre, we can’t avoid every disaster, but some pre-planning is very helpful to keep the process as painless as possible.

Here are a number of tips and ideas to help keep things moving smoothly.

Read more: Tips and Ideas for Organizing a Better Set Strike

Make a General List of What Needs Done

A list is a pretty common sense starting point. Double check if there’s a post-production checklist that your theater organization requires all productions to complete before the end of strike— this is a good starting point. If there isn’t one, make your own! Here are some common line items included in such a policy:

  • All on-stage set pieces must be deconstructed. All materials and tools must be put away in their proper places.
  • Backstage areas and wings should be checked for trash, props, or costume pieces, and should be cleared of anything unnecessary. 
  • Storage areas (for tools, lumber, props, costumes, etc) should be organized properly according to existing rules, and tidied up. 
  • Light and sound booths should be restored to the condition they were found in (or better).
  • The greenroom and dressing rooms should be clean: Leave behind no trash. All props and costumes should be removed and returned to their proper places in storage. Any personal items left behind should be taken to the lost and found. Surfaces should be disinfected, floors should be vacuumed, etc.
  • If they are in your purview, the house and lobby should also be cleaned: trash picked up and taken out, floors vacuumed, any decorations specific to the show should be removed. 

These are broad strokes. You’ll notice that this list sorts neatly into different areas of the theatre— breaking down the overall list of task into lists for general areas can be helpful to keep on top of things. You can use these separate area lists to organize groups for strike.

Plan Out Some Groups

You have the option of leaving actors the option of joining groups as they desire, or just assigning actors to groups. The latter option is a bit less fun, but I find that it’s really helpful, especially with casts of young actors. Assigning everyone to a spot ensures every group has enough people to get done what needs to get done.

At many strikes I attend, we end up with four to five groups. One works on stage, deconstructing and cleaning. Another collects lumber and hardware discarded by the stage team and runs it to storage to put it away (or pass off to a separate storage-area team). One group is typically responsible for returning props and costumes to their proper places in storage, and another is responsible for general cleaning, especially of the green room. You may need more or less groups based on the scale of your space.

It could be helpful to distribute some sort of survey (like a google form) to your cast and crew ahead of strike to gauge everyone’s comfort with different activities. You can then use this to form your groups. This could also be useful to hand out at the beginning of the rehearsal process, for set build purposes. Some possible questions:

  • Please indicate your comfort level with using power tools, 1-5
  • Are you physically able/willing to lift heavy objects
  • Are there any particular tasks you feel especially suited for? 
  • If you cannot stay for all of strike, please note the time you have to leave.

Appoint a leader for each team, too. This should be someone responsible and reliable, who won’t flake out before the end of the event, and who will make sure all tasks are completed appropriately by their team. The team leader will be in charge of making sure everything their group is assigned gets done, and will also field questions on your behalf. 

Then, Get Nitty-Gritty

Once you have a broad list of tasks for each area, and a general idea of how much man power you’ll have for each team, add much more specific items to the lists for each area based on the needs of your theatre organization or individual production. Don’t be afraid to shoot for the moon! You’ll find that you’re more likely to have people run out of things to do than have too much to do, especially if they’re only cleaning or organizing. When people run out of things to do, they’ll have to come find you to ask what to do next, which can become overwhelming quickly if you didn’t plan enough work in the first place. Nothing is worse than having a wealth of volunteers on hand and not knowing what to do with them! The waste! Try to give each team a workload that will take a similar amount of time to complete.

Make Sure the Plan is Clear

Sometime before strike (preferably before the final show), post your lists and your group assignments somewhere everyone can see them (the call board, the production group chat, etc). Make sure the lists are laid out clearly, in foolproof terms, so you don’t have to spend a ton of time fielding questions. Try to be as pedantic and specific as possible. An anecdote: A production staff I was on once told a group of middle schoolers to take some trash to the dumpster, but didn’t specify to be careful about how to fill it… the staff ended up spending the next two hours or so pulling things out of the dumpster and more carefully replacing them so everything would fit inside.

It will be helpful to meet with the team leaders for each strike team and make sure they are clear on what tasks each group is responsible for. This way, you can be sure the leader will be able to lead effectively! 

Making sure everyone knows what’s going on saves you work in the long run. It also helps decrease some of the anxiety around strike— many actors just don’t know what to do at strike and are therefore intimidated by it. This leads to the hands-off attitude we often expect from actors. If their jobs are clear, and given according to their ability, they have little excuse to not participate.

Keep Track of Your Progress

During strike, have the team leaders cross things off their groups’ lists as they are completed. This will help to make sure nothing slips through the cracks. As groups finish their task lists, the team leaders can either add additional tasks as appropriate, have their group pivot to join another group. It might be helpful to pre-plan where each group should pivot once their list is done, especially if the pivoting group has a particularly light workload.

Very important: do a final walkthrough before everyone leaves! Nothing is worse than dismissing everyone and THEN realizing someone forgot to do something important! Have someone reliable— perhaps the stage manager— periodically check around to ensure tasks are getting done properly. If anything isn’t meeting expectations, intervene early. 

Other

Here are a couple of broad miscellaneous tips that might be helpful:

  • It is helpful to take photographs as proof of the state of each area at the end of strike. If you’re in any kind of shared space, it’s good to cover all your bases and show that you’ve done strike to an appropriate standard. You may also want to keep a copy of your lists. You just never know how these might come in handy!
  • If you are unsure of exactly what the theatre organization itself expects from your strike, be sure to check in with someone in authority. You don’t want to accidentally skip something important, and you don’t want to step on toes doing something you aren’t meant to do.
  • Playing music during strike is fun! Ideally something energetic and upbeat. 
  • As always, when you’re using power tools and working with potentially dangerous, sharp, or heavy materials, it’s good to have a first-aid kit ready on hand.
  • Most strikes are scheduled to run until they are over, and all the necessary tasks are done. If you have to schedule an end time (because of a rented space, etc), planning ahead is EXTRA important. Prioritize carefully.
  • Generally speaking, keeping the backstage and greenroom areas in decent shape during the run of the show is a good practice to make the strike itself easier. This is easier said than done. Enforcing simple rules like “all costumes must be hung up before the cast leaves after a show” can help achieve this.

Final Thoughts

Strike generally isn’t anyone’s favorite part of the production process, but it’s sadly unavoidable. Making it as quick and easy as possible makes it a lot less painful. As always, we can’t plan for everything. Some plans will inevitably fall apart. It’s good to spend some time ahead of strike thinking about how you want the day to go and building some strategies to get there.

You got this!

If you are an actor looking for tips on making the most of strike, or a production staff member looking for helpful resources for your actors, check out my article for non-technically inclined actors here. 

Actor Life, directing, Theatre

We All Have to Get Real About the “Will You Accept Another Role?” Question on Audition Forms

If both actors and directors use it dishonestly, it might as well not be there— but it’s a useful tool when handled with integrity.

Let’s set the mental stage: you’re auditioning for your favorite musical. Jittery with adrenaline and excitement, you politely greet the audition monitor and receive an audition form. 

The standard questions are present. After filling in your personal information, the form asks if you are auditioning for any particular role. Of course, the role you really want is the lead, which is your absolute dream role. You write it down. But the line below that one presents a problem.

“ARE YOU WILLING TO ACCEPT ANOTHER ROLE? CIRCLE: YES/NO.”

The mind games begin.

Read more: We All Have to Get Real About the “Will You Accept Another Role?” Question on Audition Forms

You pause. This is your favorite musical. You’d love to just be a part of it. But you also know that the production dates fall on the same weekend your childhood friend is getting married. You really, really want to support her… and you also really want to play your dream role. If you land that role, it would be worth missing the wedding for. On the other hand, if you don’t manage to get the part, you would be willing to wait until the next time a local company produces the show to be in it.

You consider your answer. You know it isn’t the answer many directors want. Would it call your dedication into question? But then why would they bother asking?, you wonder, and you circle “NO.”

Who can say exactly how this anecdote ends? Maybe the production staff asked the question in earnest, and will decide to cast you in your dream role after all. Unfortunately, it’s also as likely that this question hasn’t been asked in earnest— haven’t we all heard horror stories of directors who ask this question as a sort of trap, and toss out on principle any form with that answer? How many actors feel this fear and circle “yes,” only to have their dishonesty come back to bite them once cast?

I’ve yet to meet someone who disagrees that honestly is the best policy. However, in this case, honesty can be a trap unless both parties— the actor filling out the form and the director receiving it— are willing to be honest. 

A Useful Audition Staple

This question, “Are you willing to accept another role?”, is common on audition forms in community and school theater circles. It’s always preceded by the question of which roles the actor is interested in. Some directors forgo asking both questions, arguing that an actor should audition for a show itself and not a specific role. And anyway, the director always has final say on casting, and the director’s vision may not align with the actor’s. Why give them the input at all? Some actors just don’t have a good concept of where they fit best in a production. Perhaps they don’t quite understand their type, or the types of the other actors auditioning with them. Regardless, the director’s say is king.

As a director and as an actor, I think asking both of these questions— “Are there any specific roles you want?” and “Are you willing to accept another role?”— is valuable. Despite the claim that these questions contribute to actors’ egoism (and I can understand the feeling behind this thought), it’s important to remember that directors cannot know the reasoning behind an actor’s answers to these questions. These questions are helpful for receiving more information about actors auditioning for a production. While it would be inappropriate to ask actors to justify why they noted that they wouldn’t accept another role, it is already helpful to know that they wouldn’t! Certainly, asking the question is better than not asking it and ending up with a number of actors quitting the show because they, for one reason or another, aren’t willing to play the role in which they were cast.

A lesser-thought-of benefit to asking this question is gauging an actor’s comfort with certain roles. Perhaps an actor is auditioning for an innocent character in an otherwise sexually charged show— it’s possible that actor is comfortable with playing only that character for personal reasons. Getting this information is crucial.

I would advocate that production staffs take this a step further and ask on their audition forms if there are any roles for which actors are not interested in being considered. A good blanket example of this question’s usefulness would be the show Heathers. Perhaps an actor would feel uncomfortable playing a role where her weight is commented on or made fun of— a very understandable case, in which she should be allowed to opt out of being seen for Martha or Heather Duke. Perhaps an actor would feel very uncomfortable with the thought of handling and firing prop firearms, and would want to opt out of being seen for Veronica or JD.

The bottom line is that directors can’t read an actor’s mind. Therefore, any information the audition form can provide the director about the actor and their wishes is of benefit. Asking whether an actor is willing to accept another role is advantageous. Rather than resisting this question for fear of egoism, directors stand to benefit from asking this question and more. The caveat, then, is that this question must be used with integrity.

Penalized for Honesty

As I’ve mentioned, a number of directors dislike this question on audition forms and refuse to use it. They believe it indicates an egotistical streak in the actor and excuses diva-like behavior. I think this is an incorrect and unfair assumption to leap to, but if the director truly feels this way, then certainly, they should leave this question off their audition form. 

The real problem arises when this question is put on an audition form and used as a sort of underhanded test. We’ve all heard horror stories of directors who include this question on their audition forms and then toss out any form with a “no” response on principle. I have personally heard production staff members argue in favor of doing this! This practice is misleading and manipulative. The production staff holds a position of authority over actors. In an audition room, the production staff holds all the power. It is utterly dishonest to abuse this authority and penalize an actor for truthfully expressing their feelings in response to a question you asked!

Because this question is sometimes asked deceptively, actors are forced to consider answering dishonestly. If the only way to be cast is to lie and say you’re willing to accept a role you’re not, then every actor will mark this on their form, or else they would simply not audition in the first place!

Consider the implications of an environment where an actor’s only opportunities arise if they are willing to say yes to everything, no questions asked, even if they aren’t really comfortable. This creates an unsafe and coercive culture. 

If you are directing at an institution where you do not get to dictate what is on the audition form, and are therefore powerless to remove this question, you absolutely must use it honestly and not penalize actors for telling you the truth. If you don’t want actors to say no, then you shouldn’t ask at all.

Honesty is the Policy

The dishonesty with how this question is treated creates an environment where actors and directors must both play a sort of game of chicken to deduce who is being truthful. Actors, fearing directors have included the question as a test of loyalty, are inclined to dishonestly answer yes. Directors, unsure of whether actors have answered truthfully or not, find the question is utterly useless on every form that says yes, because separating the actors who were being honest from those who answered out of fear is impossible. 

Indeed, plenty of actors lie when it comes to this question, even when the director is asking it sincerely. It’s generally understood that after casting notices are sent out, at least a few actors will quit a production. But actors are faced with a hard choice if they know they have a 50/50 shot of shooting themselves in the foot by telling the truth!

Directors are responsible for ending this standoff. As the ones with all the power in an audition, they must treat this question as the useful opportunity for gathering information that it is, and not as a personal affront. When and only when directors are known to ask this question with integrity will actors be able to answer truthfully.

Of course, some actors will continue to be dishonest, even if the question is posed in earnest. I think it’s important for directors to acknowledge this and let it go. Remember, a director cannot read an actor’s mind. There will never be any way of knowing for sure which actors quit a show because they didn’t like their role. School and community theatre is a huge time commitment, and deciding not to participate in a production is often a multifaceted decision. Assuming positive intent creates a healthier environment for us all.

Directors: Ask the valuable question in good faith. Treat the answers as honest. If anyone in the situation is going to lie, it definitely shouldn’t be you. 

Actors: Treat the question in good faith. If it wasn’t, you’ll have avoided working with a director who uses their power in unscrupulous ways. If it was, you lose nothing. You’ll be better off either way.