(Featured image by Pittsburgh Performance Photography. The Curious Incident of the Dog in the Night-Time, directed by Jessica Zack, 2024. Lighting design by Craig Soich.)
A few months back, I was asked to build a prop dog for my friend’s production. This prop can be a bit of a challenge– as I was searching forums and Facebook groups for inspiration, I found a number of people looking for advice on how to approach it– so I thought others might find an explanation of my process useful.

(A photo of the finished prop, in the performance space.)
I had not read the play prior to being asked to construct this prop. The director gave me creative freedom to approach it as I saw fit. I started by looking for some inspiration photos online. One of our friends informed us that the original source material, the novel, says that the dog is a poodle– I wasn’t very keen on trying to create poodle fur (or spend the money to purchase it), so I decided to go another direction. I thought a border collie color scheme, with distinct black-and-white patches, might be striking and more easily readable on stage. This ended up being a convenient choice, as it made purchasing fur from Joann Fabrics much cheaper in the long run (more on that in a bit).
As is my favorite way to start constructing many props, I began with trash! The “core” structure of the dog was several bunches of plastic grocery bags filled with other grocery plastic bags. I arranged these into a roughly dog-shaped form, and then taped them together with masking tape, and then painter’s tape when my tape roll ran out. On a whim, I threw bits of tree branches from my yard into the legs to serve as some more solid supports– In hindsight, I’m not sure this really served any good purpose, but it seemed like a good idea at the time and certainly didn’t hurt anything. I just stabbed four sticks into the underside of the bag-dog, wrapped additional bags around them, and taped everything together.
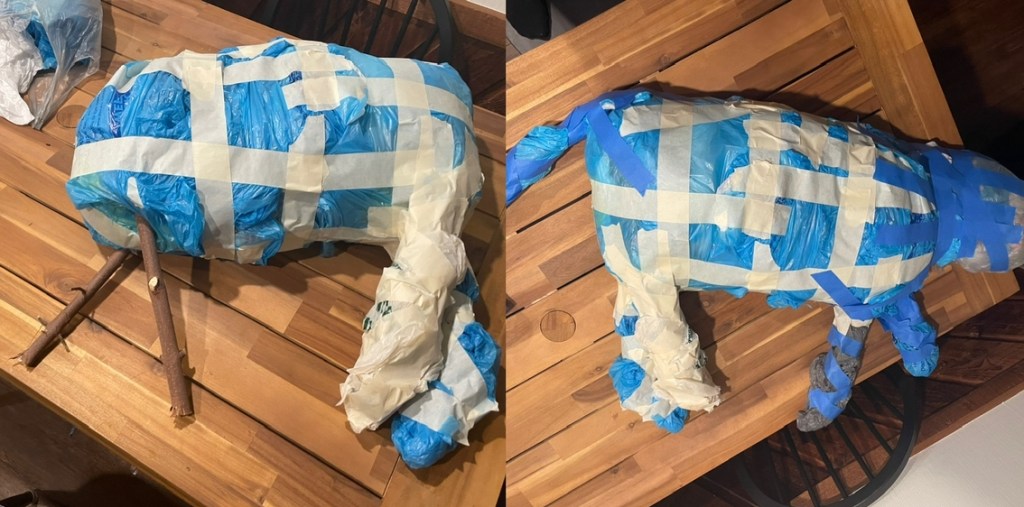
(Bag-dog in all its glory.)
The result was a dog form that was extremely lightweight, but also held its shape surprisingly well for nothing but plastic bags, tape, and a couple sticks. There was no exact science to taping it together, I just threw tape anywhere where it seems like it would help unify the bags. It’s helpful to stuff a ton of bags into one bag, do the same for another, and then sort of mash the open ends of these together to “marry” them into one, and tape them together this way– I think this helped create a more solid structure.
It is worth noting that the plastic bags, cheap and plentiful as they were for crafting, did make it so that the dog made a distinctive crinkling sound when moved. So, if this is a problem for you, you may want to find another material, or maybe experiment with using additional tape to help deaden the sound/eliminate extra movement that would create the sound.
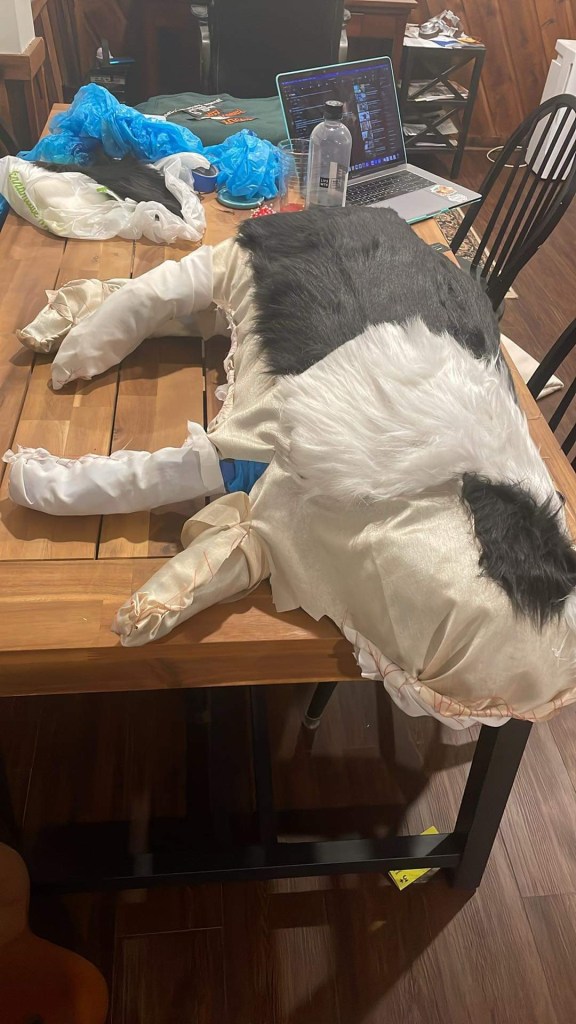
After this, traced the shape of the dog form on some old fabric, cut out the shape twice, and hand-sewed these together to make a fabric pocket to cover the plastic bags. I have really never sewn anything before, but this was meant to be an unseen interior piece anyway, so I didn’t stress about it and considered this good, low-stakes practice.

(I did eventually also cover the legs and tail with fabric, too– I guess I didn’t take a photo at that stage!)
Once the entire form was covered in fabric, I used that fabric as a surface to sew fur onto. For a brief time, I wondered if I could just sew the fur directly to the bags, but I don’t think that would’ve worked.
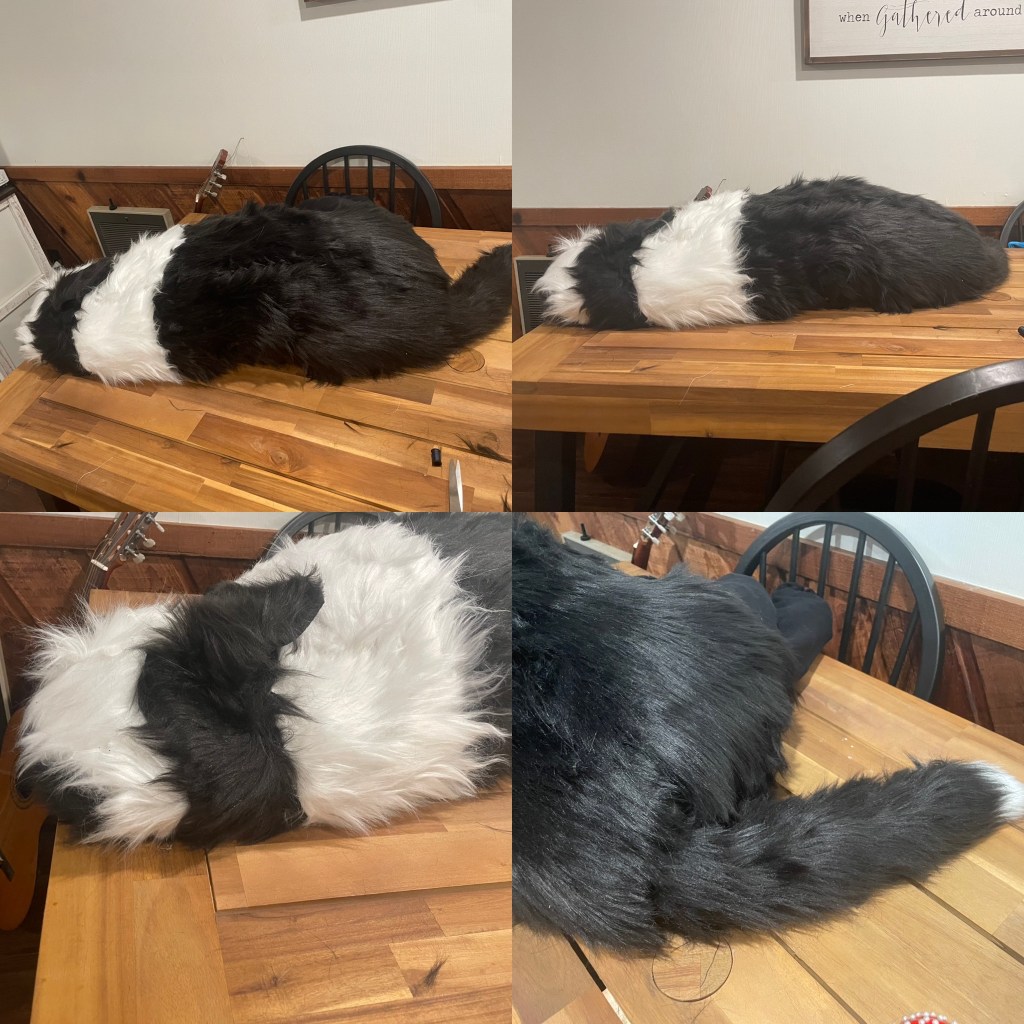
I purchased my fur in 9in x 12in sheets from Joann Fabrics. The POP! Brand fabric sheets were cost-effective compared to regular fake fur, and conveniently available in black and white. At time of purchase, these were only $4 each. I ended up buying 7 black sheets (which was the store’s full inventory of them, so I’m glad it was enough!) and 4 white sheets, and I had an extra white sheet left over when I was done. I ended up spending $35 on fur, whereas actual faux fur fabric would’ve run $30-50 per yard, AND I would’ve needed two different colors.
I used black and white thread to sew down the black and white fur pieces, respectively. In hindsight, it probably would’ve made some more sense to sew the inner fabric “pocket” together over the dog form after sewing on the fur? But I wasn’t confident in my ability to do that correctly, it seemed a bit more complicated. I had some trouble sewing at the angle I needed to because of the paper bags inside the form, though. In the end, I also added some hot glue under each of the fur panels just in case. This helped them feel a lot more solid. (I really don’t know how to sew, it was very humbling!)
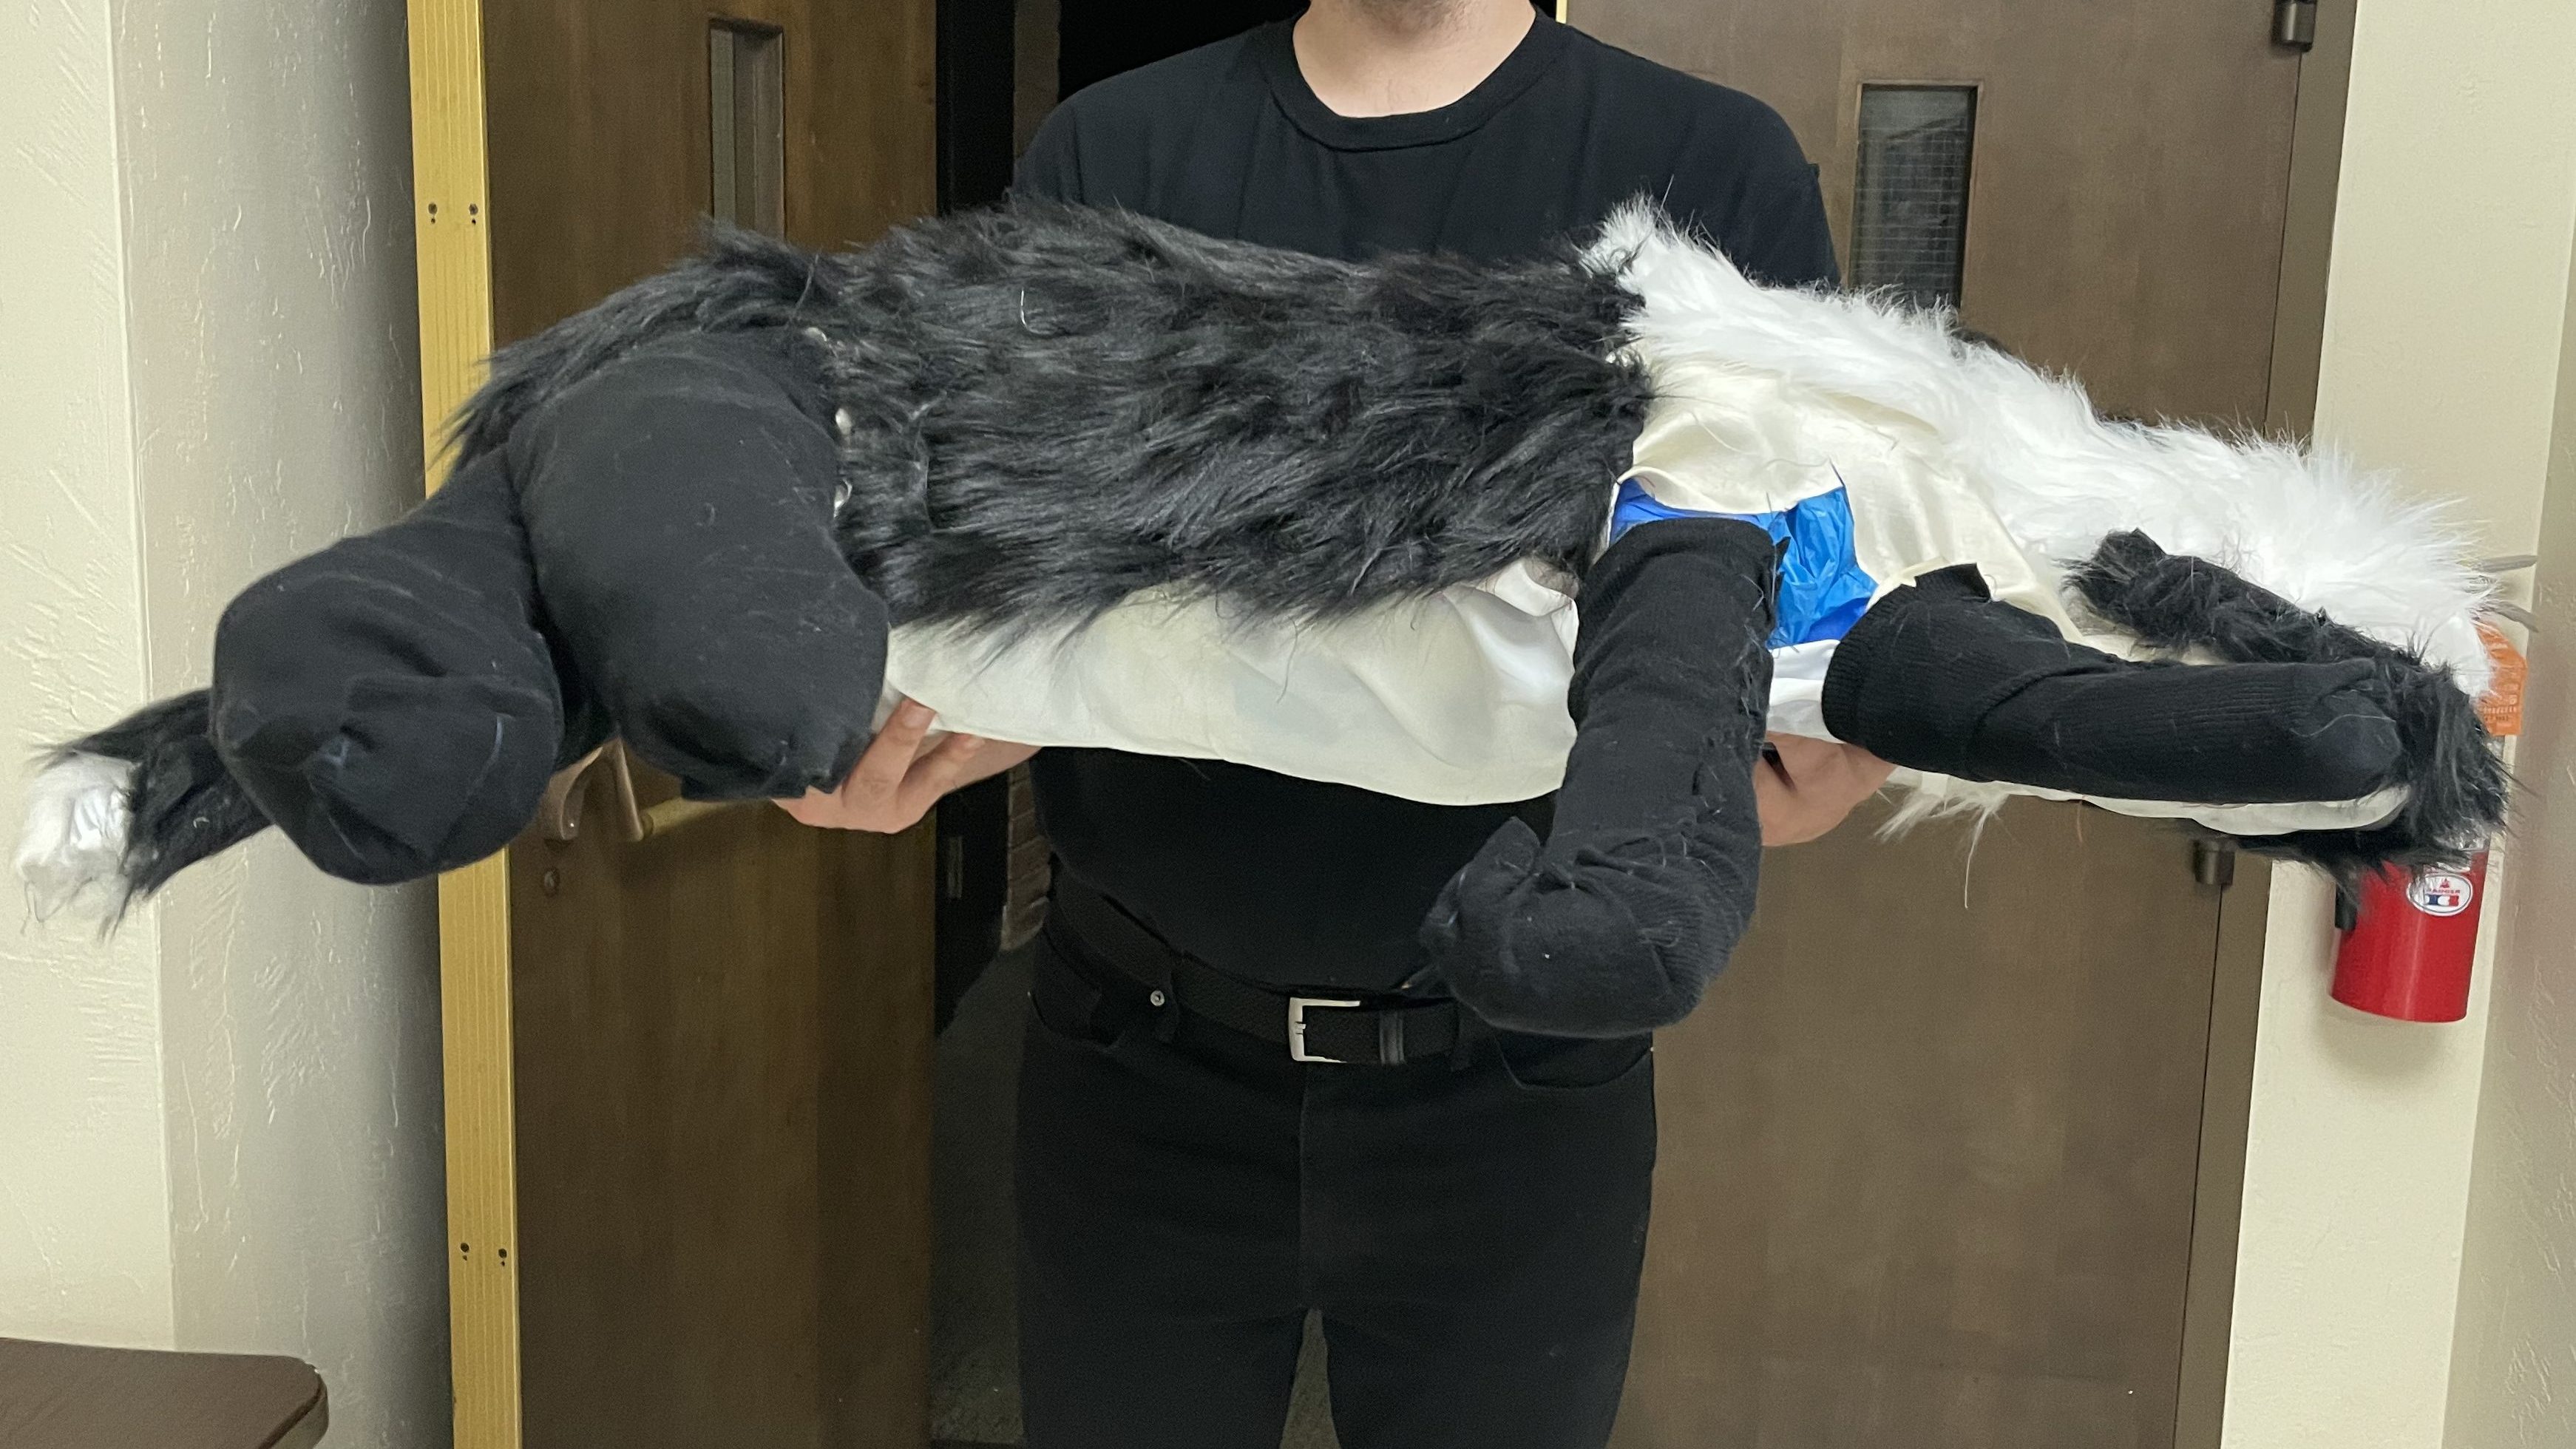
I cut the fur panels into the appropriate shapes, paying attention to the direction the fur on the pants was pointing, so that the fur looked continuous. I applied the patches carefully to the face to help sell the illusion that it was a dog– the shapes here ended up needing a bit more precision than I had expected.
(A photo during the fur process– I was getting pretty nervous around this point. The EPITOME of “trust the process.”)
I ended up running out of black fur, but I had enough to cover the side of the dog that would be visible– I decided I wanted the dog’s back to be to the audience, since that seemed easier to sell an illusion of. Trying to make very realistic looking legs and paws seemed more challenging. I still included the legs just in case someone was sitting at an angle where they would be visible– to camouflage the fact that I ran out of black fur, I just sewed some scrap black fabric over the spots I would have covered in fur. In the end, this saved me money on fur, anyway, and the difference from the audience was really not visible at all.
Shoutout to my mother, who noted upon seeing my work-in-progress that the dog really needed an ear– I added a flap of black fur to the head, sewed down the part where it attached to the head, and put a single stitch at the other end, taking care to position it so there was a small kink in the center. It really looked like a dog’s ear! I was pleased, and I think it made a big difference to the final product.
(The finished dog prop.)
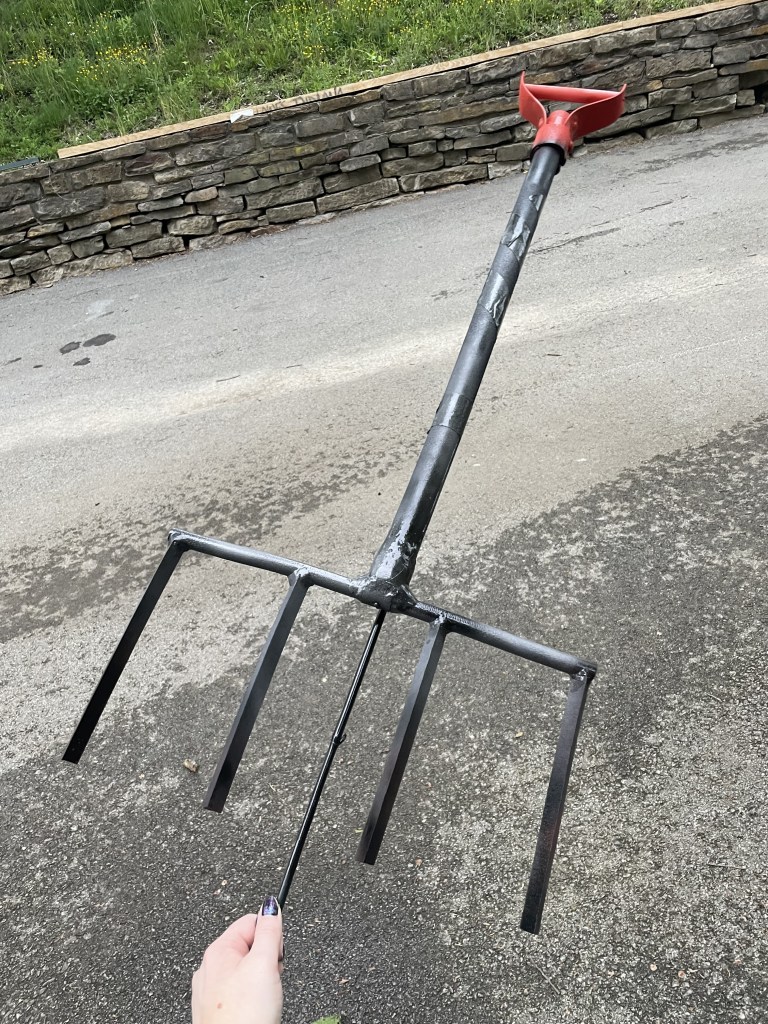
Once the dog was done, I had to set my attention to the second part of this prop– the cause of its death. Wellington the dog is stabbed with a garden fork, and that garden fork is meant to be sticking out of its body when the lights first come up.
I debated just buying an actual tool or borrowing one from a friend, but I feared this might be a safety hazard on account of the pointy ends, plus I wasn’t sure how much work it would require to make such a heavy object stand upright. And, frankly, I didn’t want to spend the money.
I did have some EVA foam materials lying around from a previous crafting project… that I ended up deciding not to use EVA foam for. So, I decided to try a second thing for the very first time with this project and build the garden fork out of EVA foam.
This process was rather quick and haphazard– I spent a bit longer than anticipated on the dog itself, so I finished up the garden fork in the hours before leaving for the theater to drop the prop off! I used some triangle-shaped EVA foam dowels attached to a square-shaped dowel to make the fork end of the tool. (I can’t find the exact dowels I purchased, but they were similar to these.) I cut the dowels to length and applied a bit of white glue to fit the pieces together. Once this was sufficiently dry, I covered the joints with foam clay. I applied the clay all around the joint, then dabbed my fingers in a tiny bit of water to shape it. Some of this shaping was on a very small scale, so I used the rounded head of a straight pin to get into areas I was struggling to reach. This ended up being a surprisingly useful sculpting tool!
I used a larger foam dowel for the shaft of the fork. I attached this piece to the “fork” part in the same way that I attached the fork tines. I used some flat cuttings of an EVA foam sheet for some detailing, and for the handle on the very top. Anywhere where I had an awkward edge I wanted to smooth over, I applied more foam clay.
(I’m not saying it was stellar work, but it definitely did the job I needed it to do!)
To get the fork to stick out of the dog, I used tape to attach a thin, straight stick to the back. Literally, just a stick from my yard! I had been looking for something more like a garden spike, but I didn’t have any of these on hand and figured a stick was just fine.
After waiting a bit for the foam clay to dry, (and admittedly, I should’ve waited longer– more like 24 hours instead of 2!) I spray painted the entire thing with a mix of black, silvery gray, and some red for the handle. The spray paint really brought the whole thing together. I spray painted the stick that would hold the fork upright black, so that it really wouldn’t be visible with the black set behind the prop.
(The fork after painting. I loved how the sort of uneven job with the foam clay made the joints look like they were welded together. I was afraid it would just look sloppy!)
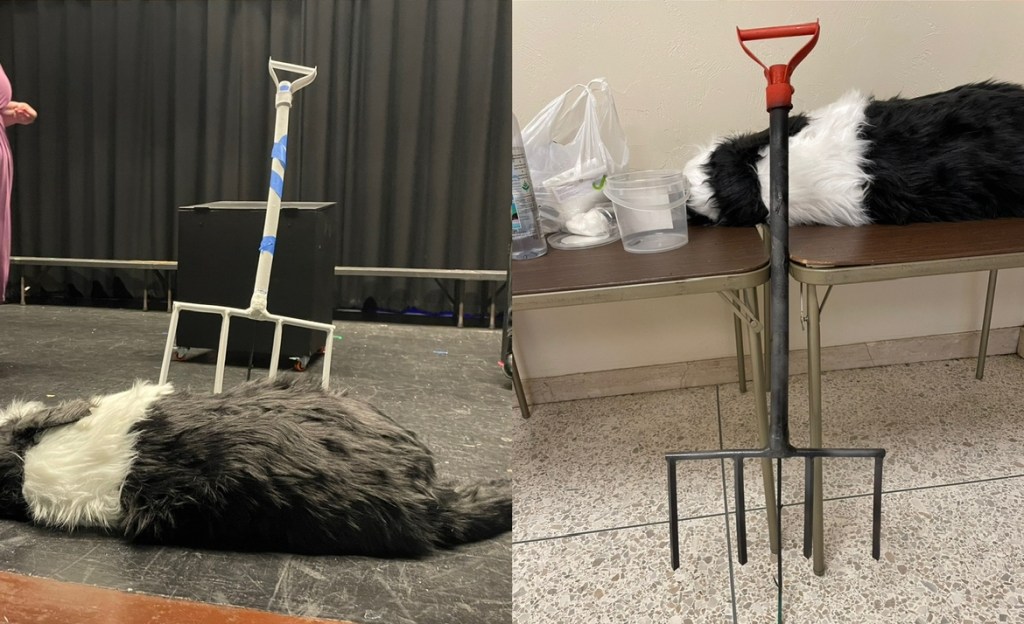
(A good before-and-after comparison. It went from a little silly looking to actually looking pretty lethal, in my opinion!)
I had left a gap on the dog’s stomach when I sewed the fur, so I just stuck the stick down into this gap. I still struggled to get the fork to stand upright, it kept flopping over a bit, so I went with the extremely elegant solution of just pumping a ton of hot glue into the gap in the fur until I could get it to stand upright. If it works, it works, I guess.
(A photo from the angle the audience WOULDN’T see– theatre is all about angles and illusions, after all!)
Not counting supplies I already had (scrap fabric; sewing thread, pins, and needles; lots of EVA foam materials, trash bags and sticks, spray paint, hot glue), I spent $35 total to make this prop. If you were to buy everything, this would probably cost a lot more, but many of these supplies are materials the average crafty person would have on hand, anyway. The EVA foam would arguably be the priciest part of this project– if you were buying all of that, I’d estimate adding another $40. You could probably avoid that cost if you used some other materials, I just used what I had on hand.
That covers my process! I hope this might be useful knowledge to some other crafters. If I can do it, you certainly can– I figured out how to work with most of these materials on the fly. Happy crafting!


One thought on “Prop-Making Fun: Building Wellington the Dog for “The Curious Incident of the Dog in the Night-Time””